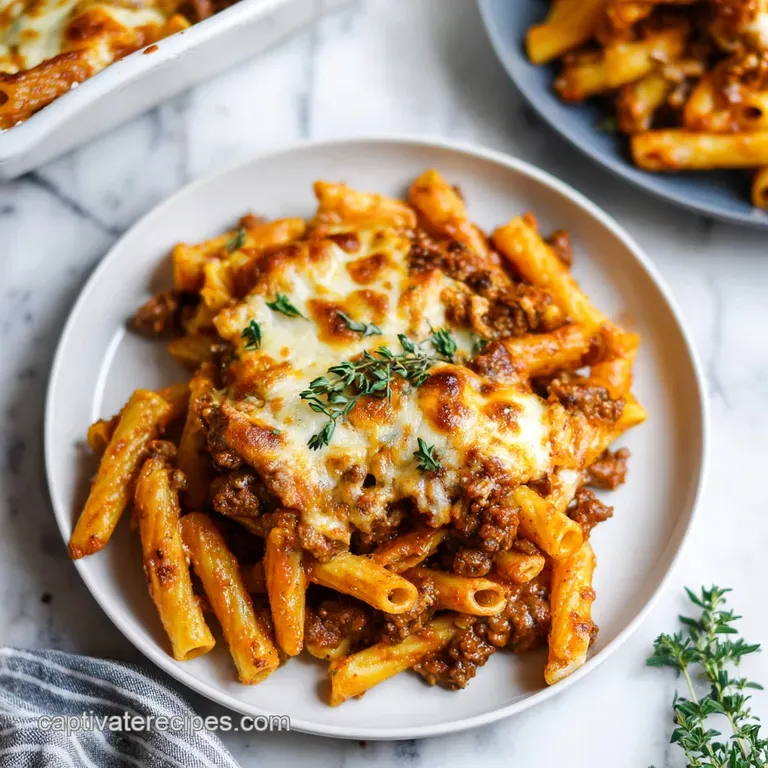
Baked Ziti: Creamy Sausage and Ricotta
- Time: Active 15 minutes, Passive 40 minutes, Total 55 minutes
- Flavor/Texture Hook: Savory, bubbly mozzarella with a velvety, herb infused ricotta center
- Perfect for: Sunday family gatherings, meal prep, or a comforting weeknight crowd pleaser
- Crafting the Ultimate Comforting Baked Ziti
- Why Traditional Methods Often Fail
- Essential Ingredients for Ziti Success
- Components and Smart Substitutions
- Minimal Tools for Reliable Cooking
- Mastering the Ziti Assembly Process
- Avoiding Sogginess and Other Pitfalls
- Guidelines for Scaling and Adjusting
- Debunking Common Kitchen Myths
- Storing and Reviving Your Ziti
- Finishing Touches for the Table
- CRITICAL: Very High in Sodium
- Recipe FAQs
- 📝 Recipe Card
Crafting the Ultimate Comforting Baked Ziti
The first time I really understood the magic of this dish, I was standing in my neighbor's kitchen while a storm rattled the windowpanes. The smell hit me before I even saw the stove.
It was that specific, heavy aroma of browning Italian sausage, where the fennel seeds start to toast and the garlic begins to turn golden and mellow. There is a specific sizzle that happens when the fat renders out of the meat and hits the bottom of a heavy Dutch oven, a sound that promises a deep, built in flavor that no jarred sauce can achieve on its own.
It felt less like cooking and more like an act of home building.
Baked ziti is often called the "lazy lasagna," but I think that does it a massive disservice. In the Italian American tradition, this is the soul of the Sunday table. It is the dish that feeds the cousins, the neighbors, and the unexpected guests.
It comes from the "zite" tradition in Naples, where long, hollow pasta tubes were broken by hand for wedding feasts. While we use the pre cut versions today, the spirit remains the same. It is meant to be shared, it is meant to be messy, and it is meant to leave you feeling completely content.
We are going to skip the common pitfalls that lead to a tray of mushy pasta or a watery mess. Instead, we are looking for that specific golden crust on top, where the mozzarella begins to shatter under your fork, revealing a silky, herb flecked interior.
If you have ever been disappointed by a pasta bake that felt dry or bland, stay with me. We are going to build layers of flavor that actually stay separated, ensuring every bite has that perfect ratio of spicy meat, tangy tomato, and creamy cheese. It is reliable, it is simple, and it works every single time.
Why Traditional Methods Often Fail
Most people treat a pasta bake like a dumping ground. They boil the noodles until they are soft, throw in a jar of cold sauce, and hope for the best. The result is usually a "pasta cake" where everything has fused into one textureless block.
To fix this, we have to look at how the components interact during that long stint in the oven.
- Par Boiling Precision: Cooking the pasta for exactly 2 minutes less than the box suggests prevents it from turning into mush as it absorbs the sauce in the oven.
- The Ricotta Liaison: Whisking an egg into the ricotta creates a stable emulsion that stays creamy and dollop like rather than melting into a thin liquid.
- Starch Water Magic: Adding a splash of the pasta water to the cheese mixture helps the sauce and cheese "grip" the smooth surface of the ziti.
- Layering Logic: Placing sauce at the very bottom creates a steam barrier that keeps the bottom layer of pasta from sticking and burning.
| Servings | Pasta Amount | Sauce Quantity | Pan Size | Cook Time |
|---|---|---|---|---|
| 4 people | 0.5 lb | 24 oz | 8x8 inch | 25 minutes |
| 8 people | 1 lb | 48 oz | 9x13 inch | 40 minutes |
| 12 people | 1.5 lb | 72 oz | Two 9x13 pans | 45 minutes |
Choosing the right pan is half the battle when you are scaling for a crowd. If you try to cram 1.5 lbs of pasta into a single 9x13 dish, the center will stay cold while the edges burn. It is always better to use two pans and rotate them halfway through the baking process.
This ensures that the heat circulates evenly around the pasta, giving you that uniform, bubbly cheese across the entire surface.
Essential Ingredients for Ziti Success
| Ingredient | Science Role | Pro Secret |
|---|---|---|
| Ziti Pasta | Structural Base | Use "Rigate" (ridged) versions to hold more sauce. |
| Whole Milk Ricotta | Moisture & Creaminess | Hand strain if it looks watery to prevent a soggy bake. |
| Italian Sausage | Fat & Umami | Brown it hard to create a "fond" on the pan for the sauce. |
| Low Moisture Mozzarella | Meltability | Shred it yourself for a smoother, less oily melt. |
The quality of your cheese makes or breaks this dish. I always tell people to avoid the pre shredded bags if they can. Those bags are coated in potato starch or cellulose to keep the shreds from sticking together, which also prevents them from melting into that velvety, stretchy blanket we want on top of our Baked Ziti.
If you take three minutes to grate a block of low moisture mozzarella, the difference in the final "pull" is night and day.
Components and Smart Substitutions
The beauty of this recipe is that it uses pantry staples but treats them with respect. For the base, we use 1 lb Ziti or Penne Rigate. If you can't find ziti, penne is a great backup because the ridges help the sauce cling to the exterior.
For the protein, 1 lb Italian Sausage (bulk or casings removed) provides the primary flavor profile. You'll also need 1 tbsp Extra Virgin Olive Oil to get the aromatics going.
For the aromatic foundation, we use 4 cloves Garlic, minced, and 1 small Yellow Onion, finely diced. This is the "soffritto" that builds depth. The body of the dish comes from 48 oz high-quality Marinara sauce. Don't skimp here; choose a brand that lists tomatoes and olive oil as the first ingredients.
The creamy heart consists of 15 oz Whole Milk Ricotta Cheese, 1 large Egg (lightly beaten), and 0.5 cup Grated Parmesan Cheese. We brighten it up with 0.25 cup Fresh Parsley, 1 tsp Dried Oregano, and 0.5 cup Fresh Basil leaves.
Finally, 3 cups Shredded Low Moisture Mozzarella and a pinch of Red Pepper Flakes provide the finish.
| Original Ingredient | Substitute | Why It Works |
|---|---|---|
| Italian Sausage | Ground Beef (80/20) | Rich fat content. Note: Needs extra fennel and red pepper to match sausage flavor. |
| Whole Milk Ricotta | Small Curd Cottage Cheese | Similar moisture level. Note: Results in a slightly chunkier, tangier filling. |
| Ziti Pasta | Rigatoni | Large holes capture sauce. Note: Needs 1 additional minute of boiling due to thickness. |
If you are looking for a way to use up leftovers while making this, you might find my Pizza Muffins Recipe helpful for using up extra mozzarella and pepperoni. For this ziti, if you want a vegetarian version, you can swap the sausage for sautéed mushrooms or a meat alternative, just ensure you cook them until all their moisture has evaporated to keep the dish from getting watery.
Minimal Tools for Reliable Cooking
You don't need a professional kitchen to make this work, but two specific items make the process much easier. A heavy bottomed Dutch oven (like a Lodge or Le Creuset) is the best tool for browning the sausage.
The heavy metal holds heat better than a thin skillet, meaning you get a better sear on the meat without it steaming in its own juices.
The second essential is a standard 9x13 inch ceramic or glass baking dish. Glass is great because you can see the sauce bubbling at the bottom, which is your visual cue that the heat has reached the center.
You will also need a large pot for boiling the pasta, a sturdy colander, and a medium mixing bowl for the ricotta mixture. A simple whisk or even a fork works perfectly for emulsifying the egg and cheese.
Mastering the Ziti Assembly Process
1. Searing the Savory Foundation
In a Dutch oven over medium high heat, brown the Italian sausage, breaking it into small crumbles. Add onions and garlic to the rendered fat and sauté until onions are translucent and aromatics are fragrant.
Note: This step creates the "fond," those brown bits on the bottom that pack the most flavor.
2. Par Boiling the Ziti
Bring a large pot of heavily salted water to a boil. Cook the ziti for exactly 2 minutes less than the package instructions to ensure structural integrity. Reserve a splash of pasta water before draining. Note: The pasta should still have a firm "bite" in the center.
3. Emulsifying the Ricotta Liaison
In a mixing bowl, whisk together the whole milk ricotta, beaten egg, grated parmesan, chopped parsley, dried oregano, and a splash of the reserved pasta cooking water until a silky, uniform emulsion is formed. Note: The egg acts as a binder, keeping the cheese from "breaking" in the oven.
4. Combining the Sauce
Pour the 48 oz of marinara sauce into the Dutch oven with the browned sausage and aromatics. Stir well to combine, making sure to scrape up any bits from the bottom. Toss the drained ziti into the sauce and stir until every tube is coated.
5. Assembly and Layering
In a 9x13 inch baking dish, utilize a nesting technique by layering a small amount of sauce on the bottom first. Pour in half the pasta mixture, then add large dollops of the creamy ricotta mixture across the surface. Top with the remaining pasta.
6. The Cheese Blanket
Top the assembled layers evenly with the 3 cups of shredded low moisture mozzarella. Ensure you get the cheese all the way to the edges of the dish to prevent the pasta from drying out during the bake.
7. Baking to Perfection
Bake at 375°F (190°C) for approximately 30 minutes or until the cheese is charred and bubbly. Look for the cheese to turn a deep mahogany in spots and for the sauce to sizzle at the edges.
8. Garnish and Rest
Remove from the oven and let rest for 5-10 minutes to allow the sauce to set. Note: Resting is vital; it prevents the ziti from falling apart when you scoop it out. Garnish with fresh torn basil and red pepper flakes before serving.
Avoiding Sogginess and Other Pitfalls
One of the most common complaints I hear about pasta bakes is the "watery bottom" syndrome. This usually happens because of two things: either the ricotta was too wet, or the vegetables (like the onions) weren't cooked long enough to release their moisture.
If your ricotta looks like it has a layer of liquid on top, don't just stir it back in. Set it in a fine mesh sieve for ten minutes before mixing.
Why Your Pasta Is Mushy
If the pasta loses its shape, it’s almost always overcooked before it even hits the oven. Remember that the pasta continues to "cook" as it absorbs the moisture from the marinara sauce while baking. If you boil it to "al dente" on the stove, it will be "mushy" by the time it comes out of the oven.
| Problem | Root Cause | Solution |
|---|---|---|
| Greasy surface | High fat sausage or cheap cheese | Drain excess fat after browning meat; use low moisture mozzarella. |
| Dry pasta | Not enough sauce or oven too hot | Ensure 48 oz of sauce is used; tent with foil if browning too fast. |
| Bland flavor | Under salted pasta water | Use 1 tbsp salt per gallon of water; it's your only chance to season the noodle itself. |
Another trick to keep the texture interesting is to avoid stirring the ricotta into the sauce entirely. You want those distinct "pockets" of white cheese. It creates a contrast in every bite one second you get the spicy, acidic tomato sauce, and the next, a cool, velvety cloud of herb infused ricotta.
- ✓ Pat the onions dry if they seem overly moist after chopping.
- ✓ Never skip the "reserved pasta water" step; it’s the glue of the dish.
- ✓ Use a metal spoon to break the sausage into very small bits for even distribution.
- ✓ Let the oven fully preheat to 375°F (190°C) to ensure the cheese browns quickly without overcooking the pasta.
Guidelines for Scaling and Adjusting
When you need to feed a massive crowd, doubling this recipe is fairly straightforward, but there are some math y bits to keep in mind. If you are making 2 lbs of pasta, you don't necessarily need to double the salt and spices.
I usually go to 1.5x on the dried oregano and red pepper flakes to keep the heat from becoming overwhelming.
For a smaller batch (half recipe), you can use an 8x8 inch pan. When using a smaller pan, the depth of the pasta is usually greater, so you might need to increase the bake time by about 5 minutes to ensure the center gets hot.
If you're cutting the recipe in half, beat one egg in a cup, and then just pour half of it into your ricotta mixture. It feels fussy, but it's the only way to keep that perfect "liaison" texture.
If you find yourself with extra ingredients or want to try a different pasta heavy meal for a smaller group, you might enjoy my Black Bean and Quinoa Bake, which offers a similar "bake and serve" convenience with a different flavor profile.
Debunking Common Kitchen Myths
One of the biggest myths in pasta cooking is that you should add oil to the boiling water to keep the noodles from sticking. Please, don't do this! The oil creates a slick coating on the pasta that prevents the sauce from adhering.
Instead, just use a large enough pot and give the ziti a good stir in the first two minutes of boiling. That’s when the starch is stickiest and most likely to clump.
Another misconception is that you need to use "fresh" mozzarella for the best results. While fresh mozzarella is incredible on a Margherita pizza, it has a very high water content. In a 30 minute bake, that water will release and turn your ziti into a soup.
For this specific dish, the "low moisture" block mozzarella is actually the superior choice because it melts into a thick, fatty layer that browns beautifully without thinning out the sauce.
Storing and Reviving Your Ziti
Baked ziti is actually one of those rare dishes that tastes even better the next day. As it sits in the fridge, the pasta continues to absorb the flavors of the garlic, sausage, and herbs. It will stay fresh in an airtight container in the refrigerator for up to 4 days.
When reheating, I recommend adding a tiny splash of water or extra marinara to the bowl before microwaving to prevent it from drying out.
If you want to freeze it, you have two options. You can freeze the entire dish unbaked (this is my favorite way). Just assemble it, wrap it tightly in a double layer of foil, and freeze for up to 3 months.
To bake from frozen, keep the foil on and bake at 375°F (190°C) for about an hour, then remove the foil and bake for another 15 minutes to brown the cheese.
For a zero waste tip, if you have leftover sauce or sausage bits, use them as a base for a quick breakfast hash the next morning!
Finishing Touches for the Table
When you pull that tray out of the oven, the impulse is to dive right in. Resist it! If you cut into the ziti immediately, the ricotta and sauce will run to the edges, leaving the center dry. Giving it that 10 minute rest allows the starches to firm up just enough that you get a clean, beautiful scoop every time.
To really make the flavors pop, I always serve this with something bright and acidic. A simple arugula salad with a heavy lemon vinaigrette cuts through the richness of the sausage and cheese perfectly. And if you have any crusty bread lying around, this is the time to use it.
There is nothing better than using a piece of garlic bread to swipe up that last bit of herb flecked ricotta from the bottom of your plate. It’s the kind of meal that makes everyone at the table go quiet for a few minutes, which is the highest compliment any home cook can get.

CRITICAL: Very High in Sodium
1285 mg 1285 mg (56% 56%)
The American Heart Association recommends limiting sodium intake to 2,300 mg per day, with an ideal limit of 1,500 mg per day for most adults.
Tips to Reduce Sodium in Your Ziti Bake
-
Choose Lower Sodium Marinara-20%
Select a low-sodium or no-salt added marinara sauce. This is typically the largest contributor of sodium in the dish.
-
Opt for Unseasoned Sausage-25%
Use bulk Italian sausage without added salt or seasonings. If casings are used, remove them and look for lower sodium varieties.
-
Reduce Parmesan Cheese-15%
Lower the amount of grated Parmesan cheese. Parmesan is very salty, so using half the amount can make a significant difference.
-
Use Low-Sodium Mozzarella-10%
When purchasing shredded mozzarella, look for varieties that are lower in sodium or use fresh mozzarella which often has less sodium.
-
Boost Flavor with Herbs and Spices
Enhance the taste of your dish with fresh herbs like basil and parsley, and dried oregano. A pinch of red pepper flakes can add a nice kick without sodium.
Recipe FAQs
Why does my ziti become mushy after baking?
You are likely overcooking the pasta before it hits the oven. Ensure you boil the ziti for exactly 2 minutes less than the package instructions, as it will continue to soften while absorbing the marinara sauce during the 30-minute bake time at 375°F.
How to achieve a perfectly golden, bubbly cheese crust?
Use low-moisture shredded mozzarella for the best melting performance. If you mastered the crispy surface texture in our other recipes, you will find that a high heat bake until the cheese is charred is the final step to locking in that deep, savory flavor.
Is it true I can use fresh mozzarella instead of low-moisture?
No, this is a common misconception. Fresh mozzarella contains too much water and will release excess liquid into your sauce, preventing the dish from setting properly during the rest period.
How to keep the ricotta mixture from separating?
Whisk the ricotta with the egg and parmesan thoroughly before assembly. Creating a smooth, uniform emulsion with the reserved pasta water ensures the cheese layer remains creamy rather than grainy once heated.
Can I prepare the dish in advance?
Yes, assembly ahead of time is highly recommended. You can refrigerate the assembled dish before baking for up to 24 hours, though you may need to add a few extra minutes to the oven time if the ingredients are cold when you start baking.
How to prevent the pasta from drying out in the fridge?
Add a splash of water or extra marinara sauce before reheating. Because the noodles continue to absorb liquid as they sit, this small addition restores the original texture and keeps the dish moist.
Why is the resting time necessary?
Resting for 5-10 minutes allows the sauce and cheese to set. If you slice into the ziti immediately upon pulling it from the oven, the layers will lose their structure and the sauce will run, making it difficult to plate neatly.
Baked Ziti With Sausage
Ingredients:
Instructions:
Nutrition Facts:
| Calories | 664 kcal |
|---|---|
| Protein | 34.6 g |
| Fat | 33.2 g |
| Carbs | 57.1 g |
| Fiber | 4.2 g |
| Sugar | 9.8 g |
| Sodium | 1285 mg |
