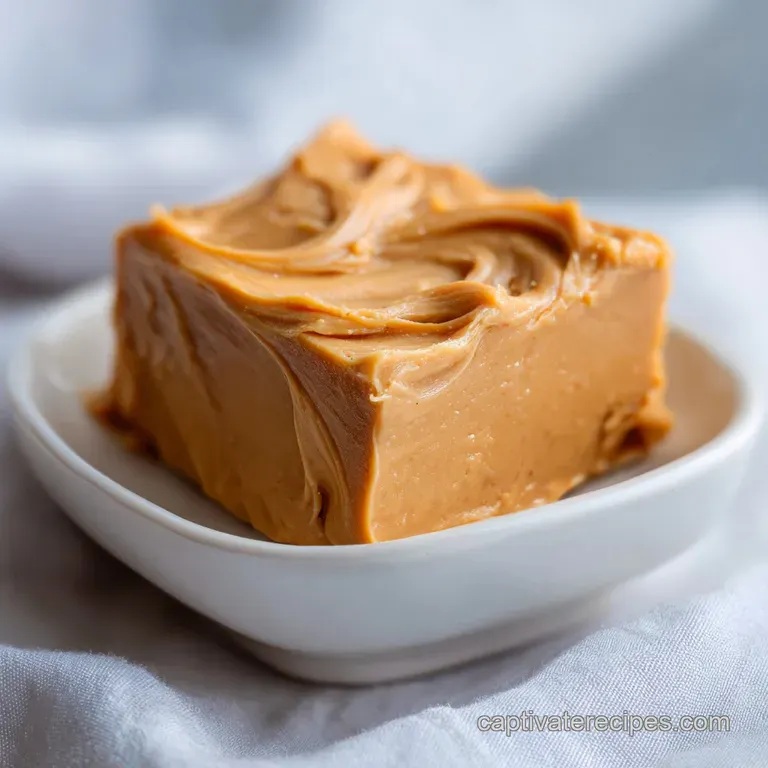
Peanut Butter Fudge: Silky and Creamy
- Time: Active 10 minutes, Passive 2 hours, Total 15 minutes
- Flavor/Texture Hook: Velvety, nutty, and buttery with a smooth finish
- Perfect for: Holiday gifting, last minute party platters, or beginner confectioners
- The Easiest Velvety Peanut Butter Fudge
- How the Texture Stays Silky
- Time and Yield Metric Breakdown
- Sourcing Your High Quality Elements
- Essential Gear for Candy Success
- Mastering the Quick Fudge Method
- Resolving Potential Texture Blunders
- Creative Variations and Flavor Swaps
- Maintaining Freshness and Storage
- Scaling and Serving Solutions
- Exposing Popular Candy Myths
- Recipe FAQs
- 📝 Recipe Card
The Easiest Velvety Peanut Butter Fudge
Did you know that the word "fudge" was likely born from a massive mistake? Back in the late 1880s, a batch of caramel was "fudged" (messed up) at a college in New York, resulting in a grainier, softer confection that students absolutely adored.
It’s funny how the best things in life like a silky square of Peanut Butter Fudge—often come from finding a simpler, better way to do things. I used to think you needed a lab coat and a degree in thermodynamics to get candy right, but this version proves otherwise.
The first time I stood over a pot of melting butter and peanut butter, I was mesmerized by the way the two fats swirled together. It looks like a shimmering pool of liquid gold before the condensed milk hits the pan. The aroma is enough to stop you in your tracks; it’s nutty, deep, and impossibly rich.
It smells like a rainy Saturday afternoon where the only thing on the agenda is comfort. You don't need a thermometer or a prayer to get this to set, which is why I've shared it with everyone from my neighbor to my cousin who once burnt toast.
We’re aiming for a specific kind of magic here: a texture that is firm enough to hold its shape in a gift box but soft enough that it practically dissolves the second it touches your tongue. There’s a distinct joy in the process, a rhythmic stirring that feels almost meditative.
By the time you pour that thick, glossy "lava" into the pan, you’ll feel like a pro confectioner. Trust me, once you see how those 24 squares look all lined up and sharp edged, you’ll never go back to the store-bought stuff.
How the Texture Stays Silky
Achieving that velvety bite isn't about luck; it's about how the ingredients interact to prevent graininess. Most candy fails because sugar crystals grow too large, creating a sandy feel. In this version, we’re using a shortcut that bypasses the traditional boiling process.
- Emulsion Stability: The butter and peanut butter provide a massive amount of fat that coats sugar molecules, preventing them from bonding together and forming crunchy crystals.
- Condensed Milk Magic: Because the milk is already reduced and sweetened, the sugar is already fully dissolved in a stable liquid, removing the need for over high heat boiling.
- Protein Structure: The proteins in the peanut butter act as a scaffolding, giving the fudge its "chew" while the fat keeps it silky.
- Sodium Contrast: Fine sea salt doesn't just add flavor; it suppresses the bitterness of the legumes and amplifies the perception of sweetness.
| Method Type | Time Requirement | Texture Outcome | Skill Level |
|---|---|---|---|
| Fast (This Recipe) | 15 minutes | Silky, dense, velvety | Beginner |
| old-fashioned | 45 minutes | Crumbly, crystalline | Advanced |
| Microwave | 10 minutes | Very soft, less depth | Absolute Beginner |
Using this fast method allows us to focus on the quality of the ingredients rather than the temperature of the stove. While the old-fashioned way has its charms, the risk of a "failed" batch is much higher. If you're looking for a reliable showstopper that you can whip up before a dinner party, this is the one.
It provides a consistent, professional grade finish every single time without the artisan level stress.
Time and Yield Metric Breakdown
When you're planning a holiday bake a-thon, timing is everything. You need to know exactly when your treats will be ready to slice so you can manage your counter space. This recipe is designed for efficiency, but it does require patience during the "set" phase to ensure those edges stay crisp and clean when you cut them.
| Metric Type | Measurement | Note |
|---|---|---|
| Active Prep | 10 minutes | Lining the pan and measuring ingredients |
| Cooking Window | 5 minutes | Gentle melting and stirring |
| Setting Time | 2 hours | Required for the fats to re solidify |
| Standard Yield | 24 servings | Based on 1.5 inch squares |
Most people underestimate how long the "cooling" part takes. If you try to slice this after just an hour, you'll end up with a delicious but messy blob. Giving it the full two hours in the fridge allows the butter to reach its structural peak.
If you find yourself with extra peanut butter after this batch, you might want to try making Soft Peanut Butter Cookies which use similar pantry staples. They are a great way to use up that last bit of a large jar.
Sourcing Your high-quality Elements
The beauty of a recipe with only five ingredients is that there is nowhere for low quality items to hide. Since the peanut butter is the star, the type you choose will dictate the entire experience.
I always tell my friends to avoid the "natural" peanut butters that have a layer of oil on top for this specific recipe; they can be too unstable and lead to an oily mess.
| Ingredient | Science Role | Pro Secret |
|---|---|---|
| Creamy Peanut Butter | Structural Base | Use a "no stir" brand for the smoothest set and consistent oil content. |
| Sweetened Condensed Milk | Liquid Sugar Binder | Ensure it is full fat; "light" versions will result in a tacky, soft fudge. |
| Grass Fed Butter | Flavor & Mouthfeel | Unsalted butter lets you control the saltiness; grass fed adds a richer yellow hue. |
- 18 oz (510g) Creamy Peanut Butter: This provides the bulk and the nutty soul of the dish. Why this? Standard creamy brands have stabilizers that prevent the fudge from separating during the cooling process.
- 14 oz (396g) Sweetened Condensed Milk: This is your sweetener and binder. Why this? It provides a pre dissolved sugar base that guarantees a smooth, non grainy texture.
- 1/2 cup (113g) Unsalted Grass Fed Butter: Adds a luxurious, velvety mouthfeel. Why this? high-quality butter has less water content, leading to a firmer, more artisanal set.
- 1 tsp (5ml) Pure Vanilla Extract: Rounds out the harshness of the sugar. Why this? Real vanilla adds floral notes that mimic the complexity of expensive chocolates.
- 1/4 tsp (1.5g) Fine Sea Salt: The ultimate flavor balancer. Why this? Sea salt dissolves faster than table salt, preventing "salt pockets" in the final fudge.
| Original Ingredient | Substitute | Why It Works |
|---|---|---|
| Unsalted Butter | Salted Butter | Works fine, just omit the extra sea salt from the recipe. |
| Sea Salt | Kosher Salt | Use a pinch more; the larger flakes provide a nice textural pop. |
| Vanilla Extract | Almond Extract | Use half the amount; adds a cherry like nuttiness to the profile. |
If you enjoy the combination of salt and nut butter, you'll definitely want to check out these Peanut Butter Pretzels for your next snack tray. They offer a similar flavor profile but with a satisfying crunch.
Essential Gear for Candy Success
You don't need a huge arsenal of tools, but a few specific items will make your life much easier. The most important thing is your pan. A heavy bottomed saucepan is non negotiable because thin pans create hot spots that can scorch the condensed milk.
Once that sugar burns, the whole batch will taste like ash, so invest in a good pot.
An 8x8 inch square baking pan is the standard here. If you use a 9x9, your squares will be thinner and potentially a bit more fragile. I also highly recommend using a silicone spatula. It allows you to scrape every last bit of that "liquid gold" from the corners of the pot, ensuring nothing goes to waste.
Finally,, don't forget the parchment paper. While you could technically grease the pan, a parchment "sling" is a total lifesaver. You just grab the edges and lift the entire block of fudge out onto a cutting board.
It makes for those perfectly straight, artisanal edges that make people ask, "Wait, you actually made this?"
Mastering the Quick Fudge Method

- Prep the pan. Line an 8x8 inch square baking pan with parchment paper, leaving an overhang on two sides to create a sling for easy removal. Note: This ensures you won't have to dig the fudge out with a knife later.
- Combine the bases. In a heavy bottomed medium saucepan over low medium heat, combine the creamy peanut butter, sweetened condensed milk, and unsalted butter.
- Melt and stir. Stir the mixture constantly until it reaches a uniform, glossy liquid state and the butter is fully emulsified. Note: Constant stirring prevents the milk solids from sticking to the bottom.
- Watch the texture. Continue stirring until the mixture resembles thick, flowing lava and no streaks of butter remain.
- Remove from heat. Pull the pan off the burner immediately to avoid over cooking the proteins in the peanut butter.
- Add aromatics. Stir in the vanilla extract and fine sea salt until fully incorporated and fragrant.
- Pour and level. Pour the mixture into the prepared pan. until the surface is flat. Smooth the top with a warm spatula and tap the pan on the counter to release air bubbles.
- The big chill. Refrigerate for at least 2 hours until the fudge is firm to the touch before slicing into 24 squares.
Chef's Tip: If you want an even smoother top, slightly dampen your spatula with warm water before the final smoothing. The water breaks the surface tension of the fat and lets you glide right over the top.
Resolving Potential Texture Blunders
Even with a simple recipe, things can get a little wonky if the heat is too high or the ingredients aren't measured correctly. The most common issue I see is oily fudge. This usually happens when the mixture gets too hot and the fat separates from the solids.
If you see pools of oil forming while you stir, take it off the heat immediately and whisk vigorously to bring the emulsion back together.
Why Your Fudge Is Grainy
If your fudge feels sandy on the tongue, it’s usually because the sweetened condensed milk was old or scorched. Sugar can crystallize if it's heated too rapidly. To prevent this, always stay on low medium heat. It might take an extra minute to melt, but the silky result is worth the wait.
| Problem | Root Cause | Solution |
|---|---|---|
| Oily Surface | Heat was too high | Whisk in a teaspoon of room temp milk to re emulsify. |
| Soft/Gooey | Not chilled long enough | Return to the fridge for another hour; check your butter quality. |
| Cracked Top | Chilled too fast | Let it sit at room temp for 10 mins before slicing to soften the crust. |
Common Mistakes Checklist:
- ✓ Never use "Natural" peanut butter with oil separation; it lacks the necessary stabilizers.
- ✓ Ensure the butter is fully melted and incorporated before adding the vanilla.
- ✓ Don't skip the salt; it's essential for cutting through the richness of the condensed milk.
- ✓ Avoid boiling the mixture; you only want it to melt and combine.
- ✓ Use a sharp, warm knife for slicing to get those clean, professional edges.
Creative Variations and Flavor Swaps
Once you've mastered the classic, you can start treating this recipe like a blank canvas. One of my favorite things to do for the holidays is to add a "crunch" factor. You can fold in half a cup of chopped dry roasted peanuts or even some crushed pretzels.
The saltiness of the pretzels against the sweet fudge is a total showstopper.
If you’re feeling fancy, try a "Tiger Butter" effect. Melt half a cup of semi sweet chocolate chips and drizzle them over the top of the fudge once it's in the pan. Use a toothpick to swirl the chocolate into the peanut butter base. It looks artisanal and tastes like a gourmet peanut butter cup. For more inspiration on textured treats, these Oatmeal Peanut Butter Cookies are a great example of how to balance "chew" with "crunch."
- The Power Nut Twist: Substitute half the peanut butter for almond butter or cashew butter. Just make sure the consistency is similar to standard creamy peanut butter.
- The Holiday Crunch: Add 1/4 cup of mini chocolate chips or crushed candy canes on top immediately after pouring into the pan.
- The Adult Version: Add a teaspoon of bourbon or dark rum along with the vanilla for a deep, smoky undertone that cuts the sweetness.
Maintaining Freshness and Storage
Because this fudge is high in fat and sugar, it stays fresh for a surprisingly long time. However, it is sensitive to temperature. If you leave it on a sunny counter, it will lose its structural integrity and become more like a thick ganache.
Always store it in an airtight container with layers separated by parchment paper to prevent sticking.
Fridge Life: This fudge will stay velvety and fresh in the refrigerator for up to 1 week. I actually think the flavor develops and deepens after the first 24 hours.
Freezer Life: You can freeze this fudge for up to 3 months! Wrap the entire block (or individual squares) tightly in plastic wrap, then place them in a freezer safe bag. To eat, just let a square sit at room temperature for about 15 minutes. It retains its texture perfectly.
Zero Waste Tip: If you have any small, odd shaped scraps left over from trimming the edges, don't throw them away. Melt them down and drizzle them over vanilla ice cream for a "fudge ripple" effect that is absolutely world class.
You can also crumble them into brownie batter before baking for hidden pockets of peanut butter joy.
Scaling and Serving Solutions
If you're making this for a big bake sale or a large wedding shower, you can easily double the recipe. However, don't just dump everything into a giant pot and hope for the best. When doubling, the "melt time" will increase, and you run a higher risk of scorching the bottom.
Work in batches if your pot isn't heavy duty enough to handle the volume.
Scaling Down: If you only want a small treat, you can halve the recipe and use a standard loaf pan. This will give you about 12 generous squares. Just remember that smaller batches melt much faster, so keep your eye on the heat!
Scaling Up: For 48 servings, use a 9x13 pan. You won't need to double the salt exactly 1.5x the salt is usually enough to avoid over seasoning. Also, give it an extra hour in the fridge to ensure the center of the larger pan is fully set.
Serving Tip: To get those perfect, "clean" cuts you see in professional candy shops, run your knife under hot water and wipe it dry between every single slice. The heat from the blade will melt the fats just enough to slide through like a hot knife through... well, butter.
Exposing Popular Candy Myths
There are so many old wives' tales about fudge that can make the process feel intimidating. Let's clear the air so you can cook with confidence.
- Myth: You must stir in only one direction to prevent crystallization. Truth: While this matters for traditional boiled sugar fudge, our condensed milk method is much more stable. You can stir however you like, as long as you're reaching the corners of the pan.
- Myth: Rain or humidity will ruin your fudge. Truth: This only applies to recipes that involve boiling sugar to a specific "stage" where atmospheric pressure and moisture can interfere. Since we're just melting and emulsifying, you can make this on the most humid day of the year without a problem.
- Myth: You need a special "fudge pot." Truth: Any heavy bottomed saucepan will work. The goal is even heat distribution, not a specific shape of cookware. As long as the heat doesn't spike in one spot, your fudge will be silky.
By focusing on the joy of the process and using these simple tricks, you’ll produce a fudge that is truly a showstopper. It’s accessible, artisanal, and most importantly ready in just 15 minutes of hands on time. Happy baking!

Recipe FAQs
How do you make fudge with peanut butter?
Combine the creamy peanut butter, sweetened condensed milk, and unsalted grass fed butter in a heavy bottomed medium saucepan over low-medium heat. Stir the mixture constantly until it reaches a uniform, glossy liquid state, remove from heat to stir in vanilla extract and sea salt, then pour into a
parchment lined 8x8 pan to refrigerate for at least 2 hours.
What are common peanut butter fudge mistakes?
Failing to stir the mixture constantly during the heating process. This can lead to hot spots or scorching, preventing that perfectly smooth, glossy emulsion required for the ideal melt-in-your mouth texture.
What are the common mistakes when making fudge?
Removing the mixture from the heat before it reaches a fully uniform, lava like consistency. If the butter and peanut butter are not completely emulsified with the condensed milk, the final product may separate or have a greasy texture rather than a set, velvety finish.
What is the secret to making good fudge?
Achieving a stable, glossy emulsion by stirring consistently over low-medium heat. If you enjoyed mastering the emulsified texture here, you will find that same attention to fat-incorporation leads to superior results in many other baked goods.
Is it true I need a candy thermometer to ensure the fudge sets?
No, this is a common misconception. Because this recipe uses a precise ratio of condensed milk and fats, it bypasses the need for high heat sugar crystallization monitoring, making it a foolproof method for beginners.
How do I know when the fudge is ready to be sliced?
Touch the surface of the fudge after it has been in the refrigerator for at least 2 hours. It should feel firm and set to the touch; if it remains soft or sticky, return it to the refrigerator for additional time.
Can I speed up the cooling process by putting it in the freezer?
Avoid using the freezer, as it can cause condensation to form on the surface of the fudge. The refrigerator provides a controlled environment that allows the butter and peanut butter fats to solidify evenly, ensuring the best possible texture.
Easy Peanut Butter Fudge
Ingredients:
Instructions:
Nutrition Facts:
| Calories | 212 kcal |
|---|---|
| Protein | 6.7 g |
| Fat | 16.1 g |
| Carbs | 13.2 g |
| Fiber | 1.3 g |
| Sugar | 10.8 g |
| Sodium | 134 mg |
