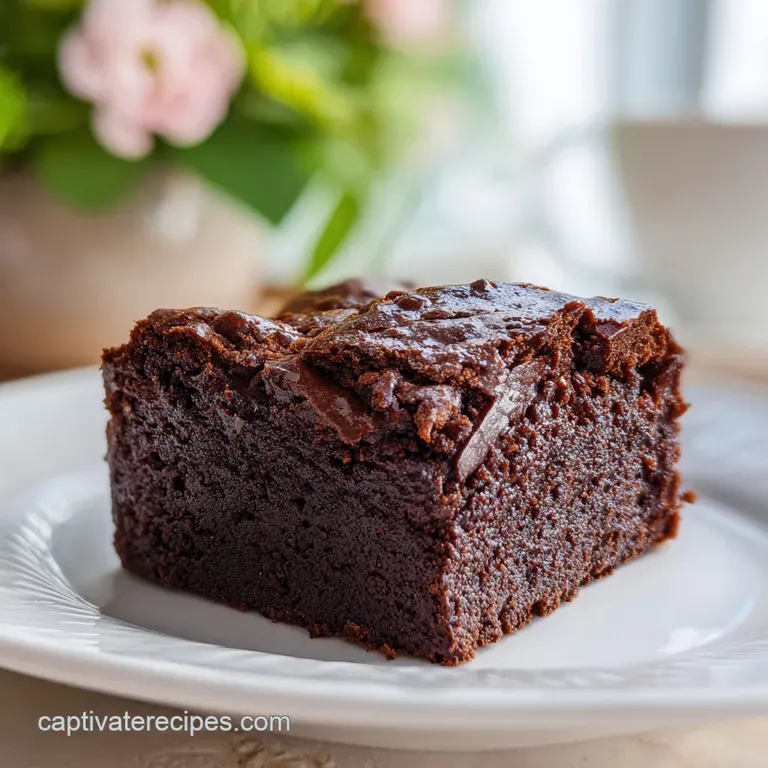
One Bowl Brownie Recipe: Fudgy and Crackly
- Time: Active 10 minutes, Passive 25 minutes, Total 35 minutes
- Flavor/Texture Hook: Fudgy center with a crackly, shatter thin top
- Perfect for: Last minute cravings, low budget baking, or tired home cooks
- Finding Bliss with This One Bowl Brownie Recipe
- Why This Simple Baking Method Actually Works
- Analyzing the Chemistry of Every Key Ingredient
- Simple Elements for Better Chocolate Results
- Essential Tools You Already Have
- Baking Your Batch Step by Step
- Solving Common Brownie Problems
- Scaling Your Chocolate Batch Up
- Debunking Some Common Baking Myths
- Keeping Your Brownies Fresh
- How to Serve These Best
- Freezing and Reheating Guidelines
- Recipe FAQs
- 📝 Recipe Card
Finding Bliss with This One Bowl Brownie Recipe
There is a specific sound that happens when you pour hot, melted butter over cocoa powder and sugar. It is a soft, muffled sizzle that smells like a chocolate factory is opening up right in your kitchen.
I remember the first time I tried this; I was staring at a sink full of dishes from a failed "gourmet" attempt and decided there had to be a better way to get my chocolate fix without the cleanup marathon.
Most recipes want you to cream butter, temper chocolate, and fold things in three different stages. Honestly, we don't have time for that on a Tuesday night. This one bowl brownie recipe is my peace offering to anyone who has ever felt defeated by a complicated dessert.
We are going for maximum fudginess with minimum effort, using basic pantry staples that won't break the bank.
We’ve all been there standing in the kitchen at 9:00 PM, craving something sweet but dreading the flour covered counters. This method simplifies the chemistry of baking into one vessel.
You’ll get that elusive, paper thin top that flakes away like a secret, revealing a velvety, dense center that puts boxed mixes to shame. Let's get into how we make this happen without losing our minds.
Why This Simple Baking Method Actually Works
- The Bloom Effect: Using hot butter to dissolve the cocoa powder "blooms" the chocolate, releasing volatile flavor compounds that stay trapped in cold fats.
- Sugar Suspension: Dissolving the sugar into the hot butter egg mixture creates the structural base for that shiny, crackly top.
- Gluten Control: By mixing the dry ingredients last and only until combined, we prevent a tough, bread like texture and keep things fudgy.
| Thickness | Internal Temp | Rest Time | Visual Cue |
|---|---|---|---|
| 1 inch | 190°F (88°C) | 15 minutes | Edges pull away from pan |
| 1.5 inches | 195°F (90°C) | 20 minutes | Center has a slight wobble |
| 0.5 inches | 185°F (85°C) | 10 minutes | Top is fully matte and set |
This timing ensures you don't end up with a dry, crumbly mess. If you pull them out when the center still looks a tiny bit underdone, the carryover heat finishes the job while they rest on the counter.
Trust me, the wait is the hardest part, but it’s what allows the structure to set so you can actually slice them.
Analyzing the Chemistry of Every Key Ingredient
Understanding why we use specific amounts of fat versus flour helps you troubleshoot on the fly. In this recipe, the ratio is skewed heavily toward fat and sugar, which is the hallmark of a dense, fudgy result rather than a cakey one.
| Ingredient | Science Role | Pro Secret |
|---|---|---|
| Melted Butter | Provides fat for tenderness | Use it hot to dissolve cocoa instantly |
| Cocoa Powder | Adds structure and flavor | Dutch process yields a darker, smoother bite |
| Large Eggs | Acts as a binder and leavener | Whisk them well to create the top crust |
Getting the eggs to room temperature is a step people often skip, but it’s vital. Cold eggs can seize up your melted butter, resulting in a chunky batter that doesn't bake evenly. If you're in a rush, just pop the eggs in a bowl of warm water for five minutes while you melt the butter.
Simple Elements for Better Chocolate Results
- 115g unsalted butter: Melted and hot. Why this? Hot fat dissolves cocoa and sugar more efficiently than room temp fat.
- 150g coconut sugar: Or organic cane sugar. Why this? Provides the sweetness and creates the essential structural lattice.
- 2 large eggs: Room temperature. Why this? They emulsify the fats and help create the shiny top skin.
- 5ml pure vanilla extract: For depth.
- 60g unsweetened cocoa powder: Sifted Dutch process. Why this? Sifting prevents "cocoa bombs" bitter clumps of unmixed powder.
- 65g all purpose flour: The minimal structure.
- 2g fine sea salt: To balance the sugar.
- 2g instant espresso powder: To intensify chocolate.
| Original Ingredient | Substitute | Why It Works |
|---|---|---|
| Coconut Sugar | Brown Sugar | Adds moisture and a molasses like chewiness. |
| Unsalted Butter | Salted Butter | Works fine; just omit the extra sea salt. |
| AP Flour | 1 to-1 GF Flour | Maintains structure but might feel slightly grittier. |
Essential Tools You Already Have
You don't need a high end stand mixer for this. In fact, a simple whisk is actually better because it gives you more control over the aeration of the eggs. You'll need an 8x8 inch square baking pan, which is the standard size for this volume of batter.
Chef's Tip: Line your pan with parchment paper, leaving an inch of overhang on the sides. This "sling" allows you to lift the entire block of brownies out once they are cool, making clean up and slicing significantly easier.
I also recommend using a metal pan if you have one. Glass and ceramic hold heat differently and can often lead to overcooked edges before the center is set. If you're using a glass dish, you might need to lower your oven temp to 325°F (160°C) and add five minutes to the timer.
Baking Your Batch step-by-step
- Preheat your oven to 350°F (180°C) and line your 8x8 inch pan with parchment paper.
- Melt the butter in a large microwave safe bowl until it is completely liquid and quite hot.
- Whisk in the sugar and espresso powder until the mixture looks gritty and combined. Note: The heat from the butter starts the sugar dissolution process.
- Add the eggs and vanilla extract to the bowl.
- Beat vigorously for about 2 minutes until the batter is pale and smooth. Note: This step is what creates the "meringue" top on the brownies.
- Sift in the cocoa powder and salt directly over the wet ingredients.
- Whisk gentlyuntil no large dry streaks remain.
- Fold in the flour using a spatula until just barely incorporated. Note: Stop the moment the white streaks disappear to avoid gluten development.
- Pour into the pan and smooth the top with your spatula.
- Bake for 25 minutes until the edges are firm and the top is crackled.
For a great pairing, these brownies are fantastic after a light meal like my Greek Chicken Bowls recipe. The saltiness of a Mediterranean meal makes the chocolate hit even harder.
Solving Common Brownie Problems
Why Your Brownies Are Too Cakey
If your brownies come out feeling more like chocolate bread, you likely overmeasured the flour or overmixed the batter. When you mix flour, you develop gluten. In bread, that's great.
In brownies, it's the enemy of the "fudge." Stick to the 65g measurement it’s not much flour, but it’s exactly what's needed for this specific one bowl brownie recipe.
| Problem | Root Cause | Solution |
|---|---|---|
| Greasy texture | Butter was too hot when adding eggs | Let butter cool for 1 minute before eggs. |
| No crackly top | Eggs weren't beaten enough | Whisk for a full 2 mins after adding eggs. |
| Hard edges | Oven ran too hot | Use an oven thermometer to verify 350°F. |
If you find yourself with leftovers that have gone a bit hard, you can use a similar reheating trick as you would for Singapore Noodles Recipe — a quick hit of steam or a damp paper towel in the microwave works wonders to restore moisture.
Common Mistakes Checklist:
- ✓ Using cold eggs (this causes the butter to clump)
- ✓ Skipping the sifting of the cocoa powder (leads to bitter lumps)
- ✓ Overbaking "just to be safe" (they will dry out!)
- ✓ Cutting them while they are still hot (they will fall apart)
Scaling Your Chocolate Batch Up
If you need to feed a crowd, you can easily double this recipe. Use a 9x13 inch pan and increase the baking time by about 10 to 15 minutes. However, be careful with the spices; I usually only increase the salt and espresso powder to 1.5x rather than a full double to keep the balance right.
When halving the recipe, use a small loaf pan. Since you can't easily use half an egg, beat one egg in a small cup and use approximately 2 tablespoons of the liquid for the half batch. Reduce the baking time by about 5 minutes and start checking for doneness early.
Debunking Some Common Baking Myths
One major myth is that you must use expensive bar chocolate to get a good brownie. While bar chocolate is great, high-quality Dutch process cocoa powder actually provides a more consistent, "pure" chocolate flavor that doesn't get masked by the fats in a chocolate bar.
Another misconception is that you need baking powder. True fudgy brownies shouldn't have any chemical leaveners. The "lift" comes entirely from the air you whisk into the eggs. Adding baking powder will give you a domed, cake like top, which is exactly what we are trying to avoid here.
Keeping Your Brownies Fresh
Store these in an airtight container at room temperature for up to 3 days. If you like them extra chewy, put them in the fridge; the fats will firm up and give them a truffle like consistency. For long term storage, wrap individual squares in plastic wrap and freeze them for up to 3 months.
Don't toss the crumbs at the bottom of the pan! Those crispy bits are perfect for topping vanilla ice cream or folding into a morning yogurt bowl. If you have extra cocoa powder, you can even use it in a savory rub for meats, similar to how we treat spices in other savory dishes.
How to Serve These Best
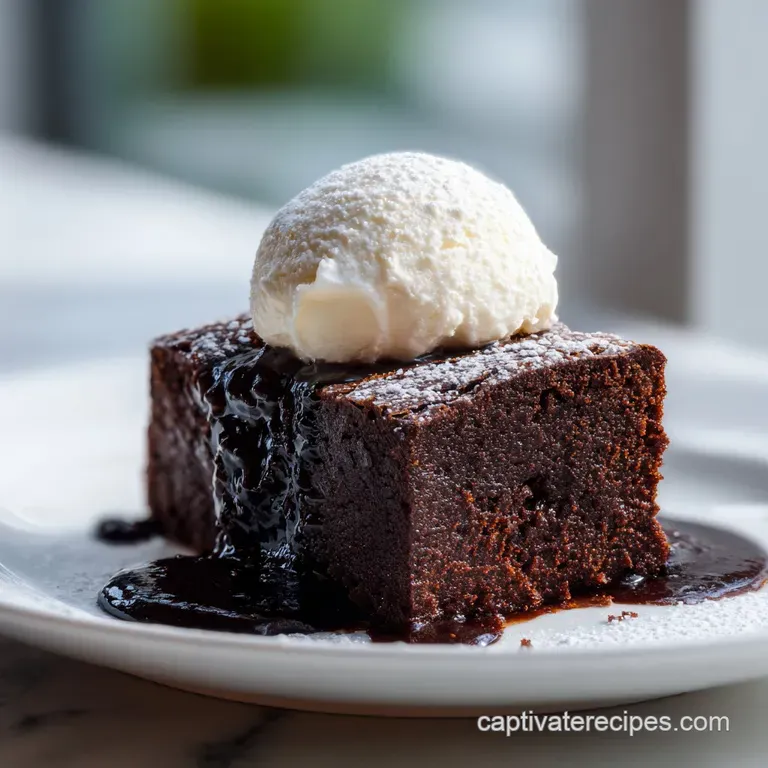
While they are incredible on their own, a sprinkle of flaky sea salt right when they come out of the oven is a total move. It cuts through the sugar and makes the chocolate taste more "expensive." If you really want to go all out, serve a warm square with a dollop of cold whipped cream or a scoop of salted caramel ice cream.
If you enjoy the process of layering flavors, you might also like the complexity found in my Gourmet Tiramisu Yule recipe. Both rely on that perfect marriage of coffee and chocolate to satisfy a serious sweet tooth.
Freezing and Reheating Guidelines
To reheat a frozen brownie, let it thaw on the counter for 30 minutes, then pop it in the microwave for 10 seconds. You want it just barely warm so the butter softens but the brownie doesn't turn into a puddle.
If you prefer a crispy edge, put it in a toaster oven at 300°F (150°C) for 5 minutes.
| Method | Time | Result |
|---|---|---|
| Microwave | 10-15 seconds | Soft and gooey |
| Oven | 5 minutes | Crispy edges, warm center |
| Room Temp | 1 hour | Original fudgy texture |
Avoid reheating in the microwave for more than 20 seconds, as the sugar can become incredibly hot and actually burn the roof of your mouth before the rest of the brownie feels warm. Patience is key to maintaining that velvety interior we worked so hard to create.

Recipe FAQs
Can I substitute oil for the melted butter in this one bowl recipe?
No, this substitution will change the texture significantly. Butter provides specific milk solids and flavor that oil lacks; using oil results in a greasier, less rich texture.
How do I ensure the top of the brownie gets that shiny, crackly crust?
Vigorously whisk the eggs and sugar for at least 2 minutes. This process dissolves the sugar into the eggs, creating a stable meringue structure that sets into the classic shiny top layer.
How to tell when these brownies are perfectly baked and not overdone?
Insert a toothpick near the edge, not the center. If the toothpick comes out with moist, fudgy crumbs clinging to it (not wet batter), they are done. The carryover heat will finish the center during the resting period.
Is it true I must use Dutch process cocoa powder for the best flavor?
No, it is not strictly required, but highly recommended for color and depth. Dutch process cocoa is alkalized, which reduces acidity, resulting in a darker color and a smoother, less bitter chocolate flavor profile.
How to properly chill and cut the brownies for clean, non-sticky slices?
Allow the brownies to cool completely, then chill them in the refrigerator for at least 1 hour. Chilling solidifies the fat, allowing a sharp, hot knife to pass through cleanly, similar to achieving perfect slices with our Fudge Recipe.
Why do my brownies taste slightly sandy or gritty after cooling?
This usually means the sugar did not fully dissolve into the hot butter/egg mixture. If you enjoyed mastering the technique of fully dissolving solids here, remember that ensuring high heat when adding sugar is key to smooth texture.
Can I use this one bowl method to make a cakey style brownie instead of fudgy?
No, this specific ingredient ratio is designed strictly for a fudgy result. To achieve a cakey texture, you would need to increase the flour substantially and add a chemical leavener like baking powder.
One Bowl Brownie Recipe

Ingredients:
Instructions:
Nutrition Facts:
| Calories | 121 calories |
|---|---|
| Protein | 2.0 g |
| Fat | 7.1 g |
| Carbs | 14.8 g |
| Fiber | 1.3 g |
| Sugar | 9.4 g |
| Sodium | 52 mg |
