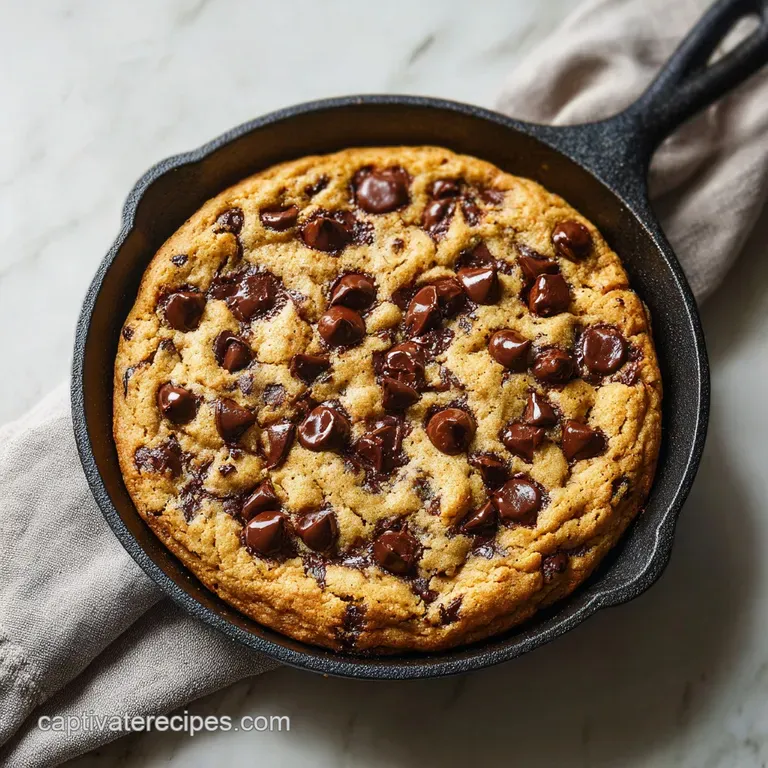
Cookie in a Frying Pan: Chewy and Golden
- Time: Active 10 minutes, Passive 15 minutes, Total 25 minutes
- Flavor/Texture Hook: Velvety browned butter base with a crispy, golden bottom and gooey molten center.
- Perfect for: Late night cravings, small households, or hot summer days when the oven is off limits.
- Making a Perfect Cookie in a Frying Pan
- Why This Method Actually Works
- Timings and Serving Sizes
- Components of a Reliable Cookie
- Tools for a Simple Bake
- Step by Step Stovetop Baking
- Troubleshooting Your Stovetop Treat
- Simple Swaps and Flavor Variations
- Keeping Your Cookie Fresh
- Perfect Pairings for Dessert
- Recipe FAQs
- 📝 Recipe Card
Making a Perfect Cookie in a Frying Pan
We have all been there. It is ten o'clock on a Tuesday, the craving for something sweet hits hard, but the thought of preheating a massive oven for one or two cookies feels like a chore. I remember my first attempt at a stovetop version.
I turned the heat too high, and within five minutes, the kitchen smelled like a campfire. The bottom was a blackened disc of carbon, while the top was still a literal puddle of raw flour and butter. It was a total mess, and honestly, I almost gave up on the whole idea of a pan baked dessert.
But the lure of a warm, chocolate filled treat was too strong. I realized the secret wasn't in the dough itself, but in how we manage the heat. This recipe is the result of those smoky kitchen disasters. It is designed for the tired home cook who wants a reliable, comforting result without the fuss.
We are going to use a simple 8 inch skillet to transform basic pantry staples into a giant, gooey masterpiece that is meant to be eaten with a spoon straight from the pan.
This version of a cookie in a frying pan actually works because we focus on low and slow heat. By browning the butter first, we add a deep, nutty complexity that balances the sweetness of the coconut sugar. It is the kind of recipe you'll memorize after making it once, and trust me, you will be making it often.
Whether you are cooking for a small family or just yourself, this one pan method is a game changer for your dessert routine.
Why This Method Actually Works
- Conductive Browning: Direct contact with the metal pan creates a focused heat source that toasts the flour and sugar, giving you a crust that shatters when you bite into it.
- Lid Trapped Steam: Covering the pan creates a pressurized heat pocket, which ensures the top of the dough sets perfectly without needing an overhead heating element.
- Fat Emulsification: Using only an egg yolk instead of a whole egg reduces the water content, preventing the cookie from becoming cakey or rubbery in the humid pan environment.
- Residual Heat Finishing: Letting the pan rest off the burner for five minutes allows the bottom to fully crisp up while the center remains soft and velvety.
Timings and Quick Decision Guide
| Method | Total Time | Crust Texture | Best For |
|---|---|---|---|
| Stovetop Skillet | 25 minutes | Ultra crispy bottom, soft top | Immediate cravings, no oven use |
| Traditional Oven | 35 minutes | Evenly crisp edges, dry top | Batch cooking for guests |
| Toaster Oven | 30 minutes | Slightly chewy, variable | Single servings in small spaces |
Selecting the right method depends on your tools and your patience. The stovetop approach is significantly faster than waiting for a full sized oven to reach temperature, and it keeps your kitchen cool.
If you are looking for that specific contrast between a scorched (but not burnt) sugary base and a molten chocolate interior, the frying pan is your best friend.
Timings and Serving Sizes
This recipe is scaled for an 8 inch skillet, which is the sweet spot for thickness and cook time. If you use a larger pan, the dough will spread too thin and likely burn before the center sets. If you use a smaller one, you will end up with a deep dish situation that stays raw in the middle for far too long.
| Servings | Ingredient Scale | Pan Size | Cook Time |
|---|---|---|---|
| 2 People | Use original recipe | 6 inch skillet | 12 minutes |
| 4 People | Use original recipe | 8 inch skillet | 15 minutes |
| 8 People | Double everything | 12 inch skillet | 20 minutes |
When scaling up, remember that the thickness of the dough dictates the cook time more than the total volume. In a 12 inch skillet, you have more surface area touching the heat, so you must be even more vigilant about keeping the burner on the lowest possible setting.
Components of a Reliable Cookie
| Component | Science Role | Pro Secret |
|---|---|---|
| Unsalted Butter | Provides fat and flavor | Brown it until it smells nutty to add a toffee like depth to the dough. |
| Coconut Sugar | Sweetener and moisture | This sugar has a lower melting point, helping the cookie get that "fudgy" texture faster. |
| Egg Yolk | Binding agent | Using only the yolk provides rich fats without the drying protein of the egg white. |
| Baking Soda | Leavening | It reacts with the acidity in the coconut sugar to create tiny air bubbles for a light crumb. |
Balancing Your Sugars
The choice of coconut sugar here is not just about being "healthy." It actually has a distinct, earthy flavor that mimics brown sugar but with a more intense caramelization profile.
Because it is slightly less refined, it interacts with the butter to create a dense, chewy structure that is less likely to collapse under the steam of the covered pan.
Essential Chocolate Mix ins
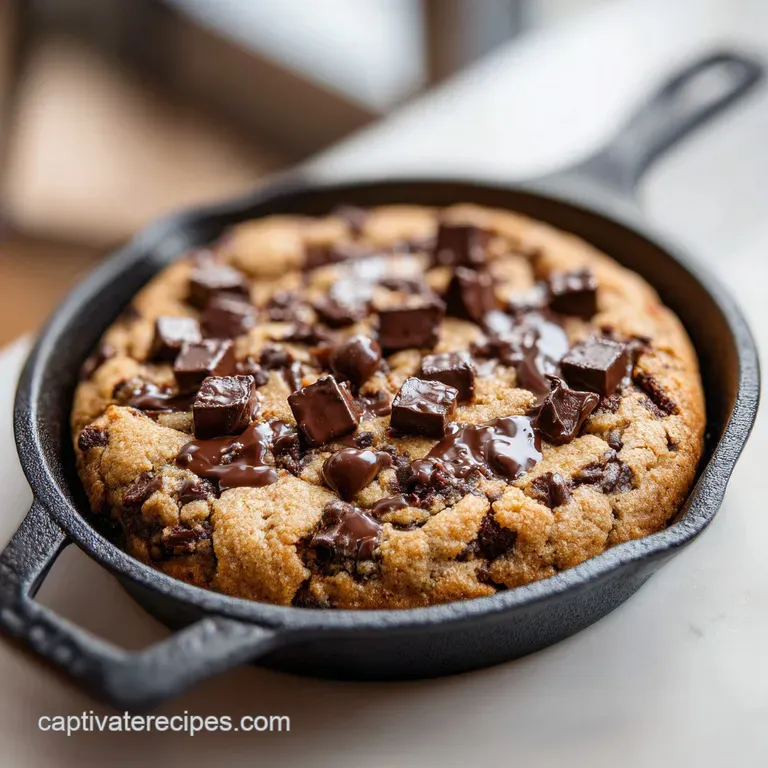
For the chocolate, I highly recommend dark chocolate chips with at least 70% cocoa. The bitterness of the dark chocolate cuts through the richness of the browned butter and the sweetness of the sugar. If you only have milk chocolate, add an extra pinch of sea salt to the dough to keep the flavors balanced.
Some people like to add nuts, but for this specific stovetop method, I find that plain chocolate allows the texture of the dough to shine.
Tools for a Simple Bake
You do not need a fancy kitchen to make a great cookie in a frying pan. The primary tool is, of course, the skillet. While cast iron is a popular choice because it holds heat so well, it can also be unforgiving if your burner runs hot.
If you are a beginner, a heavy bottomed stainless steel or even a good quality non stick pan will work beautifully.
Chef's Tip: If you are using cast iron, take the pan off the heat two minutes early. The heavy metal will continue to cook the dough even after the flame is out.
The second essential tool is a lid that fits tightly. If your skillet didn't come with a lid, you can use a large flat plate or even a piece of heavy duty aluminum foil crimped around the edges. The goal is to trap every bit of heat inside so the top of the cookie "bakes" through convection.
Without a lid, you will simply have a pancake with a burnt bottom.
step-by-step Stovetop Baking
- Place an 8 inch skillet over low heat. Add the 4 tbsp unsalted butter and melt until it begins to foam and develops a slightly nutty aroma. Note: This browning process adds a layer of flavor that makes the cookie taste like it came from a high end bakery.
- Remove the pan from the heat and let it cool for about 2 minutes so you do not scramble the egg.
- In the same skillet, stir in the 1/3 cup coconut sugar using a wooden spoon until well combined with the butter.
- Whisk in the 1 large egg yolk and 1 tsp vanilla bean paste until the mixture is smooth and glossy.
- Sift the 3/4 cup all purpose flour, 1/4 tsp baking soda, and a pinch of sea salt directly into the pan. Note: Sifting prevents flour clumps, which are harder to stir out in a shallow skillet.
- Fold the dry ingredients into the wet mixture using a spatula until a soft dough forms with no white streaks.
- Fold in the 1/2 cup dark chocolate chips and use the spatula to spread the dough evenly to the very edges of the pan.
- Cover the skillet with a tight fitting lid. This is the most important part!
- Return the pan to the stove over the lowest possible heat setting. Cook for 15 minutes until the edges are golden and the top looks matte and set.
- Remove from the heat, sprinkle with flaky sea salt, and let the cookie rest in the pan for 5 minutes. The bottom will crisp up significantly during this rest.
Troubleshooting Your Stovetop Treat
The most common issue people face with a cookie in a frying pan is heat management. Since every stove is different, "low" on my burner might be "medium low" on yours. You really have to listen to the pan. If you hear a loud, aggressive sizzle, your heat is too high. It should be a very gentle, quiet whisper of a cook.
The Charred Bottom Syndrome
If the bottom of your cookie is black before the top is even warm, your pan is too thin or your heat is too high. Thin pans hot spot easily, which means the heat isn't distributed evenly. You can try using a heat diffuser if your stove is particularly powerful.
Also, make sure you aren't skipping the browning butter step at the start, as that initial melt helps you gauge how fast your pan heats up.
| Problem | Root Cause | Solution |
|---|---|---|
| Burnt Bottom | Heat too high or pan too thin | Use a heat diffuser or lower the flame to the absolute minimum. |
| Raw, Doughy Top | Lid not tight enough | Ensure the lid creates a seal to trap steam, or use foil to cover gaps. |
| Greasy Texture | Butter was too hot when adding egg | Let the melted butter cool for 2-3 minutes before adding sugar and yolk. |
Fixing the Raw Center
Sometimes the edges look perfect, but the very middle feels like liquid batter. If this happens, don't keep it on the heat, as you'll surely burn the bottom. Instead, turn off the burner, keep the lid on, and let it sit for an extra 10 minutes. The residual heat trapped in the skillet will gently finish the center without adding more direct heat to the base. If you find this method too finicky for your specific stove, you might prefer the consistency of Mini Chocolate Chip Cookies which are baked in a standard oven.
Common Mistakes Checklist
- ✓ Never use a high flame; the lowest setting is your best friend for this recipe.
- ✓ Do not peek! Lifting the lid lets out the trapped heat needed to set the top.
- ✓ Use a room temperature egg yolk to prevent the butter from seizing up.
- ✓ Don't skip the 5 minute rest; it is essential for the structure of the cookie.
- ✓ Pat the dough down firmly so it has even contact with the bottom of the pan.
Simple Swaps and Flavor Variations
One of the best things about this recipe is how adaptable it is. If you don't have coconut sugar, you can use a mix of brown sugar and white sugar, though the texture will be slightly softer and more traditional.
For a gluten-free version, a 1:1 gluten-free baking flour usually works well, though it might take an extra 2 minutes to set because of the different starch structures.
Easy Dietary Adaptations
If you want to make this vegan, you can swap the butter for a high-quality vegan butter stick (not the tub kind, which has too much water). For the egg yolk, a tablespoon of unsweetened applesauce or a "flax egg" works, though the cookie will be much softer and might need to be eaten with a spoon rather than sliced.
| Original Ingredient | Substitute | Why It Works |
|---|---|---|
| All Purpose Flour | Oat Flour (3/4 cup) | Provides a nuttier flavor and a very soft, chewy crumb. |
| Coconut Sugar | Brown Sugar (packed) | Similar moisture content. Note: Will be slightly sweeter than the original. |
| Dark Chocolate Chips | Chopped Walnuts | Adds crunch and reduces the overall sugar content. |
If you are feeling adventurous, you can add a teaspoon of instant espresso powder to the butter while it's browning. This doesn't make the cookie taste like coffee; it just makes the chocolate flavor feel much more intense and "dark." It is a trick I learned from a professional baker friend and I never make chocolate desserts without it now.
Keeping Your Cookie Fresh
Since this is a small batch recipe, you likely won't have leftovers. But if you do, this cookie in a frying pan stores surprisingly well. Keep it in the pan (if you have a lid) or move it to an airtight container. It will stay soft and fudgy at room temperature for about 2 days.
Because of the high fat content from the egg yolk and browned butter, it doesn't dry out as fast as a standard cookie.
Storage and Zero Waste
- Fridge: You can store the baked cookie in the fridge for up to 5 days. It will become very firm, almost like a truffle texture, which some people actually prefer.
- Freezer: Wrap individual slices in parchment paper and then foil. They stay good for 2 months. You can even eat them frozen for a cold, chewy treat.
- Zero Waste: If you have a few crumbs left over or a piece that got a bit too crunchy, crumble it over vanilla ice cream or stir it into your morning yogurt. The browned butter flavor is too good to throw away!
To reheat, I suggest putting the slice back into a small skillet over very low heat for 2 minutes. This restores the crispness of the bottom without making the whole thing soggy like a microwave would.
If you are in a rush, a 15 second blast in the microwave will melt the chocolate, but you will lose that signature "shatter" of the crust.
Perfect Pairings for Dessert
This cookie is incredibly rich, so it needs something to cut through the fat. A cold glass of milk is the classic choice, but a scoop of tart raspberry sorbet or a dollop of unsweetened whipped cream is even better.
The contrast between the hot, molten cookie and a cold topping is what makes this feel like a restaurant quality dessert rather than just a quick snack.
If you are hosting a small dinner party, you could serve this as the final course after something light and savory, like French Baked Eggs on Toast. The transition from a sophisticated egg dish to a rustic, pan baked cookie shows a fun, relaxed side to your cooking.
Remember, the beauty of this dish is its imperfection. It is meant to look a bit craggy on top and have those slightly uneven edges. Don't worry about making it look like it came from a factory. The flavor of the browned butter and the gooey dark chocolate will do all the talking for you.
Grab a couple of spoons, call your favorite person over, and enjoy it while it's still warm enough to melt the salt crystals on top.

Recipe FAQs
Can I bake cookies in a frying pan?
Yes, stovetop baking is highly effective for single skillet desserts. By using a tight fitting lid and the lowest heat setting, you create a mini oven environment that perfectly sets the edges of the dough.
Are there cookies suitable for a diabetic diet?
No, this recipe is not formulated for diabetic dietary needs. It contains all-purpose flour and coconut sugar, which are not suitable for blood sugar management.
What are the most common skillet cookie mistakes?
Using heat that is too high is the biggest error. If you hear an aggressive sizzle, you are burning the bottom before the center cooks; keep the flame at the lowest setting for a gentle, whisper like cook.
Can I bake cookies directly on a pan?
Yes, but only if you use a heavy bottomed skillet and a tight fitting lid. The lid is essential to trap steam and heat, ensuring the top of the cookie cooks through while the base crisps up.
How to achieve the perfect crispy chewy texture?
Let the cookie rest for 5 minutes after removing it from the heat. This resting period allows the bottom crust to firm up and ensures the internal texture remains soft rather than raw. If you enjoy mastering these precise texture cues, the same logic applies to managing fat ratios in other drop style cookie recipes.
Why should I brown the butter first?
Browning the butter develops a deep, nutty aroma that mimics high end bakery flavors. Simply heat the butter until it foams and turns amber before adding your coconut sugar to start the base.
How to store leftovers?
Keep them in the fridge for up to 5 days or freeze slices for 2 months. Refrigeration changes the texture to a truffle like consistency, while frozen slices provide a refreshing, cold, and chewy dessert option.
Stovetop Skillet Cookie

Ingredients:
Instructions:
Nutrition Facts:
| Calories | 376 calories |
|---|---|
| Protein | 4.7g |
| Fat | 21.2g |
| Carbs | 44.5g |
| Fiber | 2.3g |
| Sugar | 22.1g |
| Sodium | 156mg |
