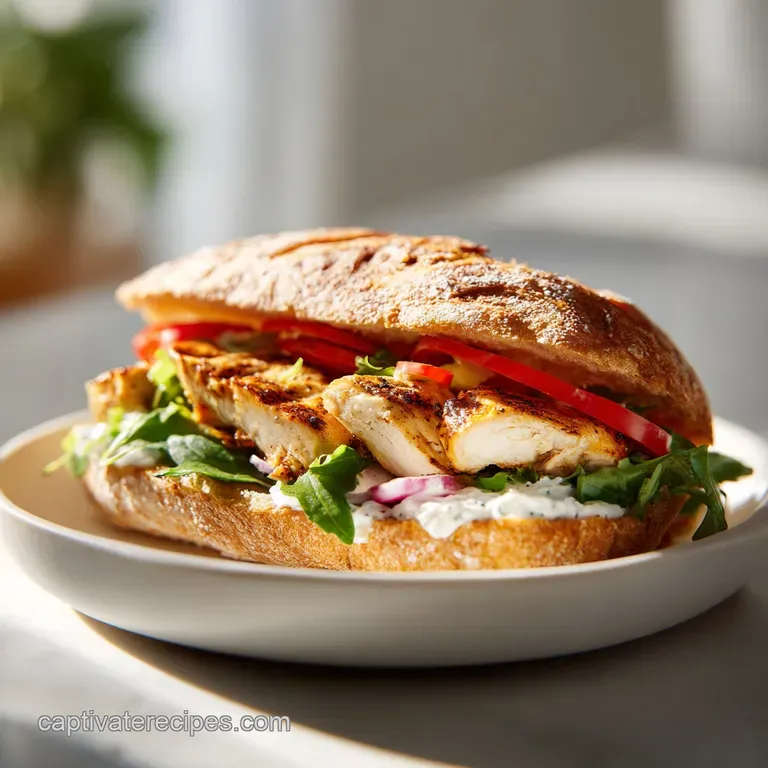
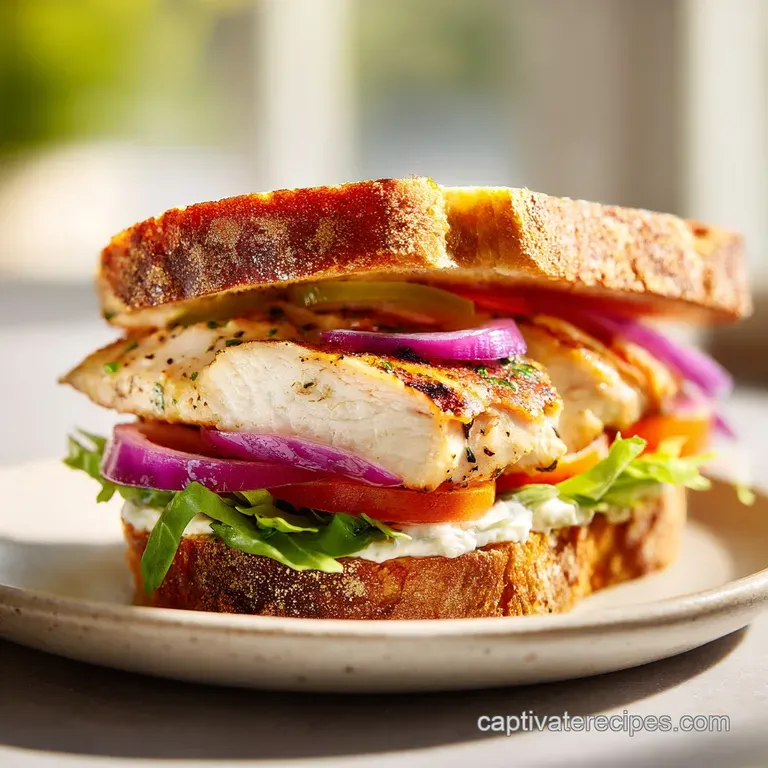
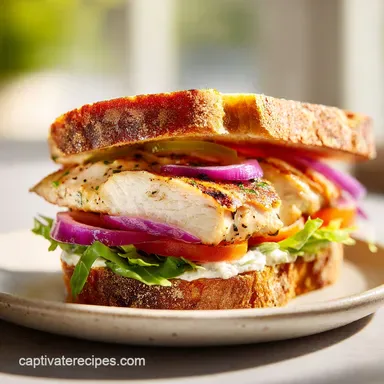
Grilled Chicken Sandwich: Juicy and Charred
- Time: Active 10 minutes, Passive 10 minutes, Total 20 minutes
- Flavor/Texture Hook: Smoky, charred exterior with a velvety, melt in-your mouth interior
- Perfect for: A reliable weeknight dinner that feels like a weekend treat
- Crafting the Ultimate Grilled Chicken Sandwich at Home
- Why This Flavor Combo Just Works
- Ingredient Deep Dive and Analysis
- Elements of a Better Build
- Tools for a Reliable Result
- Guided Steps for Better Grilling
- Fixing Common Backyard Grilling Flubs
- Swaps for Your Pantry Staples
- Keeping Your Leftovers Fresh Longer
- Side Dishes for a Full Meal
- The Truth About Grilling Myths
- Very High in Sodium
- Recipe FAQs
- 📝 Recipe Card
Crafting the Ultimate Grilled Chicken Sandwich at Home
If you have ever bitten into a sandwich only to have the chicken slide out like a wet bar of soap or, worse, feel like you are chewing on a rubber eraser, I feel your pain. For a long time, I thought the problem was my grill or the quality of the bird.
It turns out the real hero of a reliable Grilled Chicken Sandwich isn't just the fire; it is the Dijon mustard. This might sound specific, but that yellow brown jar in your fridge door is the secret to everything.
It acts as a bridge between the lemon juice and the oil, creating a thick, sticky coating that clings to the meat instead of just dripping into the flames.
I remember one Tuesday night after a long shift when I was too tired to even think about a complicated dinner. I just threw some chicken on the grates without prepping it. It was a disaster, dry as a bone and totally bland.
That was the night I realized that "easy" doesn't have to mean "lazy." We need those ten minutes of prep to make the magic happen. When you whisk that mustard with the honey and garlic, you aren't just making a sauce; you are creating a protective layer that keeps the juices where they belong.
This Grilled Chicken Sandwich is going to change how you look at "healthy" meals. We are going for big flavors, a bit of smoky paprika, and a basil pesto mayo that makes the whole thing feel expensive. You don't need fancy equipment, just a heavy pan or a mallet to get that chicken flat.
Once you see how much faster it cooks and how much better it tastes when it's all one thickness, you will never go back to those bulky, uneven breasts again.
Why This Flavor Combo Just Works
Before we get our hands messy, we should talk about what is actually happening in that bowl and on the grill. Understanding the "why" makes you a more reliable cook because you can spot when something is going right.
- Mechanical Tenderization: When we pound the chicken to an even 1/2 inch, we break down tough muscle fibers. This ensures the heat travels through the meat at a consistent speed, preventing the outside from overcooking while the middle is still finishing.
- The Acid Mustard Emulsion: Lemon juice softens the exterior proteins, while the Dijon mustard acts as a binder. This keeps the fat (olive oil) and water based juices from separating, ensuring the meat stays hydrated during the 400°F sear.
- Surface Area Sugars: The small amount of honey in the marinade isn't there to make it sweet. Instead, it interacts with the heat to create a quick char. This gives us that dark, smoky crust in just 4 or 5 minutes.
- Aromatic Infusion: Garlic and smoked paprika are oil soluble. By mixing them with olive oil first, we carry those flavors deep into the nooks and crannies of the meat, rather than just having them sit on the surface.
| Thickness | Internal Temp | Rest Time | Visual Cue |
|---|---|---|---|
| 1/2 inch | 160°F (71°C) | 3 minutes | No pink, clear juices |
| 1/4 inch | 160°F (71°C) | 2 minutes | Opaque throughout |
| 3/4 inch | 160°F (71°C) | 5 minutes | Firm to the touch |
You can see from the table above that getting the thickness right is the most important part of the timing. If you leave the breast at its natural shape, the thin tail will be leather by the time the fat center hits a safe temperature. Pounding it out is the most reliable way to get a juicy result every single time.
Ingredient Deep Dive and Analysis
Selecting the right components for your Grilled Chicken Sandwich is the difference between a sad lunch and a meal you will actually crave. Here is the breakdown of why we use these specific items.
| Ingredient | Science Role | Pro Secret |
|---|---|---|
| Dijon Mustard | Emulsifier | Use "extra strong" for a bolder tang that cuts through the mayo |
| Brioche Buns | Structural Fat | Toast them until the edges are dark to prevent the pesto from soaking in |
| Smoked Paprika | Flavor Catalyst | Buy "Pimentón de la Vera" for a truly authentic, deep wood smoke aroma |
| Provolone Cheese | Moisture Barrier | Place it on the chicken 60 seconds before pulling to create a seal |
We need to be intentional about how we layer these textures. The arugula adds a peppery crunch that contrasts with the soft, buttery bun, while the red onion provides a sharp bite that wakes up the palate.
Elements of a Better Build
To get started, gather your supplies. We aren't doing anything fancy here, just solid ingredients that work hard.
- Chicken Breasts: 4 pieces (150g/5oz each). Why this? They provide the lean protein base that absorbs the marinade perfectly.
- Extra Virgin Olive Oil: 30ml. Why this? It carries flavor and prevents the chicken from sticking to the grates.
- Lemon Juice: 15ml. Why this? The acid brightens the flavor and starts the tenderizing process.
- Dijon Mustard: 10g. Why this? It binds the marinade and adds a sophisticated, sharp kick.
- Honey: 5g. Why this? A tiny amount aids in caramelization for those beautiful grill marks.
- Garlic: 3 cloves, minced. Why this? Fresh garlic is non negotiable for that savory, pungent aroma.
- Spices: 5g smoked paprika, 5g kosher salt, 2g cracked black pepper.
- The Sandwich Parts: 4 brioche buns, 60ml mayo, 15ml basil pesto, 4 slices provolone or havarti.
- Fresh Toppings: 1 beefsteak tomato, 50g arugula, 0.5 red onion.
If you find yourself missing an ingredient, don't panic. You can swap a few things out without ruining the meal, though the texture might shift slightly.
| Original Ingredient | Substitute | Why It Works |
|---|---|---|
| Brioche Buns | Ciabatta Rolls | High hydration makes them chewy. Note: Much crunchier than brioche |
| Provolone | Pepper Jack | Similar melting point. Note: Adds a significant spicy heat |
| Arugula | Baby Spinach | Leafy and green. Note: Lacks the peppery bite of arugula |
When choosing your bread, think about the "smush factor." A brioche bun is soft and gives way easily, making the sandwich easy to eat. A ciabatta or baguette will require more jaw work but holds up better if you are adding lots of extra wet toppings like pickles or extra sauce.
Tools for a Reliable Result
You don't need a professional kitchen, but a few specific tools will make this much easier.
- Meat Mallet: This is essential for the flattening process. If you don't have one, a heavy cast iron skillet or even a rolling pin will work in a pinch.
- Outdoor Grill or Grill Pan: You want high, direct heat to get that char.
- Instant Read Thermometer: This is the only way to be 100% sure your chicken is safe and juicy.
- Mixing Bowl: Large enough to toss the chicken comfortably.
- Plastic Wrap: To keep the kitchen clean while you are pounding the meat.
Guided Steps for Better Grilling
Follow these steps exactly to ensure your Chicken Sandwich turns out as good as it looks in the photos. We are aiming for a total cook time of about 10 minutes.
- Flatten the meat. Place your 4 chicken breasts between two sheets of plastic wrap. Using the flat side of a meat mallet, pound the thickest part of the breast until the entire piece is an even 1/2 inch thickness. Note: This prevents the thin part from drying out before the thick part is done.
- Whisk the marinade. In a large bowl, combine 30ml olive oil, 15ml lemon juice, 10g Dijon mustard, 5g honey, 3 minced garlic cloves, and your spices (paprika, salt, pepper).
- Coat the chicken. Toss the flattened chicken in the mixture. Ensure every inch is covered. Let it sit at room temperature for 10 minutes. Note: Do not go longer than 30 minutes or the acid will turn the meat mushy.
- Heat the grill. Preheat your grill to medium high (400°F). Scrub the grates clean and wipe them with an oiled paper towel.
- Start the sear. Place the chicken on the hot grates. Let it sit undisturbed for 4 minutes. Wait until you see the edges turn opaque and white.
- The flip and melt. Flip the chicken. Immediately place a slice of provolone or havarti on each breast. Cook for another 4 minutes.
- Check the temp. Remove the chicken when the internal temperature hits 160°F (71°C). Note: Carryover cooking will bring it to the safe 165°F while it rests.
- Toast the buns. Place the split brioche buns face down on the grill for 30 to 60 seconds until the edges are golden and crispy.
- Prepare the spread. Mix 60ml mayonnaise with 15ml basil pesto in a small ramekin. Spread this generously on both sides of the toasted buns.
- Build the sandwich. Layer the bottom bun with 50g arugula, a thick slice of beefsteak tomato, the grilled chicken, and thinly shaved red onions. Close it up and serve immediately.
Fixing Common Backyard Grilling Flubs
Even the best of us run into trouble sometimes. Most issues with a Grilled Chicken Sandwich come down to heat management or prep.
The Chicken is Rubbery or Tough
This usually happens for two reasons: either the chicken wasn't pounded to an even thickness, or it was overcooked. If one side of the breast is an inch thick and the other is a quarter inch, the thin side will be rubber by the time the center is safe to eat.
Also, if you wait until 165°F to pull it off the grill, it will likely hit 170°F or higher while resting, which dries out lean breast meat.
Chicken Sticking to the Grates
If you try to flip the chicken and it feels glued to the grill, stop. This is the meat's way of telling you it isn't ready. When the proteins have seared properly, they will naturally "release" from the metal. Also, make sure your grates are hot before adding the meat.
Putting cold meat on a cold grill is a recipe for a sticky mess.
| Problem | Root Cause | Solution |
|---|---|---|
| Dry Meat | Overcooking | Pull meat at 160°F and let rest for 3 mins |
| No Char | Grill temp too low | Ensure grill reaches 400°F before starting |
| Bland Flavor | Too little salt | Use 5g kosher salt as measured; it's vital for sear |
Common Mistakes Checklist
- ✓ Always pat the chicken dry before adding the marinade if you want a better sear.
- ✓ Do not skip the resting period; 3 minutes allows the juices to redistribute.
- ✓ Avoid using "extra virgin" olive oil for the grates; use a high smoke point oil like canola for the actual grill bars.
- ✓ Slice the red onions as thin as possible (paper thin) so they don't overpower the delicate pesto.
- ✓ Toast the buns last so they stay warm and crispy when the chicken is ready.
Swaps for Your Pantry Staples
If you want to change things up, this recipe is very forgiving. You can take this basic Chicken Sandwich and move it in several different directions depending on what you have in the fridge.
If you are in a rush and want something similar but with more fat and flavor, these garlic herb chicken thighs are a reliable alternative that handle the heat of the grill even better than breasts. Thighs are much harder to overcook, making them a great choice for beginners who might be nervous about dry meat.
| Fresh Approach | Shortcut Version | Flavor Impact |
|---|---|---|
| Fresh Minced Garlic | Garlic Powder (1 tsp) | Less pungent, more uniform savory note |
| Fresh Lemon Juice | Apple Cider Vinegar | More "bite" and tang, less citrus aroma |
| Homemade Pesto | store-bought Pesto | Saltier and more oil heavy; still works well |
For those who crave a bit of heat, looking at my spicy Thai peanut chicken might give you some ideas for a fusion twist. You could easily swap the pesto for a spicy peanut sauce and use pickled carrots instead of tomatoes.
3 Global Flavor Variations
- The Southwest: Swap the pesto for mashed avocado and use pepper jack cheese. Add a few pickled jalapeños for a spicy kick.
- The Mediterranean: Use feta cheese crumbles instead of provolone and add roasted red peppers to the assembly.
- The Buffalo: Toss the grilled chicken in buffalo sauce right before putting it on the bun, and use blue cheese dressing instead of the pesto mayo.
Keeping Your Leftovers Fresh Longer
A Grilled Chicken Sandwich is best eaten fresh, but the components store quite well. I often make extra chicken just to have for salads later in the week.
Storage: Store the grilled chicken in an airtight container in the fridge for up to 3 days. Keep the buns, veggies, and sauce in separate containers. If you store them assembled, the tomato and arugula will turn the bun into a soggy sponge within a few hours.
Freezing: You can freeze the marinated (uncoated) chicken or the cooked chicken. To freeze cooked chicken, wrap each breast tightly in plastic wrap and then place them in a freezer bag. They will stay good for up to 2 months. Thaw in the fridge overnight before reheating.
Reheating: To keep the chicken from getting rubbery, avoid the microwave if possible. Instead, wrap the chicken in foil with a tiny splash of water or chicken broth and heat it in a 350°F (180°C) oven for about 10 minutes.
This "steams" the meat slightly, keeping it moist.
Zero Waste Tip: Don't throw away those red onion scraps or the ends of the tomato. Chop them up and toss them into a quick omelet the next morning. If you have leftover pesto mayo, it makes a fantastic dip for roasted potatoes or a spread for a turkey wrap the next day.
Side Dishes for a Full Meal
While this Grilled Chicken Sandwich is a star on its own, it plays very well with others. Since the grill is already hot, you might as well use it for your sides too.
- Grilled Corn: Brush some corn with a little butter and lime juice while the chicken rests. The char on the kernels matches the sandwich perfectly.
- Sweet Potato Fries: The sweetness of the fries balances the salt and vinegar of the marinade.
- Simple Green Salad: Since we already have arugula, a bigger salad with a light vinaigrette helps cut through the richness of the pesto mayo.
- Potato Chips: Honestly, sometimes a handful of kettle cooked sea salt chips is the only crunch you need.
The Truth About Grilling Myths
There are a lot of old wives' tales about grilling chicken that actually make your food worse. Let's clear a few up so you can cook with confidence.
Myth: You should wash your chicken before marinating it. Actually, washing chicken just splashes bacteria around your sink and counters. The heat of the 400°F grill will kill anything on the surface much more effectively than tap water ever could.
Just pat it dry with a paper towel to help the oil stick.
Myth: Searing meat "locks in" the juices. Searing creates a crust (the Maillard reaction) which adds incredible flavor, but it doesn't create a waterproof seal. Juiciness is actually a result of temperature control. If you overcook the chicken, it will be dry, no matter how good your sear is.
This is why that instant read thermometer is your best friend.
Myth: You need to marinate chicken overnight for the best flavor. Because chicken breasts are relatively thin (especially once pounded), a long soak in an acidic marinade can actually start "cooking" the meat, making the texture mealy or mushy.
10 to 20 minutes is plenty of time for the surface flavors to take hold and for the salt to start working its way into the fibers.
Decision Shortcut If you want a crispier texture, use a ciabatta roll and press the sandwich in a panini press for 2 minutes after assembly.
If you want a lighter meal, ditch the bun and serve the chicken over a massive bed of the arugula and tomato with a drizzle of balsamic glaze. If you want a faster prep, skip the marinade sit time and just use a dry rub of salt, pepper, and garlic powder, then brush with the pesto mayo while grilling.

Very High in Sodium
1140 mg 1140 mg (50% 50%)
The American Heart Association recommends limiting sodium intake to no more than 2,300mg per day, with an ideal limit of under 1,500mg for most adults.
Tips to Reduce Sodium
-
Eliminate Kosher Salt-25%
Completely remove the 5g of kosher salt from the recipe. This is the single largest source of added sodium. Flavor will come from other ingredients.
-
Choose Lower Sodium Cheese-15%
Opt for provolone or havarti cheese varieties labeled as 'low sodium' or 'reduced sodium'. If unavailable, use a slightly smaller portion.
-
Use Low-Sodium Dijon Mustard-10%
Replace the 10g of standard Dijon mustard with a 'low sodium' or 'reduced sodium' version. Check the label for the sodium content.
-
Boost Flavor with Herbs and Spices
Increase the use of garlic, smoked paprika, and cracked black pepper. Consider adding fresh herbs like parsley or chives to further enhance flavor without sodium.
-
Rinse Red Onion-2%
While not a major source, thinly shaving the red onion and then briefly rinsing it under cold water can help remove some surface sodium if it was processed.
Recipe FAQs
What is good to put on a grilled chicken sandwich?
Use a combination of pesto mayonnaise, provolone or havarti cheese, arugula, tomato, and shaved red onion. These ingredients provide a balance of creamy, peppery, and acidic notes that complement the smoky flavor of the chicken.
How to cook chicken to avoid acid reflux?
Use lean chicken breasts and minimize heavy or acidic toppings. Grilling is an excellent method as it requires minimal added fat, and keeping your portion size to 150g helps maintain comfortable digestion.
What fast food chain has the healthiest chicken?
No specific fast food chain matches the quality of a homemade sandwich. By grilling your own chicken at home, you control the ingredients and avoid hidden additives, ensuring a meal that is significantly fresher and more nutritious.
How long does it take to grill a chicken sandwich?
Plan for 20 minutes total from start to finish. This includes 10 minutes of prep time and 10 minutes of active grilling to ensure the chicken reaches an internal temperature of 160°F.
Is it necessary to pound the chicken to an even thickness?
Yes, this is essential for even cooking. Pounding the meat to a uniform 1/2 inch thickness prevents the thin edges from drying out before the center is cooked through, a technique of consistency that ensures a juicy result every time.
Should I rest the chicken before assembling the sandwich?
Yes, always rest the meat for 3 minutes after grilling. This short waiting period allows the internal juices to redistribute throughout the breast, keeping the sandwich moist rather than soggy.
How to ensure the grill marks are clean and distinct?
Preheat the grill to 400°F and avoid moving the meat until it releases naturally. Cook for 4-5 minutes per side without lifting or sliding the chicken, which allows the searing process to create perfect grill marks.
Grilled Chicken Sandwich
Ingredients:
Instructions:
Nutrition Facts:
| Calories | 672 kcal |
|---|---|
| Protein | 45.1 g |
| Fat | 38.2 g |
| Carbs | 36.4 g |
| Fiber | 2.1 g |
| Sugar | 6.8 g |
| Sodium | 1140 mg |
