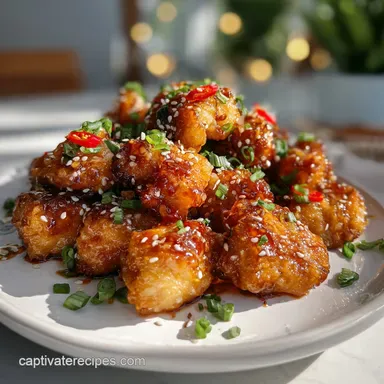
Mochiko Chicken Bites with Soy and Ginger

- Time: 15 min active + 20 min cooking + 4 hrs chilling
- Flavor & Texture: Savory-sweet with a chewy crisp crust
- Perfect for: Party appetizers or a reliable family dinner
Mochiko Chicken Bites
That first bite is all about the sound. It's a sharp, audible crack that gives way to juicy chicken. Unlike standard fried chicken, the crust here isn't bready or thick, but rather a thin, mahogany colored shell.
The magic comes from the Mochiko flour. It's glutinous rice flour, which behaves differently than wheat. It creates a translucent, slightly elastic coating that browns deeply without becoming doughy.
You can expect a salty, ginger forward flavor with a hint of sweetness from the honey. These Mochiko Chicken Bites are great because they use simple tools and basic ingredients to get a result that feels professional.
Why the Texture Works
- Rice Flour Choice: Glutinous rice flour lacks the gluten found in wheat, so it doesn't get bready. Instead, it forms a tight, crisp seal.
- Thigh Meat: I prefer thighs because the extra fat prevents the meat from drying out at 350°F.
- The Long Chill: Resting the chicken for 4 hours lets the starch hydrate and the salt penetrate deep into the muscle fibers.
The difference between this and a standard batter is huge. Wheat flour absorbs more oil and puffs up, while rice flour stays lean and crisp.
| Batter Type | Texture | Crust Feel | Best Use |
|---|---|---|---|
| Standard Wheat | Bready/Puffy | Thick and soft | Southern-style fried chicken |
| Mochiko Rice | Chewy Crisp | Thin and shattering | Asian-style bites/appetizers |
The Essential Ingredients
Ingredient Deep Dive
| Ingredient | Role | If You Don't Have It |
|---|---|---|
| Mochiko Flour | Creates the crisp shell | 1:1 mix of cornstarch and rice flour (approx) |
| Honey | Browning and sweetness | Maple syrup or brown rice syrup |
| Egg | Binds batter to meat | 1 tbsp cornstarch slurry (will be less sticky) |
| Soy Sauce | Umami and salt | Tamari or coconut aminos |
Full List
- 1.5 lb (680 g) boneless, skinless chicken thighs, cut into 1 inch cubes
- 0.5 cup (60 g) Mochiko flour (glutinous rice flour) Why this? Provides the signature chewy crisp texture.
- 0.25 cup (60 ml) low-sodium soy sauce
- 2 tbsp (30 ml) honey Why this? Helps the crust brown to a deep mahogany.
- 1 tbsp (15 g) grated fresh ginger
- 3 cloves garlic, minced
- 1 large egg, beaten
- 0.5 tsp (3 g) black pepper
- 0.5 tsp (3 g) salt
- 1 cup (240 ml) neutral oil (avocado or grapeseed)
Tools You'll Need
No specialized equipment is required here. A big mixing bowl and a wok or heavy-bottomed skillet are ideal. Be sure to use a wire rack, since resting fried chicken on paper towels typically leads to a soggy bottom. An instant-read thermometer is also helpful for monitoring the temperatures of both the oil and the meat.
How to Cook Them
Creating the Flavor Base
Combine the soy sauce, honey, grated ginger, minced garlic, and black pepper in a large bowl, whisking well. Beat in the egg until the consistency is smooth.
Coating the Chicken
Add the chicken cubes and toss until thoroughly coated. Gradually fold in the Mochiko flour, stirring until a thick, velvety paste adheres to the chicken. Note: If you see clumps, whisk the flour in smaller increments.
The Marinating Stage
Cover the bowl and refrigerate for at least 4 hours, or overnight. This allows the batter to set and the flavors to fully develop.
Achieving a Golden Crunch
Bring the oil in your pan to 350°F (175°C). Fry the Mochiko Chicken Bites in batches, leaving enough space between each piece. Cook for 3-4 minutes per side until deep mahogany brown and the internal temperature hits 165°F (74°C).
Wait for the oil to return to 350°F (175°C) between batches so the heat remains constant.
Draining for Crispness
Lift the bites from the oil and place them immediately on a wire rack set over paper towels. This encourages air circulation and keeps them crispy.
Fixing Common Issues

Preventing Batter Clumps
If your batter looks lumpy, you likely added the flour too fast. To fix this, whisk a small amount of the marinade into the flour separately to make a smooth slurry, then fold that back into the main bowl.
Avoiding Greasy Bites
Greasy chicken happens when the oil temperature drops too low. This usually occurs if the pan is overcrowded. Fry in smaller batches and always verify the oil is back at 350°F (175°C) before adding the next round.
Stopping the Garlic from Burning
Since this is a fry rather than a sauté, the garlic is protected by the batter. However, if the oil exceeds 375°F, the exterior will burn before the inside is safe. Keep a steady medium-high heat.
Scaling the Batch
Adjust the ingredient amounts based on how many people you are serving. Because the pieces are small, the cooking duration stays the same regardless of the volume, as long as you don't overfill the pan.
For a half batch (2 servings):
- 0.75 lb chicken
- 0.25 cup Mochiko flour
- 2 tbsp soy sauce
- 1 tbsp honey
- 0.5 tbsp ginger
- 1-2 garlic cloves
- 25 g beaten egg (whisk one egg and measure by weight)
- 0.25 tsp pepper and salt
For a double batch (8 servings):
- 3 lb chicken
- 1 cup Mochiko flour
- 0.5 cup soy sauce
- 4 tbsp honey
- 2 tbsp ginger
- 6 garlic cloves
- 2 large eggs
- 1 tsp pepper and salt
Storage and Leftovers
Keep any remaining bites in an airtight dish in the refrigerator for 3 days maximum.
When warming them up, skip the microwave to prevent the rice flour crust from becoming chewy. Instead, pop them in a toaster oven or an air fryer at 375°F (190°C) for 3-5 minutes to restore that signature shatteringly crisp shell.
Freezing is not recommended for these. Freezer moisture degrades the starch structure, meaning they won't have their usual crunch after thawing.
Easy Flavor Twists
Sriracha Glaze
Whisk 2 tbsp sriracha, 1 tbsp honey, and a splash of soy sauce. Toss the hot chicken in this mixture right after frying for a spicy kick.
Toasted Sesame Twist
Add 1 tsp of toasted sesame oil to the marinade and garnish with toasted sesame seeds. It adds a nutty depth that pairs well with the ginger.
The Air Fryer Method
For a lower oil version, spray the bites generously with oil. Air fry at 400°F (200°C) for 10-12 minutes, shaking the basket halfway through. Note that they won't be quite as mahogany dark as the pan-fried version.
If you're planning a larger spread, these go great alongside some Quick Pizza Dough Flatbread served with a dipping sauce.
Best Side Pairings
I suggest serving these atop steamed jasmine rice to catch every drop of the flavorful juices. A side of cabbage slaw or quick-pickled cucumbers offers a zesty, acidic balance to the richness of the fried breading. For a quick dip, stir together sriracha, lime, and a bit of mayonnaise.
High in Sodium
975 mg of sodium per serving (42% DV)
To support cardiovascular wellness, the American Heart Association suggests a maximum daily sodium intake of 2,300 mg for most adults.
Tips to Reduce Sodium
-
Swap Soy Sauce
Use coconut aminos instead of low-sodium soy sauce for a savory taste with naturally less sodium.
-
Omit Added Salt
Skip the 0.5 tsp of salt entirely, as the soy sauce provides plenty of saltiness on its own.
-
Amplify Aromatics
Double the amount of minced garlic and fresh ginger to build a stronger flavor profile that requires less salt.
-
Add a Touch of Acid
Incorporate a splash of rice vinegar or a bit of lime juice to brighten the dish and simulate the palate-stimulating effect of salt.
-
Use Bold Spices
Boost the black pepper or incorporate toasted sesame seeds and red pepper flakes for added depth and heat.
Recipe FAQs
How to make Mochiko chicken bites?
Whisk the sauce ingredients, beat in the egg, coat the chicken, and fold in the flour.
Tip: Stir the flour in small increments to prevent clumps.
What is Mochiko flour?
This is a glutinous rice flour that provides a characteristic chewy texture.
Tip: Ensure you use glutinous rice flour rather than standard rice flour for the correct bite.
Why does the batter require 4 hours of chilling?
Refrigeration allows the flour to hydrate and the flavors to penetrate the meat.
Tip: Leave the bowl covered to prevent the surface from drying out.
Which method is best for reheating leftovers?
Heat them in an air fryer at 375°F (190°C) for 3-5 minutes.
Tip: Avoid the microwave to prevent the crust from becoming rubbery.
Can these bites be frozen?
No, freezer moisture breaks down the starch and ruins the crunch.
Tip: Consume them within three days for peak crispness.
What oil is recommended for this recipe?
Use a neutral oil such as avocado or grapeseed.
Tip: Maintain the oil at 350°F (175°C) for a deep mahogany brown finish.
Do I need to fry the chicken in batches?
Fry in small groups to keep the oil temperature steady and avoid crowding.
Tip: Wait for the oil to return to 350°F (175°C) between each batch.
Where should leftover chicken be stored?
Keep the cooked bites in a container in the refrigerator.
Tip: Use a wire rack for draining immediately after frying to maintain the exterior texture.
Mochiko Chicken Bites for 4 Servings