Best Moist Vanilla Cupcakes from Scratch
- Time: Active 20 mins, Passive 22 mins, Total 42 mins
- Flavor/Texture Hook: Velvety crumb with intense vanilla bean aroma
- Perfect for: Birthday celebrations or high end afternoon tea
- Baking the Best Moist Vanilla Cupcakes from Scratch
- Finding Joy in Vanilla Crumbs
- The Science of Velvet Crumbs
- Perfect Batch Sizing and Timing
- Essential Elements for Success
- Kitchen Tools for Joyful Baking
- The Path to Fluffy Perfection
- Fixing Common Baking Errors
- Adding Creative Flavor Twists
- Perfect Batch Scaling Guidelines
- Storing Your Sweet Creations
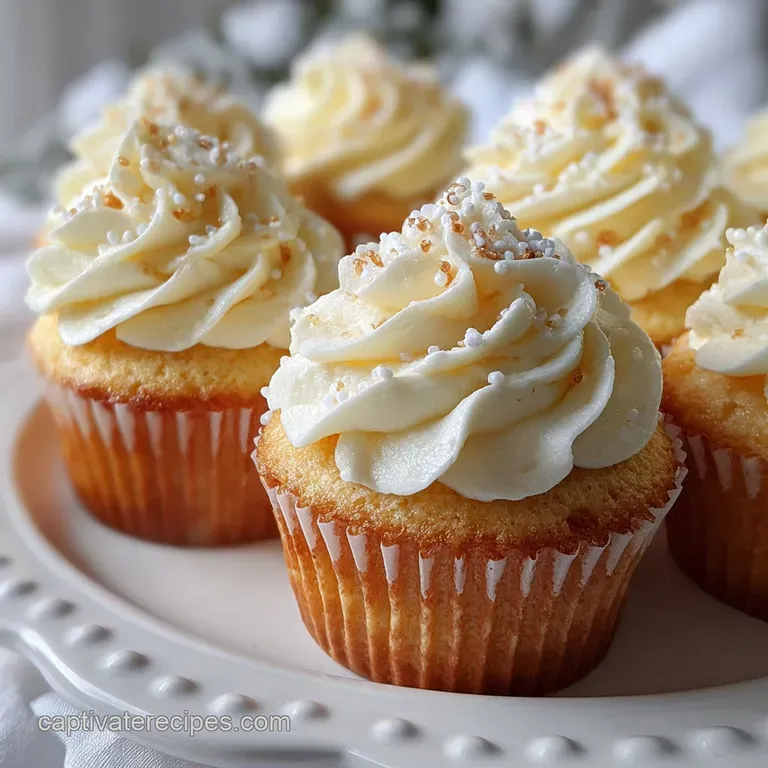
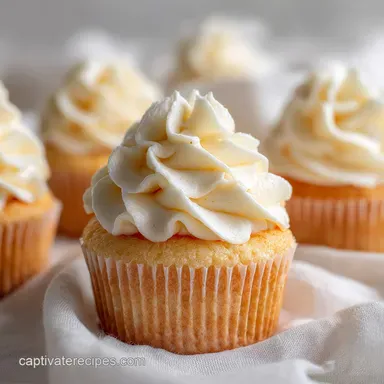
- How to Style and Serve
- Recipe FAQs
- 📝 Recipe Card
Baking the Best Moist Vanilla Cupcakes from Scratch
Imagine walking into a high end patisserie where the air is thick with the scent of warm sugar and expensive vanilla beans. That specific, comforting aroma is exactly what fills my kitchen every time I pull these beauties out of the oven.
For years, I struggled with "vanilla bricks" those dry, uninspired cakes that needed a gallon of milk just to swallow. I realized I was treating vanilla like a secondary flavor, when it should be the showstopper.
The first time I nailed this recipe, the texture was so velvety it practically melted. There's a specific joy in peeling back a pleated paper liner to find a golden, springy cake that doesn't crumble into a mess. I remember sharing a batch with my neighbor, who is a notorious "frosting only" person.
She actually ate the cake first and forgot the buttercream. That’s when I knew this was the one. We’re moving past basic baking and into the realm of artisanal treats that feel like a warm hug.
We've all been there staring at a recipe that promises the world but delivers a muffin like texture. This isn't that. We are chasing a delicate, tight crumb that feels luxurious on the tongue. By using a specific blend of fats and a unique mixing method, we ensure every single bite is as plush as the last.
It's about precision, but also about the pleasure of creating something beautiful from the most humble pantry staples.
Finding Joy in Vanilla Crumbs
The magic happens when we rethink how we combine ingredients. Most people cream butter and sugar until fluffy, but we are going to do things a bit differently to protect that tender texture. It's a small change that makes a massive impact on the final result.
Fat Coated Gluten: Mixing butter into the flour first coats the proteins, which physically limits how much gluten can form when we add liquids.
Acidity Balance: Using sour cream provides thickness and acid that reacts with the baking soda for a gentle, even rise.
Emulsion Stability: Combining oil and butter gives us the flavor of dairy with the lasting moisture that only liquid fats can provide.
Temperature Precision: Room temperature ingredients allow for a seamless emulsion, preventing the batter from breaking or curdling during the final mix.
| Method | Bake Time | Texture Result | Best Use |
|---|---|---|---|
| Standard Oven | 22 minutes | Soft, flat tops | Classic frosting swirls |
| Convection | 18 minutes | Higher domes, crisp edges | Unfrosted snacking cakes |
| Air Fryer | 15 minutes | Dense, very moist | Small batch cravings |
The choice of method really depends on your final goal. While a standard oven is the gold standard for that perfectly level surface that bakers love for decorating, convection can give you a slightly more "shatter crisp" edge on the very top of the dome.
If you’re looking for a quick fix, the air fryer works surprisingly well for 4-6 cakes at a time, though they tend to be a bit more compact.
The Science of Velvet Crumbs
Understanding why we use specific components helps take the guesswork out of the oven. Every gram of flour and every drop of vanilla has a job to do in creating that iconic "scratch made" profile.
| Component | Science Role | Pro Secret |
|---|---|---|
| Cake Flour | Low protein (8%) ensures a weak gluten structure | Sift it twice to aerate and prevent heavy clumps |
| Sour Cream | Fat and acid tenderize the crumb | Use full fat for the most velvety mouthfeel |
| Vanilla Bean Paste | Concentrated flavor and visual flecks | Add it to the fat, not the flour, to carry flavor |
The Hybrid Fat Strategy
I used to be a butter purist until I realized why bakery cakes stayed moist longer than mine. Butter provides incredible flavor, but it's solid at room temperature, which can make a cake feel firm. By swapping just 2 tablespoons of that butter for neutral vegetable oil, we introduce a fat that stays liquid.
This ensures that even after a day on the counter, your cake remains pillowy and soft.
Power of Full Fat Sour Cream
Think of sour cream as your insurance policy against dryness. Unlike milk, which is thin, sour cream adds a creamy density to the batter. The lactic acid weakens the gluten strands just enough to create a "short" crumb, meaning the cake breaks easily and feels tender rather than bready.
It’s the difference between a grocery store cupcake and one from a boutique bakery.
Perfect Batch Sizing and Timing
Timing is everything in baking. We want to catch the cake at the peak of its rise, just as the structure sets but before the moisture begins to evaporate. Following these specs ensures you don't end up with a "shrunken" cupcake that pulls away from the liner prematurely.
- Yield: 12 standard cupcakes
- Prep Time:20 minutes
- Bake Time:22 minutes
- Internal Temp:205°F for the perfect set
Reverse Creaming Precision
This technique is my favorite trick for a flat top. By mixing the 115g of softened butter into the 190g of cake flour and 200g of sugar, we create a texture like wet sand. This isn't just a quirk; it’s a deliberate way to minimize air bubbles.
Fewer large air bubbles mean no giant holes in your cake and no volcanic eruptions in the center. It’s a precision move that results in a professional finish every time.
Essential Elements for Success
Before you start, make sure your ingredients are at that "just right" temperature. If your eggs are cold, they will seize the butter, and you'll lose that silky emulsion we've worked so hard to build.
- 1 ½ cups (190g) cake flour: Sifted to ensure lightness. Why this? Lower protein than AP flour means a much softer, more delicate bite.
- 1 cup (200g) granulated white sugar: Provides sweetness and moisture retention.
- 1 ½ tsp baking powder: Our primary lifting agent.
- ½ tsp baking soda: Reacts with the sour cream for a tender lift.
- ½ tsp fine sea salt: Balances the sugar and enhances the vanilla.
- ½ cup (115g) unsalted butter: Softened to exactly 65°F. Why this? At this temp, it incorporates into flour without melting into a greasy mess.
- 2 tbsp (30ml) neutral vegetable oil: Keeps the crumb moist for days.
- 2 large eggs: Room temperature to ensure a smooth batter.
- ½ cup (120g) full fat sour cream: Adds richness and tang.
- 1 tbsp pure vanilla bean paste: For those beautiful black specks and deep flavor.
- ¼ cup (60ml) whole milk: Thins the batter to the perfect pouring consistency.
| Original Ingredient | Substitute | Why It Works |
|---|---|---|
| Cake Flour | AP Flour + Cornstarch | 1.5 cups AP minus 3 tbsp, add 3 tbsp cornstarch. Mimics low protein. |
| Sour Cream | Full fat Greek Yogurt | Similar acidity and fat. Note: Result may be slightly tangier. |
| Vanilla Bean Paste | Vanilla Extract | Use a 1:1 ratio. Note: You will lose the visual "specks." |
Kitchen Tools for Joyful Baking

You don't need a professional kitchen, but a few specific tools will make the process much more rhythmic and enjoyable. A stand mixer is helpful, but a hand mixer works beautifully here as well.
- Digital Scale: Essential for the 190g of flour; volume measurements are too risky.
- Standard 12 cup muffin tin: Preferably light colored aluminum to prevent over browning.
- Fine mesh sieve: For sifting that cake flour into a cloud like powder.
- Silicone spatula: To scrape every last bit of the vanilla flecked batter from the bowl.
- Trigger scoop: A 3 tablespoon scoop ensures every cupcake is the exact same size.
Chef's Note: If your butter is too cold, don't microwave it! Grate it with a cheese grater instead. The smaller pieces will warm up to that perfect 65°F in minutes without melting.
The Path to Fluffy Perfection
Let's walk through this step-by-step. Pay attention to the sensory cues the way the batter looks and smells is just as important as the timer on your stove.
- Preheat and Prep: Set your oven to 350°F and line your tin. Ensure all ingredients are truly at room temperature.
- Sift the Dry: Sift the cake flour, sugar, baking powder, baking soda, and salt into your mixing bowl. Note: Sifting removes lumps and aerates the mix.
- Incorporate the Fats: Add the softened butter and oil to the dry ingredients. Beat on low until the mixture looks like fine, damp sand.
- Whisk the Wet: In a separate jug, whisk the eggs, sour cream, vanilla, and milk until smooth.
- First Addition: Pour about half of the wet mixture into the flour butter mix. Beat on medium until the scent of vanilla blooms and the batter looks pale.
- Final Emulsion: Add the remaining liquid in two stages, beating for 30 seconds after each. Note: This builds the structure without over mixing.
- Scrape and Fold: Give the bowl one final manual stir with a spatula to catch any stray flour at the bottom.
- Portion the Batter: Fill liners about two thirds full. Do not overfill or they will spill over the edges.
- The Precision Bake: Bake for 20-22 minutes. Check at 20 minutes; the tops should be springy and a toothpick should come out clean.
- Cooling Cycle: Let them rest in the tin for 5 minutes, then move to a wire rack. Note: Leaving them in the tin too long causes "steamed" soggy bottoms.
Fixing Common Baking Errors
Even the best of us hit a snag sometimes. If your cupcakes didn't turn out like the pictures, it's usually a small technical tweak away from perfection.
Preventing the Center Sink
If your cupcakes look like little craters, they likely rose too fast and then collapsed. This often happens if your baking powder is expired or if you opened the oven door too early. The rush of cold air interrupts the "setting" of the cake structure.
Try to wait until at least 18 minutes have passed before peeking.
Avoiding a Rubbery Crumb
This is the classic sign of over mixing. When you add the liquids, stop as soon as the streaks of flour disappear. Over working the batter after the milk and eggs are in creates a gluten web that is too strong, turning your delicate cake into something resembling a bagel.
| Problem | Root Cause | Solution |
|---|---|---|
| Liners peeling off | Excess moisture or steam | Remove from pan after 5 mins to cool on a rack. |
| Greasy bottoms | Butter was too soft/melted | Ensure butter stays at 65°F (cool to the touch). |
| Coarse, dry texture | Over baked or too much flour | Use a scale for flour; check temp 2 mins early. |
Common Mistakes Checklist
- ✓ Always use room temperature eggs; cold eggs will curdle the butter fats.
- ✓ Check your oven temperature with an external thermometer to ensure it's truly 350°F.
- ✓ Don't skip the sifting; cake flour is notorious for having small, stubborn clumps.
- ✓ Use a trigger scoop for portioning to ensure even baking across the entire tray.
- ✓ Let the cupcakes cool completely before frosting, or the butter in the icing will melt.
Adding Creative Flavor Twists
Once you've mastered this base, it becomes a canvas for your creativity. This recipe is incredibly stable, making it easy to adapt with different infusions.
Espresso Vanilla Infusion
For a sophisticated "Latte" cupcake, dissolve 1 tablespoon of instant espresso powder into the milk before adding it to the batter. The coffee deepens the vanilla notes and creates a beautiful mocha colored crumb. This pairs perfectly with a salted caramel frosting or a simple dusting of cocoa powder.
White Chocolate Raspberry Twist
Gently fold in 1/2 cup of mini white chocolate chips and 1/4 cup of freeze dried raspberry crumbles into the finished batter. The freeze dried fruit provides intense flavor without adding excess moisture that might make the cake soggy. It's a colorful and vibrant variation that feels very "boutique." If you're looking for more cookie style treats, you might love the texture of my Chewy Chocolate Chip recipe which uses a similar fat to sugar logic.
For a simpler change, you can even swap the vanilla for almond extract, but be careful almond is much stronger, so start with just half a teaspoon. If you're in the mood for something even simpler, my 3 ingredient peanut butter recipe is a great quick fix when you don't want to pull out the stand mixer.
Perfect Batch Scaling Guidelines
Whether you're baking for a big party or just a quiet night in, you can adjust this recipe with a little math and care.
Scaling Down (6 Cupcakes): Cut all ingredients exactly in half. For the 2 eggs, beat them in a small bowl first and then use exactly 50g of the mixture (which is about one large egg's worth of volume).
Use the same 350°F temperature, but start checking for doneness around 18 minutes.
Scaling Up (24 Cupcakes): Double everything exactly. However, when doubling, only increase the salt and baking powder to 1.75x rather than a full 2x to avoid a metallic aftertaste or a "soapy" flavor.
You may need to add 2-3 minutes to the total bake time if you are cramming two trays into the oven at once, as the total thermal mass will be higher.
Storing Your Sweet Creations
The beauty of the "oil and butter" hybrid is that these stay fresh longer than most scratch made cakes. But there's a right and wrong way to keep them.
Storage: Keep unfrosted cupcakes in an airtight container at room temperature for up to 3 days. Do not refrigerate them! The fridge is a moisture thief and will turn your velvety cake into a dry sponge within hours.
If they are frosted with buttercream, they can sit out for up to 2 days as long as your kitchen isn't too hot.
Freezing: These freeze like a dream. Wrap individual unfrosted cupcakes in plastic wrap and place them in a freezer bag for up to 3 months. To thaw, just let them sit on the counter for an hour. They will taste just as fresh as the day they were baked.
Zero Waste Tip: If you happen to have a few cupcakes that went a bit stale, don't toss them! Crumble them up and mix with a spoonful of frosting to make cake pops, or toast the crumbs in a pan with a little butter to use as a "cake crouton" topping for vanilla ice cream.
How to Style and Serve
Presentation is where the "joy" really comes in. For a classic look, use a large open star tip to create a high, swirling mound of buttercream. If you want something more modern, use a round tip for a smooth, "blob" style finish that looks very professional.
Serve these at room temperature. If you’ve kept them in a cool pantry, give them 20 minutes to "wake up" before serving. The fats need to soften slightly to give you that melt in-the mouth sensation. I love serving these alongside a tart berry compote or a simple glass of cold milk.
They are the ultimate "blank canvas" dessert beautiful in their simplicity, but sturdy enough to hold up to whatever decorations your heart desires.
Debunking Baking Myths
Myth: "All purpose flour is just as good as cake flour." Actually, AP flour has more protein, which creates more gluten. Using it will result in a tougher, breadier texture.
If you must use it, the cornstarch swap mentioned in the substitution table is your best bet to mimic that tender "shatter" of a true cake flour crumb.
Myth: "Over beating the eggs makes the cake fluffier." In this specific reverse creaming method, we don't want a ton of air in the eggs. Too much air causes the cupcakes to puff up like balloons and then collapse into sad little valleys. We want a smooth, stable emulsion, not a meringue.
Myth: "You have to use buttermilk for a moist cake." While buttermilk is great, the combination of whole milk and full fat sour cream actually provides a more consistent, velvety result without the risk of the batter becoming too thin.
The sour cream gives us the acidity of buttermilk but with much more structural body.

Recipe FAQs
What makes these vanilla cupcakes extra moist?
Using a hybrid fat blend of butter and oil. The oil remains liquid at room temperature, ensuring the cupcakes stay tender and moist for days. Full fat sour cream also contributes significantly to moisture and a tender crumb.
Why is the reverse creaming method important for this recipe?
It coats the flour with fat first. This prevents gluten from developing excessively, leading to a finer, more tender, and velvety crumb that is less likely to become tough or dry.
How do I ensure my cupcakes have a flat top for frosting?
Follow the reverse creaming method precisely and don't overfill the liners. By mixing the butter into the dry ingredients first, you minimize air bubbles, which helps create a more level surface. Filling liners only two-thirds full also prevents them from overflowing and creating domed tops.
Can I use all-purpose flour instead of cake flour?
Yes, but with a substitution. All-purpose flour has more protein, which can lead to a tougher cake. To mimic cake flour, for every 1.5 cups of AP flour, remove 3 tablespoons and add 3 tablespoons of cornstarch.
What is the ideal oven temperature and bake time for these cupcakes?
Preheat your oven to 350°F (175°C) and bake for 20-22 minutes. Always check for doneness around the 20-minute mark with a toothpick inserted into the center; it should come out clean.
How should I store unfrosted vanilla cupcakes to keep them moist?
Store them in an airtight container at room temperature for up to 3 days. Refrigeration will actually dry them out due to moisture loss. If frosted with buttercream, they can stay at room temperature for up to 2 days.
What's the best way to achieve intense vanilla flavor?
Use high-quality pure vanilla bean paste. The paste contains both the extract and the visual flecks of vanilla bean, offering a deeper, more complex flavor. Ensure it's incorporated properly by adding it with the fats and other wet ingredients.
Moist Vanilla Cupcakes
Ingredients:
Instructions:
Nutrition Facts:
| Calories | 244 kcal |
|---|---|
| Protein | 2.8 g |
| Fat | 12.9 g |
| Carbs | 30.1 g |
| Fiber | 0.3 g |
| Sugar | 17.1 g |
| Sodium | 166 mg |
