Pizza Pot Pies: Crispy Crust
- Time: Active 20 minutes, Passive 25 minutes, Total 45 minutes
- Flavor/Texture Hook: Shatter crisp dough with a molten, velvety cheese center
- Perfect for: Fun family dinners or impressing friends with a "magic" table side flip
- Secret to Reliable Pizza Pot Pies
- Science Behind the Crust Shatter
- Recipe Specs for Success
- Selecting the Right Ingredients
- Essential Tools for the Job
- Assembling the Pot Pies
- Solving Common Baking Issues
- Simple Dietary Adjustments
- Proper Storage and Waste
- Best Serving Pairings
- High in Sodium
- Recipe FAQs
- 📝 Recipe Card
Secret to Reliable Pizza Pot Pies
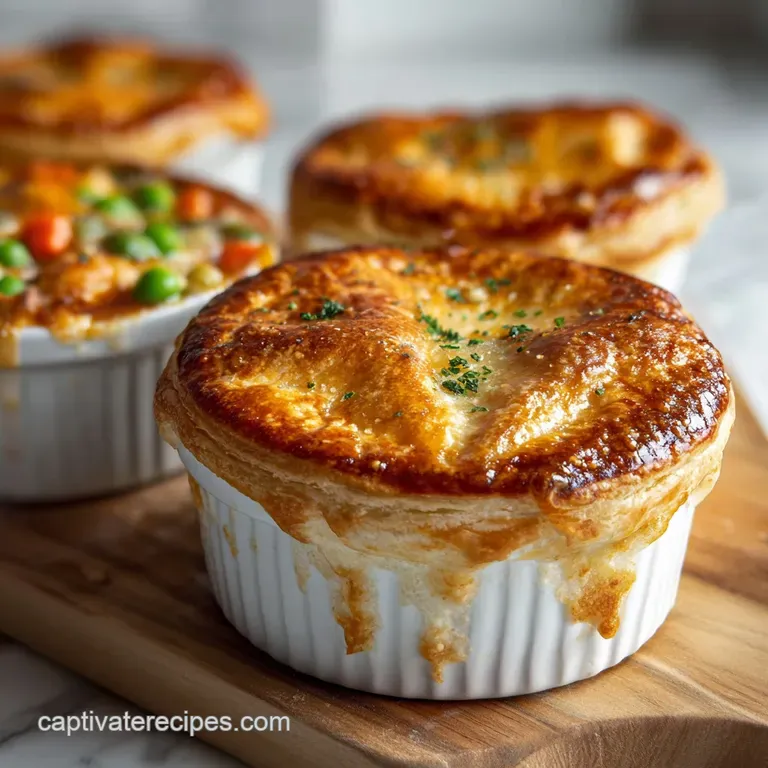
The first time I tried a pizza pot pie, I was at a tiny shop in Chicago. I watched the server bring out a ceramic bowl, run a knife around the edge, and flip it over onto a plate. The "shatter" sound the crust made when it hit the ceramic was something I'll never forget.
I tried making it at home that weekend and ended up with a literal soup of dough and sauce. It was a mess, but it taught me that the order of layers is everything.
You don't need a fancy brick oven to get that restaurant style finish. We are going to use basic oven safe bowls and a few simple tricks to make sure the dough rises instead of sinking into the sauce.
This dish is all about the contrast between the crispy, garlic buttered top and the rich, molten filling hiding underneath. It's the ultimate comfort food for those nights when a standard slice just won't cut it.
Science Behind the Crust Shatter
Mastering the Thermal Release: When the cheese is layered directly against the greased bowl, it creates a fat barrier that prevents the sauce from soaking into the dough. This allows the steam to push the dough upward, creating an airy pocket rather than a soggy lid.
Executing the Perfect Flip: The high heat of the oven causes the moisture in the dough to evaporate rapidly, which is what gives us that distinct crunch. This recipe relies on high protein dough to maintain structural integrity during the inversion process.
| Servings | Ingredient Adjustments | Bowl Size | Cook Time |
|---|---|---|---|
| 2 people | 0.5 lb dough, 1 cup cheese | 280 ml | 22 minutes |
| 4 people | 1 lb dough, 2 cups cheese | 450 ml | 25 minutes |
| 6 people | 1.5 lb dough, 3 cups cheese | 450 ml | 28 minutes |
This filling reminds me of the savory, comforting profile found in our Stuffed Pepper Soup recipe, which also uses simple pantry staples to build deep flavor.
Recipe Specs for Success
Managing the temperature of your ingredients is the secret to a clean release. I've found that using cold cheese actually helps it stay together while you're stretching the dough over the top. If the cheese is too warm, it starts to melt before it even hits the oven, making the seal slippery and difficult to manage.
| Component | Science Role | Pro Secret |
|---|---|---|
| High protein dough | Provides elastic structure | Let it sit at room temp for 30 minutes before stretching |
| San Marzano tomatoes | Low acidity and thick texture | Hand crush them to keep some chunky texture for "bite" |
| Low moisture mozzarella | Prevents a watery filling | Freeze for 10 minutes before shredding to get clean strands |
Selecting the Right Ingredients
You want ingredients that can stand up to high heat without turning into a puddle. For the sauce, 14 oz San Marzano crushed tomatoes are non negotiable because they have a natural sweetness that balances the 1 tsp dried oregano and 2 cloves garlic perfectly.
Using 1 lb high protein pizza dough ensures the "lid" doesn't tear when it hits the steam.
- 14 oz San Marzano crushed tomatoes Why this? Superior sweetness and thicker consistency than standard canned tomatoes.
- 1 tsp dried oregano (Substitute: Dried basil or Italian seasoning)
- 2 cloves garlic, microplaned (Substitute: 0.5 tsp garlic powder)
- 0.5 tsp sea salt (Substitute: Table salt)
- 1 tbsp extra virgin olive oil (Substitute: Avocado oil)
- 1 lb high protein pizza dough (Substitute: Pre made refrigerated dough)
- 2 tbsp melted grass fed butter (Substitute: Salted butter)
- 1 tsp garlic powder Why this? Infuses the butter for a crust that tastes like garlic bread.
- 2 cups low moisture, part skim mozzarella cheese (Substitute: Provolone)
- 0.5 cup lean turkey sausage crumbles (Substitute: Cooked ground beef)
- 0.5 cup green bell peppers, finely diced Why this? Adds a necessary crunch and vegetal brightness to the fat.
- 0.25 cup fresh basil leaves, chiffonade (Substitute: Fresh parsley)
Essential Tools for the Job
You don't need a pizza stone or a specialized oven, but you do need four oven safe ceramic bowls. I usually use 450 ml ramekins or soup bowls. A microplane is also helpful for the 2 cloves garlic to ensure it melts into the sauce without leaving sharp, raw chunks.
Chef's Note: If you don't have a microplane, smash the garlic into a paste with the side of your knife and a pinch of salt. It prevents the garlic from burning and turning bitter in the over high heat environment.
If you're comfortable working with dough, you might enjoy the shaping techniques used in our Swirled Garlic Herb recipe, which shares a similar focus on yeast based textures.
Assembling the Pot Pies
- Preheat your oven to 220°C and grease four oven safe bowls heavily with olive oil.
- Mix 14 oz San Marzano crushed tomatoes with 1 tsp dried oregano, 2 cloves microplaned garlic, 0.5 tsp sea salt, and 1 tbsp olive oil.
- Press 0.5 cup mozzarella cheese into the bottom and up the sides of each bowl until the ceramic is completely covered. Note: This creates the protective cheese seal.
- Divide 0.5 cup lean turkey sausage and 0.5 cup diced green peppers among the bowls.
- Ladle the tomato sauce over the fillings until the bowls are three quarters full.
- Divide 1 lb pizza dough into four equal pieces and stretch each into a circle slightly larger than your bowl.
- Drape the dough over the bowl and press the edges firmly against the outside rim until it sticks like a drum skin.
- Brush the dough with 2 tbsp melted butter mixed with 1 tsp garlic powder.
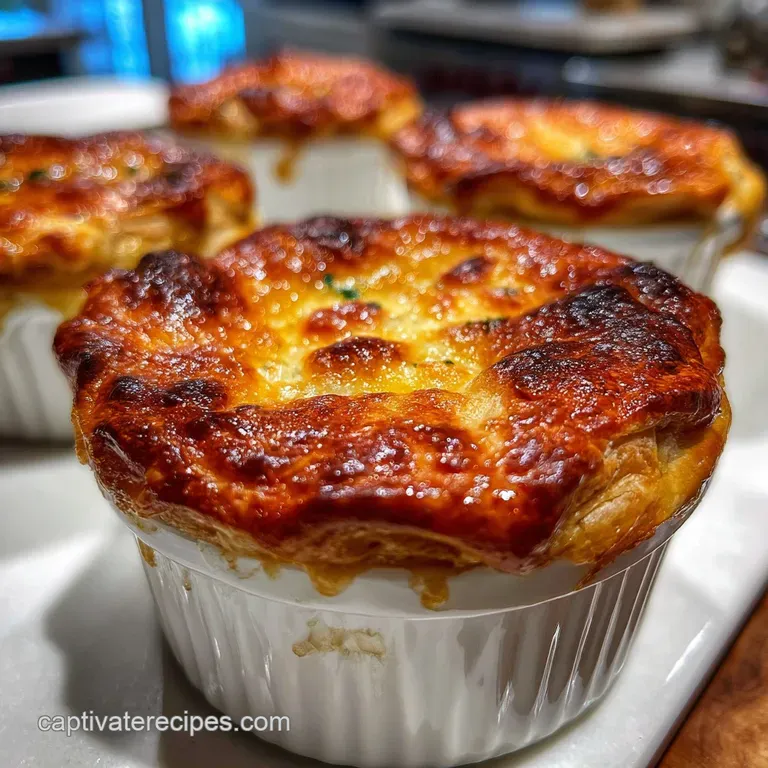
- Bake for 25 minutes until the crust is deep golden brown and sounds hollow when tapped.
- Let rest for 5 minutes, then run a knife around the edge and flip onto a plate until the pie releases with a sizzle.
| Method | Time | Texture | Best For |
|---|---|---|---|
| Oven (Standard) | 25 minutes | Uniformly crispy | Best overall results |
| Air Fryer | 15 minutes | Extra shattered crust | Quick individual portions |
Solving Common Baking Issues
Preventing a Soggy Mid Section
If your dough is wet or gummy after flipping, the seal between the cheese and the bowl was likely broken. Ensure the cheese goes all the way up the sides. Another trick is to bake the bowls on the lowest rack of the oven to ensure the bottom of the "lid" gets enough heat.
Fixing a Stuck Crust
If the pie won't release, don't force it. The cheese usually needs a moment to contract. Wait a full 5 minutes after taking it out of the oven before attempting the flip. If it's still stuck, run a thin offset spatula around the very edge to break the vacuum.
| Problem | Root Cause | Solution |
|---|---|---|
| Dough won't stretch | Dough is too cold | Let it rest at room temp for 20 more minutes |
| Filling is too watery | Vegetables released moisture | Sauté peppers for 2 minutes before adding to the bowl |
| Crust is burnt | Oven rack is too high | Move to center rack and tent with foil for last 5 minutes |
Common Mistakes Checklist
- ✓ Grease the outside rim of the bowl so the dough doesn't stick to the exterior.
- ✓ Don't overfill the sauce; leave at least 1 cm of headspace to allow for bubbling.
- ✓ Pat the diced peppers dry with a paper towel to remove excess surface water.
- ✓ Use low moisture mozzarella; fresh mozzarella has too much water for this specific method.
- ✓ Ensure the dough is stretched thin; a thick slab won't cook through in the center.
Simple Dietary Adjustments
Swapping for gluten-free Dough You can use a gluten-free pizza dough blend, but keep in mind it doesn't have the same elasticity. Instead of stretching it over the sides, cut a circle the exact size of the bowl opening and press it firmly into the top edge.
It will be more of a "biscuit" style top than a draped one.
Creating a Plant Forward Feast For a vegetarian version, swap the turkey sausage for sautéed mushrooms or olives. If you're going dairy-free, use a cashew based mozzarella.
Just be aware that vegan cheeses don't always create the same structural "shell" as dairy cheese, so your flip might be a bit more rustic.
Proper Storage and Waste
Storage: These are best eaten fresh for that "shatter" crunch, but you can keep leftovers in the fridge for up to 3 days. To reheat, put them back in an oven or air fryer at 175°C for 10 minutes. Avoid the microwave, or you'll end up with a rubbery crust.
Freezing: You can freeze the assembled, unbaked bowls for up to 2 months. Wrap them tightly in plastic wrap and foil. Bake directly from frozen at 200°C, adding about 15 minutes to the total cook time.
Zero Waste: If you have leftover San Marzano sauce, simmer it down with a bit of cream for a quick pasta sauce the next day. Any leftover dough scraps can be rolled in cinnamon sugar and baked for a 5 minute dessert.
Best Serving Pairings
Since this is a heavy, cheese forward dish, I always serve it with something bright and acidic. A simple arugula salad with a lemon vinaigrette cuts through the fat of the mozzarella perfectly. For a drink, a light bodied red like a Chianti or even a crisp sparkling water with lime works wonders.
If you have extra fresh basil, use it generously. The chiffonade basil should be added after the flip so the heat of the filling releases the aroma without wilting the leaves into nothingness. It adds a "velvety" finish to the sauce that ties the whole meal together.
- The dough will fall into the sauce
- As long as you stretch the dough taut like a drum and seal it to the dry outer rim of the bowl, the air pressure inside will keep it afloat.
- You need a pizza stone
- The ceramic bowl acts as its own heat conductor, providing more than enough energy to crisp the dough from the inside out.
- Fresh mozzarella is always better
- Not here. Fresh mozzarella releases too much whey, which will steam your dough from the bottom and make it soggy. Stick to low moisture blocks.

High in Sodium
985 mg 985 mg of sodium per serving (43% 43% of daily value)
The American Heart Association recommends limiting sodium intake to about 2,300mg per day.
Tips to Reduce Sodium in Your Pizza
-
Low-Sodium Cheese-15%
Replace the regular mozzarella with a low-sodium mozzarella cheese. This can significantly reduce the sodium content, as cheese is a major contributor.
-
Reduce Sausage-15%
Use half the amount of turkey sausage crumbles, or replace it entirely with a lower sodium protein source like grilled chicken breast or mushrooms.
-
Reduce Added Salt-10%
Reduce the amount of sea salt added to the tomato sauce by half or eliminate it entirely. Taste and adjust other seasonings instead.
-
No-Salt Added Tomatoes-10%
Opt for no-salt added crushed tomatoes. This can reduce the overall sodium content of the sauce without sacrificing flavor.
-
Flavor with Herbs
Enhance the flavor of your pizza with fresh herbs and spices instead of relying on salt. Consider adding more fresh basil, oregano, or red pepper flakes.
Recipe FAQs
Can I use refrigerated store-bought dough for this recipe?
Yes, high protein store-bought dough works well. Substitute 1 lb high protein dough, but ensure it rests at room temperature for 30 minutes before stretching for better elasticity.
Why does my crust end up soggy after flipping the pot pie?
No, a soggy crust means the cheese barrier failed. Ensure low moisture mozzarella fully coats the greased bowl sides to stop sauce seepage before draping the dough lid.
How to achieve the signature crispiness on the dough top?
Brush the dough generously with butter mixed with garlic powder. Baking at 220°C ensures rapid moisture evaporation, creating the desired hollow, crunchy texture.
Is it true I should use fresh mozzarella instead of low moisture?
No, fresh mozzarella is a major issue here. Fresh cheese releases too much whey during baking, creating steam that directly ruins the structural integrity of the crust.
How long should the baked pie rest before attempting to flip it onto a plate?
Wait a full 5 minutes after removal from the oven. This resting period allows the cheese shell to contract slightly, which helps the crust release cleanly without tearing.
How do I prevent the microplaned garlic in the sauce from burning?
Ensure the garlic is mixed thoroughly into the sauce and not touching the bowl directly. Layering the cheese first creates a protective layer, preventing the garlic from scorching on the hot ceramic.
What is the minimum oven safe bowl size recommended for a single serving?
Use a minimum 280 ml capacity bowl for one person. Smaller bowls may not provide enough headspace for the dough to rise properly during the 22-minute bake time.
Pizza Pot Pies Recipe
Ingredients:
Instructions:
Nutrition Facts:
| Calories | 624 calories |
|---|---|
| Protein | 27.6 g |
| Fat | 28.2 g |
| Carbs | 64.5 g |
| Fiber | 4.2 g |
| Sugar | 5.8 g |
| Sodium | 985 mg |
