Skull Potatoes: Spooky Halloween Side
- Time: Active 20 minutes, Passive 30 minutes, Total 50 minutes
- Flavor/Texture Hook: Shatter crisp exterior with a velvety, buttery interior
- Perfect for: Halloween parties, themed dinners, or impressive kid friendly sides
- Crafting the Spookiest Roasted Skull Potatoes
- Fast vs Classic Cooking Methods
- The Essentials for Bone White Spuds
- Tools for Carving and Roasting
- Step-by-Step Skull Carving Guide
- Common Roasting Mistakes to Avoid
- Flavor Swaps and Easy Substitutes
- Storing and Reheating Your Skulls
- Serving Your Graveyard Potato Platter
- Recipe FAQs
- 📝 Recipe Card
Crafting the Spookiest Roasted Skull Potatoes
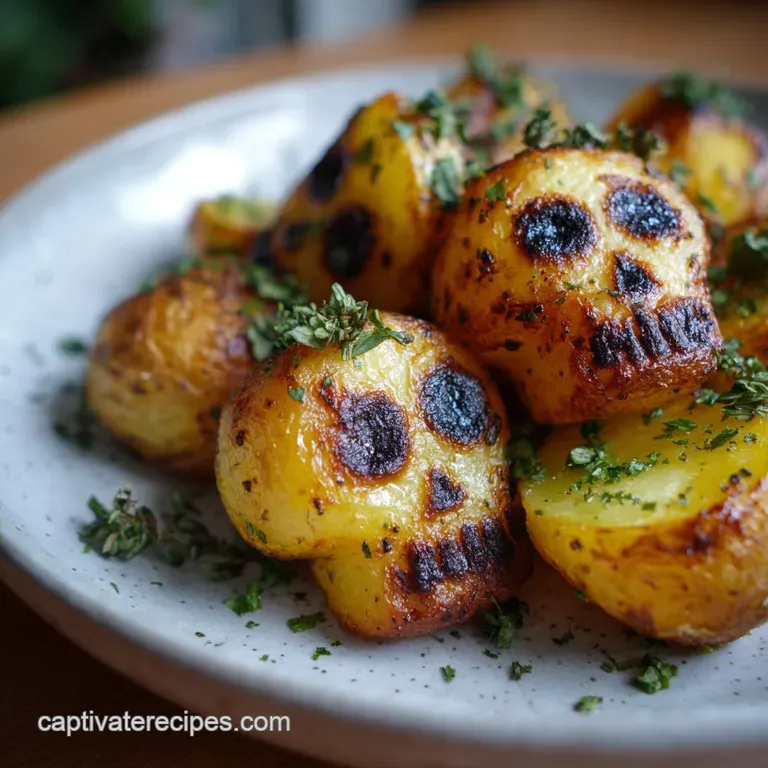
The first time I tried carving these, the kitchen smelled like a wood fired pizza oven, thick with smoky paprika and earthy rosemary. I remember standing over the cutting board with a small paring knife, feeling like a bit of a mad scientist.
My first attempt ended up looking more like a confused potato blob than a skeleton, but once I figured out the right depth for the cuts, the whole tray transformed.
There is something so satisfying about the way the edges of the carved "mouth" catch the heat in the oven. They turn into these crispy, jagged ridges that practically shatter when you bite into them. Plus, the inside stays velvety and soft, which is exactly what you want in a roasted spud.
If you are tired of the same old side dishes, these will definitely wake up your dinner table.
We are not just making food here; we are building a mood. When you pull these out of the oven and the steam rises from the hollow eye sockets, it is genuinely impressive. Trust me, even the "boring" eaters in your house will be reaching for seconds.
Let's get into how to make these work without them turning into a mushy mess.
Fast vs Classic Cooking Methods
Roasting potatoes seems simple, but when you add the intricate carving of "Skull Potatoes for Halloween," the technique matters. You want the features to stay sharp, not melt away into a golden blur. This comparison helps you decide which route to take based on how much time you have before the party starts.
| Method | Time | Texture | Best For |
|---|---|---|---|
| over High heat Roast | 30 minutes | Shatter crisp edges | Last minute parties |
| Slow Bake | 1 hours 10 mins | Leathery, tough skin | Realistic "mummified" look |
| Air Fryer | 20 minutes | Extremely crunchy | Small batches only |
Choosing the right method depends on your guest list. If you are serving a crowd, the over high heat oven method is your best friend because you can fit more on a single tray. If you have time to kill and want a creepier, more wrinkled appearance, the slow bake method is surprisingly effective.
The Essentials for Bone White Spuds
The magic happens when the chemistry of the potato meets the high heat of your oven. To get that "dead" look, we need to manage the starch and the surface sugars perfectly. If you just toss them in oil, they will brown too fast and lose the skeletal vibe.
- Oxidation Control: Lemon juice lowers the pH on the potato surface, which stops enzymes from turning the carvings brown before they even hit the oven.
- Starch Gelatinization: Soaking in cold water removes excess surface starch, allowing the olive oil to create a thinner, crispier skin rather than a gummy layer.
- Thermal Contraction: High heat causes the moisture in the carved areas to evaporate rapidly, making the "face" features shrink and look more skeletal as they bake.
- Maillard Management: By using garlic powder instead of fresh garlic, we get the flavor without the burnt, bitter bits that usually ruin a over high heat roast.
This recipe pairs perfectly with my Lemon Herb Chicken recipe if you want a full meal that feels consistent. The acidity in the chicken matches the lemon notes we use to keep the potatoes bright.
| Component | Science Role | Pro Secret |
|---|---|---|
| Yukon Gold Potatoes | Starch balance | Keeps the "bone" color yellow gold rather than gray |
| Fresh Lemon Juice | pH Regulator | Prevents the carvings from oxidizing and turning black |
| Extra Virgin Olive Oil | Heat Conductor | Deepens the hollows of the eyes by localized frying |
The choice of potato is non negotiable here. While Russets are great for mash, they are too floury for carving and will crumble apart under the knife. Yukon Golds have that waxy meets starchy texture that holds a sharp edge through the entire roasting process.
Tools for Carving and Roasting
You don't need a professional sculptor's kit to make these "Potatoes for Halloween," but a few specific tools make the job much faster. I have tried using a regular chef's knife for the eyes, and let me tell you, it is a recipe for a finger injury.
- Paring Knife: A small, sharp blade is essential for the "teeth" and "nose" details.
- Metal Straw or Melon Baller: This is the ultimate hack for perfect, deep eye sockets.
- Large Mixing Bowl: You need enough space to submerge the 1.5 lbs Yukon Gold potatoes completely in the 4 cups cold water.
- Rimmed Baking Sheet: This prevents the 3 tbsp extra virgin olive oil from dripping into your oven and starting a smoky fire.
Chef Tip: Freeze your potatoes for just 10 minutes before carving. It firms up the exterior starch and makes the paring knife glide through the "bone" like butter without slipping.
For a deeper winter vibe or if you find yourself with leftover spuds, you might like my Simple Slow Cooker recipe. It is a reliable way to use up the same ingredients in a totally different way.
step-by-step Skull Carving Guide
Before you start, make sure your work surface is stable. I like to put a damp paper towel under my cutting board so it doesn't slide around while I'm doing the detailed work. Remember, we are using 1.5 lbs Yukon Gold potatoes, which usually gives you about 10 to 12 medium sized skulls.
- Prep the Water: Combine 4 cups cold water and 2 tbsp fresh lemon juice in a large bowl. Note: This stops the potatoes from turning brown as you work through the batch.
- Level the Base: Slice a small sliver off the bottom of each potato. Wait until the potato sits flat without wobbling on the board.
- Shape the Jaw: Use your paring knife to trim the lower third of the potato into a narrower "chin" shape.
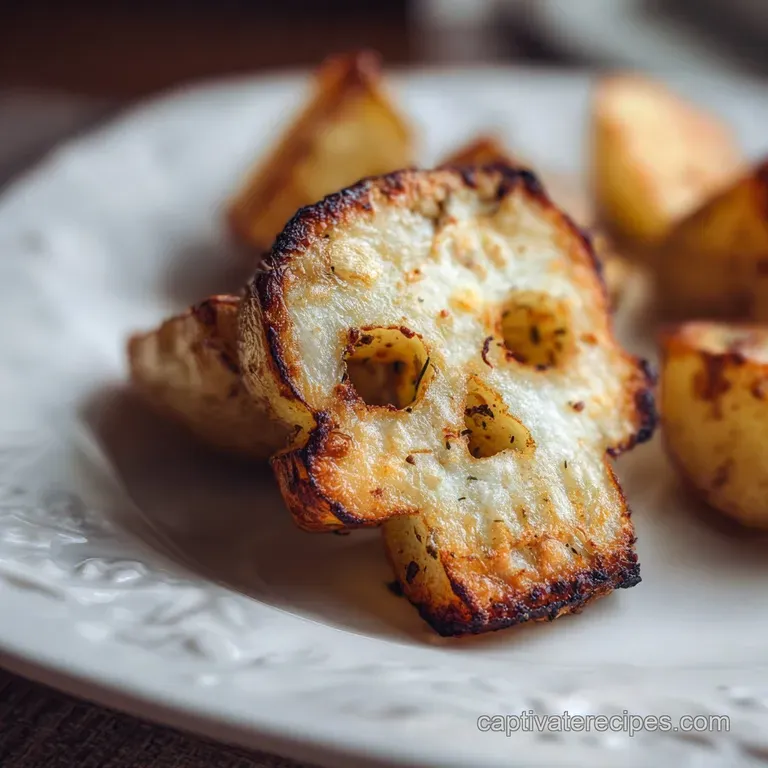
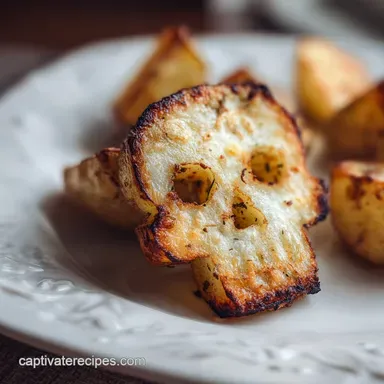
- Carve the Eyes: Press a metal straw or small melon baller into the top half of the potato. Push at least 1/4 inch deep to ensure the eyes don't disappear when the potato swells.
- Define the Nose: Cut a small upside down "V" shape just below the eyes. Note: Keep this small; a big nose makes it look more like a Muppet than a skull.
- Create the Teeth: Score horizontal and vertical lines across the "mouth" area. Do not cut all the way through, just deep enough for the oil to seep in.
- Acid Bath: Drop each finished skull into the lemon water immediately. Leave them for 5 minutes to lock in that pale bone color.
- Seasoning Coat: Drain and pat the potatoes bone dry. Toss with 3 tbsp extra virgin olive oil, 1 tsp smoked paprika, 1 tsp garlic powder, 1/2 tsp dried rosemary, 1 tsp flaky sea salt, and 1/2 tsp cracked black pepper.
- Roast: Arrange on a baking sheet and bake at 400°F for 30 minutes. Cook until the edges are golden and the faces look shrunken.
Common Roasting Mistakes to Avoid
The biggest hurdle with "Skull Potatoes for Halloween recipe" is the moisture. If you don't dry them properly after the lemon bath, the oil won't stick, and they will steam instead of roast. You'll end up with a soggy, sad looking face instead of a crisp skeleton.
The Problem of Disappearing Features
If your eye sockets and teeth marks seem to vanish once the potatoes hit the heat, it is usually because the cuts weren't deep enough. Potatoes expand as the starches swell. You have to be aggressive with the carving. Think of it like 3D modeling rather than drawing on the surface.
The Mystery of the Gray Potato
Sometimes the "Potatoes for Halloween" turn a weird, unappealing gray color. This is almost always due to skipping the acid bath or using a bowl that reacts with the potatoes, like unlined aluminum. Stick to glass or stainless steel for the soaking step.
| Problem | Root Cause | Solution |
|---|---|---|
| Soggy texture | Too much surface moisture | Pat dry with a lint free towel before oiling |
| Burnt features | Sugar in the seasoning | Use garlic powder instead of fresh minced garlic |
| Faces won't crisp | Overcrowded pan | Use two trays or work in smaller batches |
- ✓ Pat the potatoes bone dry after the lemon bath to ensure they roast instead of steam.
- ✓ Cut the "eye" sockets at least a quarter inch deep so they don't disappear as the potato swells.
- ✓ Preheat your baking sheet in the oven for five minutes before adding the potatoes.
- ✓ Don't overcrowd the pan, or the skulls will look boiled rather than roasted.
- ✓ Use a high smoke point oil like extra virgin olive oil for the best crust.
Flavor Swaps and Easy Substitutes
One of the best things about this "Skull potato recipe" is how adaptable it is for different budgets or pantry staples. You don't always need the exact spices listed to get a great result. The core technique of carving and roasting stays the same regardless of the flavor profile.
| Original Ingredient | Substitute | Why It Works |
|---|---|---|
| Smoked Paprika | Chili Powder | Adds a similar red hue but with more kick. |
| Dried Rosemary | Dried Thyme | Same woody aroma, but a bit more subtle for kids. |
| Extra Virgin Olive Oil | Ghee (Melted) | Provides a much higher smoke point and a buttery finish. |
If you want a different vibe, try the "Vampire's Kiss" version by doubling the garlic powder and adding a pinch of white pepper. It keeps the "skulls" looking very pale but packs a massive punch of flavor. If you are out of lemon juice, 1 tbsp of white vinegar in the water works just as well to stop the browning.
Storing and Reheating Your Skulls
If you are making these "Halloween skull potatoes" for a party, you can actually do most of the work ahead of time. Carve them and keep them submerged in the lemon water in the fridge for up to 4 hours. Just make sure they are fully covered so no air hits the surfaces.
Storage: Leftovers can stay in an airtight container in the fridge for up to 3 days. They will lose that initial "shatter" crunch, but the flavor actually deepens as the rosemary and garlic soak into the potato flesh.
I don't recommend freezing these after they are cooked, as the texture becomes grainy and the delicate carvings will likely break off.
Zero Waste Tip: Don't throw away the scraps from trimming the jaws! Toss those small bits in the same seasoning and roast them on the side of the pan. They make "potato croutons" that are incredible over a salad or just as a chef’s snack while you wait for the main tray to finish.
Serving Your Graveyard Potato Platter
When it comes to "How to make skull potatoes for halloween," the presentation is half the fun. I love serving these on a dark slate board or a matte black platter to make the pale "bone" color pop. It creates a high contrast look that feels very professional.
If you want to go the extra mile, put a small dollop of sriracha or beet puree in the bottom of each eye socket right before serving. It gives them a "bleeding" look that is perfect for a more intense Halloween theme.
Alternatively, nestle them into a bed of sautéed kale or spinach to look like they are rising from a grassy graveyard.
- The "Graveyard" Platter: Arrange the skulls upright in a shallow dish of black bean dip or dark gravy.
- The "Better Than a Steakhouse" Angle: Serve them alongside a thick ribeye, letting the meat juices act as the "sauce" for the potatoes.
- The Kid Friendly Dip: Serve with a "brain dip" (roasted red pepper hummus) on the side.
These "Quick skull potatoes recipe" steps ensure you aren't spending the whole night in the kitchen. Once they are in the oven, you have 30 minutes to get your costume on or finish the rest of the meal. They are reliable, budget friendly, and always the first thing to disappear from the table.
Happy roasting!

Recipe FAQs
Can I use regular potatoes for skull potatoes?
No, Yukon Golds are best. Their waxy starchy texture holds a sharp edge when carved and fries up to a perfect consistency.
How do I prevent the carved potato faces from turning brown?
Soak them in lemon water. The acidity lowers the pH on the surface, stopping oxidation before they hit the heat.
What is the best method for making the skull features crispy?
Roast at high heat for about 30 minutes. This rapid cooking causes moisture to evaporate from the carved areas, creating shrunken, crisp edges.
Why do my potato carvings seem to disappear during roasting?
The cuts likely weren't deep enough. Potatoes expand as they cook, so you need to carve aggressively to ensure features remain visible.
Can I prepare skull potatoes ahead of time?
Yes, you can carve them a few hours in advance. Keep them submerged in lemon water in the refrigerator until you're ready to season and roast.
What seasoning makes skull potatoes taste great?
A mix of smoked paprika, garlic powder, rosemary, salt, and pepper works well. This combination provides earthy, savory notes without burning easily at high heat.
How should I store leftover skull potatoes?
Store in an airtight container in the fridge for up to 3 days. They will lose some crispness but develop deeper flavors.
Skull Potatoes Recipe
Ingredients:
Instructions:
Nutrition Facts:
| Calories | 186 kcal |
|---|---|
| Protein | 3.1 g |
| Fat | 8.5 g |
| Carbs | 25.2 g |
| Fiber | 3.2 g |
| Sugar | 1.1 g |
| Sodium | 468 mg |
