Quick 20-Minute Ground Beef Taco for Families
- Time: Active 15 minutes, Passive 5 minutes, Total 20 minutes
- Flavor/Texture Hook: Savory, velvety beef with a satisfying shell shatter
- Perfect for: Hectic Tuesday nights and beginner friendly meal prep
- Quick 20 Minute Ground Beef Taco for Families with Mild Seasoning
- Why This Scientific Method Guarantees Juicy Meat
- Key Success Metrics for Your Taco Night
- Fresh Ingredients and Simple Pantry Spices
- Essential Kitchen Tools for a Fast Cleanup
- From Sizzle to Serving in Under Fifteen Minutes
- Avoiding Common Mistakes for the Best Results
- Scaling the Recipe for Large Crowds
- Flavor Variations for Picky Eaters
- How to Store and Refresh Your Leftover Taco Meat
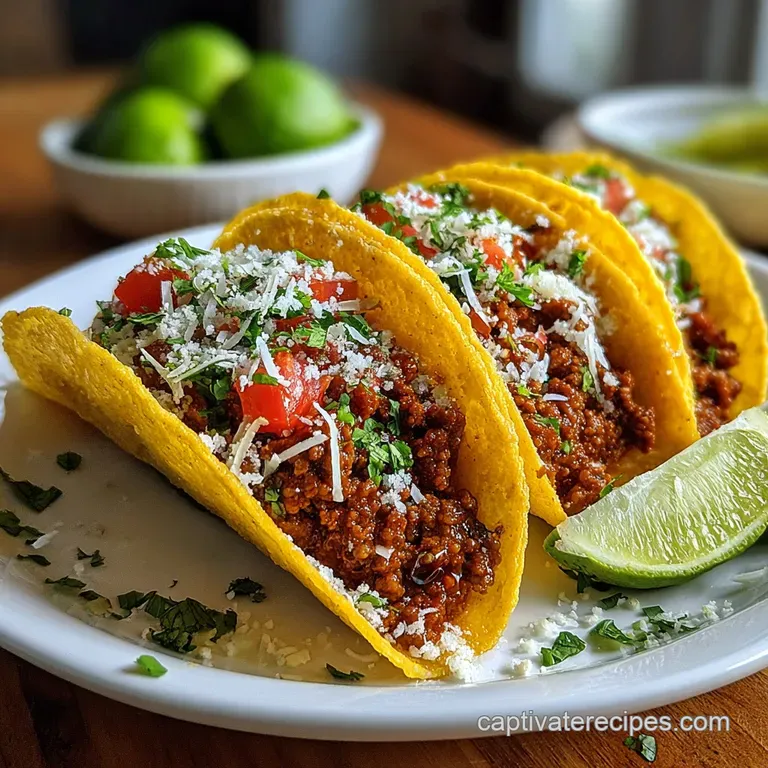
- Creative Ways to Plate and Top Your Mild Beef Tacos
- Recipe FAQs
- 📝 Recipe Card
Quick 20 Minute Ground Beef Taco for Families with Mild Seasoning
The kitchen is a battlefield at 5:30 PM. I’ve been there, staring at a pound of ground beef while the kids ask for the third time when dinner is ready. You want that specific sizzle of the meat hitting the pan, the one that signals relief is coming.
This recipe is the result of years of "taco Tuesdays" where I realized that you don't need a complicated spice rack to make something that tastes better than the yellow box kits.
I remember one night I tried to get fancy with toasted whole peppercorns and three types of dried chilies. My youngest took one bite, turned bright red, and that was the end of that meal. I learned my lesson.
Now, I stick to this mild, savory blend that uses a secret splash of broth to keep things from getting dry or crumbly. It’s reliable, it’s fast, and it actually works for everyone at the table.
We are focusing on the Maillard reaction and proper hydration here. By browning the beef correctly and then simmering it in a seasoned liquid, we create a light sauce that coats every morsel of meat. This ensures your tacos aren't just a pile of dry granules falling out of the shell.
You'll get a rich, umami heavy bite that feels like you spent an hour over the stove, even though we're clocking out in exactly 20 minutes.
Why This Scientific Method Guarantees Juicy Meat
- Maillard Reaction: Browning the meat in avocado oil at a high temp creates complex flavor compounds that raw boiling can't achieve.
- Hydration Control: Adding beef broth at the end emulsifies with the rendered fat, creating a "velvety" coating that sticks to the beef.
- Spice Blooming: Toasting the mild chili powder and cumin in the residual oil releases fat soluble flavor compounds before the liquid is added.
- Acid Balance: Though not in the main list, the slight vinegar in the spices helps break down tough proteins for a tender mouthfeel.
| Thickness | Internal Temp | Rest Time | Visual Cue |
|---|---|---|---|
| Small Crumbles | 160°F | 2 minutes | No traces of pink remain |
| Large Chunks | 165°F | 3 minutes | Deep brown with crispy edges |
| Fine Mince | 160°F | 1 minute | Uniformly brown and saucy |
This timing ensures you don't overcook the lean beef into rubbery pebbles. Since we are using 90/10 lean ground beef, we really rely on that beef broth to provide the moisture that fat usually would in a higher grease mix. This reminds me of the speed I need for my Creamy Garlic Shrimp recipe where every minute counts to keep the protein tender.
Key Success Metrics for Your Taco Night
| Ingredient | Science Role | Pro Secret |
|---|---|---|
| 1 lb Lean Ground Beef | Primary Protein | Use 90/10 ratio to prevent a grease soaked taco shell. |
| 1/2 cup Beef Broth | Liquid Emulsifier | Use low sodium to control the final seasoning profile. |
| 1 tsp Cumin | Aromatic Base | Adds "earthiness" without the heat associated with cayenne. |
| 1 tbsp Avocado Oil | Heat Conductor | High smoke point allows for a better sear than butter. |
Choosing the right fat is a smart move for your budget and your health. Avocado oil is great, but if you're looking to save a few dollars, standard vegetable oil works just as well without altering the flavor. The beef broth is the real hero here; it bridges the gap between the dry spices and the meat.
Fresh Ingredients and Simple Pantry Spices
To get started, gather these items. I've included a few smart swaps if your pantry is looking a bit bare.
- 1 lb Lean Ground Beef (90/10 ratio): Why this? Provides enough fat for flavor without needing a heavy drain.
- Substitute: Ground Turkey (adds a lighter flavor, might need 1 extra tsp of oil).
- 1 tbsp Avocado Oil: Why this? Won't burn during the over high heat browning phase.
- Substitute: Light Olive Oil (Standard fat source, works perfectly).
- 1/2 cup Low Sodium Beef Broth: Why this? Creates the "sauce" that binds the seasoning to the meat.
- Substitute: Water + 1/2 tsp Soy Sauce (Soy adds the missing umami).
- 1 tbsp Mild Chili Powder: Why this? Provides the classic taco color without the spice heat.
- Substitute: Paprika with a pinch of Oregano (Very mild, kid approved).
- 1 tsp Ground Cumin: Why this? The signature scent of a "real" taco.
- Substitute: Ground Coriander (A bit brighter/citrusy but works).
- 1 tsp Smoked Paprika: Why this? Adds a hint of "charred" flavor without a grill.
- Substitute: Sweet Paprika (Less smoky, more sweet).
- 1/2 tsp Onion Powder: Why this? Instant flavor without the texture of raw onions.
- Substitute: Very finely minced shallots (Fresh but mild).
- 1/2 tsp Garlic Powder: Why this? Distributes evenly through the meat crumbles.
- Substitute: 1 clove of fresh minced garlic (Add in the last minute of browning).
- 1/2 tsp Dried Oregano: Why this? Adds an earthy, herbal backnote.
- Substitute: Dried Marjoram (Very similar floral profile).
- 1/2 tsp Salt & 1/4 tsp Black Pepper: Essential for waking up all the other flavors.
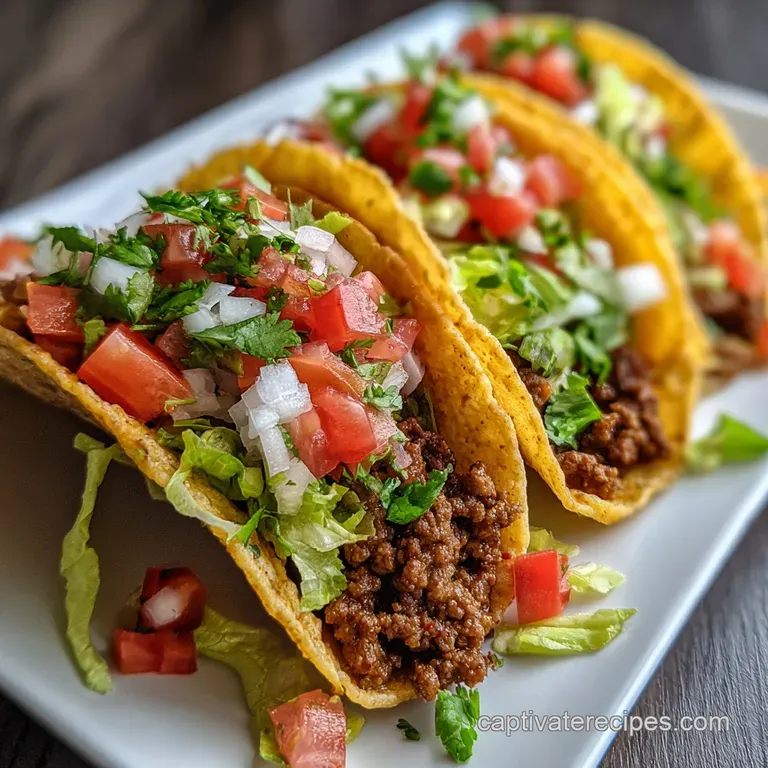
For the assembly, you'll want 12 Hard Taco Shells, 1 cup Shredded Iceberg Lettuce for crunch, 1/2 cup Shredded Sharp Cheddar Cheese, 1/2 cup Diced Tomatoes, and 1/4 cup Sour Cream.
Essential Kitchen Tools for a Fast Cleanup
You don't need a professional kitchen, but a few specific tools make this 20 minute goal achievable. I highly recommend a large cast iron or heavy stainless steel skillet. These hold heat better, which means when you drop that cold meat in, the temperature doesn't plummet.
Chef's Tip: Use a stiff potato masher to break up the ground beef while it browns. It creates a uniform, fine crumble that mimics the texture of professional taco shops much better than a wooden spoon.
You'll also need a colander if you choose a higher fat beef, though with 90/10, you can usually just tilt the pan and spoon out any excess. A small whisk is handy for mixing the broth and spices, ensuring no clumps of onion powder end up in a single bite.
From Sizzle to Serving in Under Fifteen Minutes
- Heat the pan. Set your skillet over medium high heat and add the 1 tbsp Avocado Oil. Note: Wait until the oil shimmers before adding the beef.
- Brown the beef. Add the 1 lb Lean Ground Beef to the hot pan. Cook 5 minutes until browned and sizzling, breaking it into tiny crumbles with your masher.
- Drain the excess. If you see more than a tablespoon of liquid fat, carefully tilt the pan and remove it. Note: Leaving a little fat helps carry the spice flavor.
- Bloom the spices. Sprinkle the chili powder, cumin, smoked paprika, onion powder, garlic powder, oregano, salt, and pepper over the meat. Stir for 1 minute until fragrant and toasted.
- Deglaze with broth. Pour in the 1/2 cup Low Sodium Beef Broth. Scrape the bottom of the pan to release those brown bits (fond).
- Simmer and thicken. Reduce the heat to medium low. Cook 3-5 minutes until the liquid reduces by half and coats the meat.
- Warm the shells. While the meat simmers, place the 12 Hard Taco Shells in a 300°F oven for 3 minutes. Bake until they smell toasted and feel crispy.
- Prepare the toppings. Dice your tomatoes and shred the lettuce if you haven't already.
- Final stir. Give the beef one last mix to ensure the "sauce" is evenly distributed.
- Assemble. Fill each shell with 2-3 tablespoons of meat, followed by cheese, lettuce, tomatoes, and a dollop of sour cream.
Avoiding Common Mistakes for the Best Results
Why Your Taco Meat Is Greasy
If your tacos are soggy, it’s usually because the fat wasn't drained or the broth didn't reduce enough. Using 90/10 beef helps, but you must let that liquid simmer down. If it looks like soup, keep the heat up for another two minutes.
| Problem | Root Cause | Solution |
|---|---|---|
| Meat is tough | Overcooked at high heat | Add an extra splash of broth and cover the pan for 2 mins. |
| Flavor is flat | Spices were old or didn't bloom | Add a tiny squeeze of lime juice to brighten the flavor. |
| Shells are soggy | Meat was too watery | Use a slotted spoon to serve or simmer longer. |
- ✓ Preheat the pan for 3 full minutes before adding the meat.
- ✓ Don't crowd the pan; if doubling the recipe, brown the meat in two batches.
- ✓ Toast the shells; cold shells "shatter" poorly and taste like cardboard.
- ✓ Add the cheese directly onto the hot meat so it melts into the crumbles.
This process is straightforward, but small details like warming the shells make a huge difference. If you're looking for other beef ideas that handle leftovers well, my Simple Slow Cooker recipe is a great weekend project.
Scaling the Recipe for Large Crowds
If you are feeding a neighborhood or just a very hungry group of teenagers, scaling this is easy. For a double batch (2 lbs beef), use a very large skillet or a Dutch oven. You only need to increase the salt and spices by 1.5x rather than a full 2x, as spices can become overwhelming in large volumes.
Reduce the total broth by about 10% to ensure it still thickens in a reasonable time.
When cutting the recipe in half, the liquid evaporates much faster. Watch the pan closely during the simmer phase. You might only need 2 minutes of simmering instead of 5. Use a smaller 8 inch skillet to prevent the broth from spreading too thin and burning.
Flavor Variations for Picky Eaters
If you want to change things up without making two separate meals, try these "If you want X, do Y" shortcuts:
- If you want more "hidden" nutrition, add 1/2 cup of finely grated carrots to the meat while browning; they vanish into the sauce.
- If you want a "creamy" taco, stir in 2 tablespoons of cream cheese right at the end of the simmer phase.
- If you want a "Street Taco" vibe, swap the hard shells for corn tortillas charred directly over a gas flame for 30 seconds.
Myth: You must use a packet for "authentic" flavor. Actually, most packets are 50% cornstarch and salt. Making your own blend with this recipe allows you to control the sodium and avoid that "artificial" aftertaste.
Myth: Rinsing ground beef makes it healthier. Please don't do this. Rinsing cooked beef removes all the fat soluble flavor and leaves you with gritty, tasteless protein. Just buy a leaner cut (90/10 or 93/7) to start with.
How to Store and Refresh Your Leftover Taco Meat
Storage: Store the cooked beef in an airtight container in the fridge for up to 4 days. Keep the toppings (lettuce, tomatoes) in separate containers to prevent them from becoming a wilted mess.
Freezing: This meat freezes beautifully! Let it cool completely, then flat pack it in a freezer bag for up to 3 months. To reheat, thaw overnight in the fridge and add a tablespoon of water or broth to the pan to restore the velvety texture.
Zero Waste Tip: If you have leftover crumbles that aren't enough for a full taco, toss them into a morning omelet or sprinkle them over a baked potato. Even the broken bits at the bottom of the taco shell bag can be used as "croutons" for a taco salad the next day.
Creative Ways to Plate and Top Your Mild Beef Tacos
Setting up a "Taco Bar" is the ultimate move for a stress free family dinner. Line up the bowls: meat first, then the "melters" (cheese), then the "crunch" (lettuce), and finally the "coolers" (sour cream). This allows everyone to customize their plate.
If you have leftovers and are tired of shells, this beef makes an incredible base for a "Taco Bowl" with rice. It’s also a great way to use up any lingering veggies in the fridge. For a side dish that fits the 20 minute theme, you can't go wrong with some quick black beans or a simple corn salad.
Trust me, once you see how fast this comes together, those seasoning packets will stay on the grocery store shelf forever.

Recipe FAQs
Can I make this recipe with ground turkey instead of beef?
Yes, ground turkey works well. It will offer a lighter flavor and might benefit from an extra teaspoon of oil during browning.
What is the best way to break up the ground beef while cooking?
Use a stiff potato masher. It creates a more uniform, fine crumble that mimics professional taco meat better than a wooden spoon.
My taco meat seems dry. What did I do wrong?
Likely didn't reduce the broth enough. The beef broth creates a sauce; simmer it for 3-5 minutes until it thickens and coats the meat, rather than remaining soupy.
How can I add more hidden nutrients to the taco meat?
Grate half a cup of carrots finely. Add them to the meat during the browning stage; they will become virtually undetectable in the sauce.
Is it okay to use a different type of oil for browning?
Yes, standard vegetable oil is a good substitute. Avocado oil has a higher smoke point, but vegetable oil will work perfectly fine without altering the flavor.
How long can I store the leftover taco meat?
Up to 4 days in the refrigerator. Store it in an airtight container and keep toppings separate to maintain freshness.
Can I make this recipe spicier for adults?
Yes, add a pinch of cayenne pepper or a dash of hot sauce. Stir it in with the other spices to bloom the flavor, or add it at the end to control the heat level.
20 Minute Mild Beef Tacos
Ingredients:
Instructions:
Nutrition Facts:
| Calories | 512 kcal |
|---|---|
| Protein | 34.6 g |
| Fat | 29.8 g |
| Carbs | 26.4 g |
| Fiber | 4.2 g |
| Sugar | 2.1 g |
| Sodium | 685 mg |
