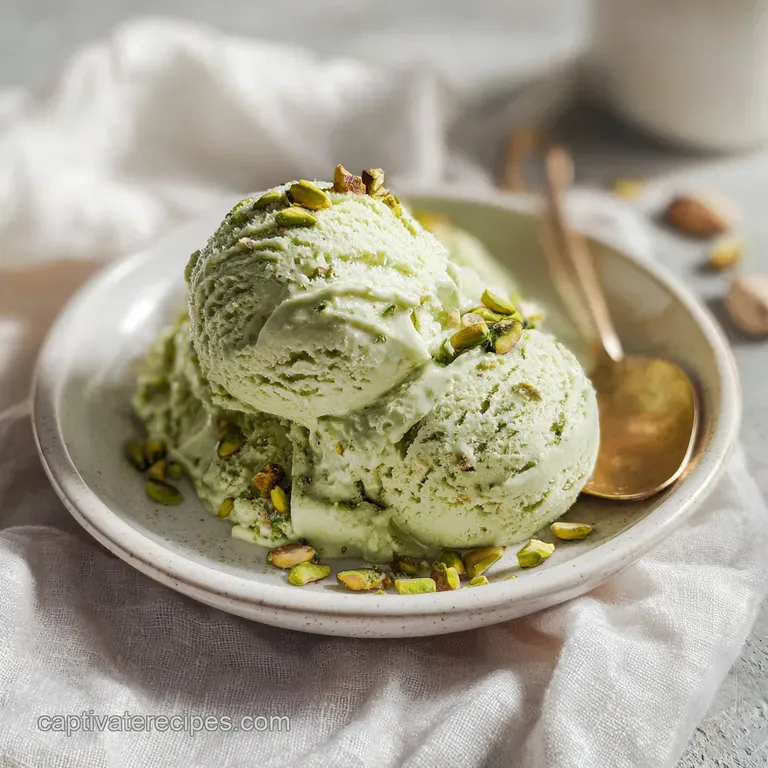
Pistachio Ice Cream: Creamy and Nutty
- Time: Active 30 minutes, Passive 15 minutes, Total 45 minutes
- Flavor/Texture Hook: Silky, nutty, and buttery with a pale sage hue
- Perfect for: Dinner parties, special occasions, or high end weekend treats
- Why Store Brands Fail at Pistachio Ice Cream
- Essential Batch Specifications
- The Secret to Intense Nutty Flavor
- Choosing Premium Recipe Components
- Ingredients & Substitutes
- Required Tools for Success
- Step by Step Churning Guide
- Mastering Texture and Consistency
- Customizing Your Frozen Batch
- Essential Scaling Guidelines
- Common Churning Fallacies
- Storage and Freezing Guidelines
- Best Ways to Serve
- Recipe FAQs
- 📝 Recipe Card
Why Store Brands Fail at Pistachio Ice Cream
The first time I really smelled raw pistachios roasting in my own oven, it changed everything. You know that neon green stuff from the grocery store? It usually tastes like almond extract and sugar, which is a total letdown. Real pistachio flavor isn't loud or synthetic. It is warm, buttery, and slightly earthy.
When those nuts hit 325°F, they start to release these incredible oils that smell like a dream. That aroma is the sensory trigger that tells you your kitchen is about to become a high end gelateria.
We aren't just tossing chopped nuts into a vanilla base here. That is a mistake I made years ago, and all it got me was soggy nut chunks and bland cream. To get that showstopper result, we have to treat the pistachio as the hero it is.
We are going to roast them until they are golden and then perform a two part infusion. Half of the nuts steep in the hot milk like tea, while the other half gets pulverized into a silky, liquid gold paste. It is a bit of a process, but the joy of tasting that first velvety spoonful makes every minute worth it.
This recipe is for people who love the artisanal side of cooking. It is about slowing down and letting the ingredients do the heavy lifting. We aren't hiding behind fake colors or heavy syrups.
Instead, we are using a classic custard method to create something that feels truly accessible yet looks like it came out of a boutique shop in Sicily. Let's get into what actually makes this work so well.
Essential Batch Specifications
When you are aiming for that perfect churn, knowing your method is half the battle. Some people want the shortcut, while others want the full experience. I always lean toward the classic method because the texture is incomparable.
| Method | Time | Texture | Best For |
|---|---|---|---|
| Classic Custard | 45 minutes | Silky and dense | Impressing guests |
| No Churn Shortcut | 20 minutes | Airy and light | Quick cravings |
| Ninja Creami | 10 minutes | Firm and icy | High protein goals |
Deciding which path to take depends on your patience. If you want a dense, velvety mouthfeel, stick with the custard. If you need something faster, the shortcut works, but you lose that deep, cooked egg richness that defines a premium scoop.
The Secret to Intense Nutty Flavor
What actually makes this recipe stand out is the double infusion technique. Most people just use a paste or just steep the nuts. Doing both is the secret to a multi dimensional flavor.
- Oil Extraction: Roasting the 1.5 cups (200g) raw shelled pistachios at 325°F for 8–10 minutes wakes up the fats, making them easier to incorporate into the liquid dairy.
- Steep Duration: Letting half the roasted nuts sit in the hot milk for exactly 30 minutes allows the milk proteins to bind with the volatile aromatic compounds of the nut.
- Micro Emulsion: Blending the remaining nuts with 1 tbsp neutral oil creates a paste so fine it disappears into the custard, preventing a gritty or sandy texture on the tongue.
Choosing Premium Recipe Components
Selecting your ingredients is the most important part of this artisanal process. If you start with stale nuts, no amount of sugar can save the batch.
| Ingredient | Science Role | Pro Secret |
|---|---|---|
| Heavy Cream (36%) | Provides fat structure | Never use "ultra pasteurized" if you can avoid it; it affects the churn. |
| Large Egg Yolks | Emulsifier and stabilizer | Yolks prevent large ice crystals from forming during the freezing process. |
| Raw Pistachios | Primary flavor fat | Buy raw, unsalted ones so you can control the toast and the salt levels. |
| Vanilla Bean Paste | Flavor bridge | The tiny seeds add a visual "fancy" factor and a deeper floral note than liquid extract. |
You really want to look for those bright green kernels if possible. Sometimes they are labeled as "Bronte" pistachios, but any high-quality raw nut will work. The 1 tbsp neutral oil (grapeseed or avocado) is there specifically to help the blender turn those hard nuts into a liquid paste without adding a heavy flavor of its own.
Ingredients & Substitutes
- 1.5 cups (200g) raw shelled pistachios: Use raw for total control. Why this? Toasted nuts provide a deeper, more complex flavor profile than raw.
- Sub: Roasted unsalted pistachios (skip the roasting step).
- 1 tbsp neutral oil (grapeseed or avocado): Helps create a smooth paste. Why this? It keeps the nut butter fluid and easy to blend.
- Sub: Refined coconut oil (melted).
- 0.5 tsp sea salt: Balances the sweetness. Why this? Salt enhances the earthy notes of the nut.
- Sub: Kosher salt (use slightly more).
- 2 cups (480ml) heavy cream (36% milkfat): The base of the richness. Why this? High fat content ensures a velvety, non icy texture.
- Sub: Full fat coconut milk (will add a coconut flavor).
- 1 cup (240ml) whole milk: Thins the cream just enough. Why this? Whole milk provides the necessary water content for a balanced custard.
- Sub: 2% milk (result will be slightly less creamy).
- 0.75 cup (150g) granulated sugar: Sweetens and lowers the freezing point. Why this? Sugar keeps the final product soft enough to scoop.
- Sub: Cane sugar.
- 5 large egg yolks: For a classic, rich custard. Why this? Yolks provide lecithin which emulsifies the water and fat.
- Sub: 1 tbsp cornstarch mixed with cold milk (for egg free, though less rich).
- 1 tsp vanilla bean paste: Adds floral depth. Why this? Paste has a stronger, more authentic flavor than liquid extract.
- Sub: Pure vanilla extract.
Required Tools for Success
You don't need a professional laboratory, but a few specific tools will make this process much easier. A high speed blender is non negotiable if you want that microscopic paste. If you use a standard food processor, you might end up with a slightly "rustic" or grainy texture.
It still tastes great, but it won't have that professional silkiness.
A heavy bottomed saucepan is also key. When you are cooking the custard base with those 5 large egg yolks and 0.75 cup sugar, you need even heat. Thin pans have hot spots that will scramble your eggs before the mixture thickens. I also always recommend a fine mesh sieve.
Straining the mixture after the nuts have steeped is the difference between a "home cook" version and a "chef" version.
step-by-step Churning Guide
- Roast the 1.5 cups raw shelled pistachios at 325°F (160°C) for 8–10 minutes until aromatic and golden. Note: Keep a close eye on them; they burn quickly.
- Immediately simmer half of the roasted nuts with the 1 cup whole milk and 2 cups heavy cream in a medium saucepan.
- Remove from heat and let steep for 30 minutes until the liquid turns a pale green gold.
- In a separate bowl, whisk the 5 large egg yolks and 0.75 cup granulated sugar together until the mixture is pale and thick.
- Slowly temper the warm pistachio infused dairy into the egg yolk mixture by streaming it in gradually while whisking constantly. Note: This prevents the eggs from curdling.
- Return the mixture to the saucepan and cook over medium low heat, stirring constantly, until the custard thickens enough to coat the back of a spoon.
- Using a high speed blender, process the remaining roasted nuts with the 1 tbsp neutral oil and 0.5 tsp sea salt until a smooth, microscopic paste forms.
- Whisk the pistachio paste and 1 tsp vanilla bean paste into the warm custard.
- Strain the mixture through a fine mesh sieve and chill in the refrigerator for at least 4 hours, preferably overnight. The base should be ice cold before churning.
- Churn the chilled base in an ice cream maker according to the manufacturer’s instructions until it reaches a soft serve consistency, then transfer to a container and freeze until firm.
Mastering Texture and Consistency
Sometimes things don't go exactly to plan in the kitchen. If your custard looks a little lumpy or your ice cream is as hard as a rock after a night in the freezer, don't panic. Most of these issues are easily fixed with a few simple adjustments to your technique.
Why Your Base Is Gritty
If the texture feels like fine sand on your tongue, it usually means the pistachio paste wasn't blended long enough. High speed blenders are best for this because they break down the nut fibers completely. If you are using a standard blender, try adding an extra teaspoon of oil to help the blades catch.
Also, make sure you don't skip the fine mesh sieve step; it catches any stubborn nut fragments that didn't get pulverized.
Why Your Cream Is Icy
Icy ice cream happens when the base doesn't have enough fat or sugar, or when it freezes too slowly. Make sure you are using 36% milkfat heavy cream. If you use a lower fat substitute, you are essentially making ice milk, which will always be crunchier.
Also, ensure your churning bowl is completely frozen (usually 24 hours in the back of the freezer) before you start.
| Problem | Root Cause | Solution |
|---|---|---|
| Separated Custard | Heat was too high | Whisk vigorously or use an immersion blender to re emulsify. |
| Too Soft | Not enough freezing time | Ensure the freezer is set to its coldest setting and wait 6 hours. |
| Lack of Flavor | Nuts weren't roasted | You can steep the cold base with more roasted nuts for 12 hours. |
Common Mistakes Checklist
- ✓ Don't skip the 30 minute steep; this is where the "background" flavor comes from.
- ✓ Always temper your eggs slowly to avoid a "scrambled egg" taste in your dessert.
- ✓ Ensure the base is below 40°F before pouring it into the churner.
- ✓ Don't over churn; stop once it looks like thick soft serve or it may become buttery.
- ✓ Use a pre chilled storage container to prevent the edges from melting during transfer.
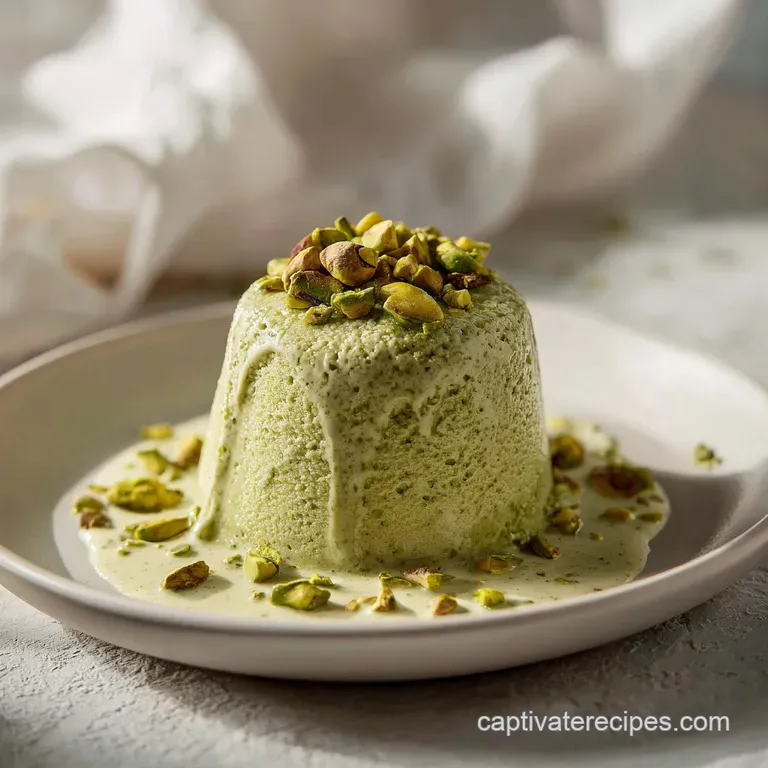
Customizing Your Frozen Batch
While the classic version is a showstopper on its own, there are plenty of ways to play with the flavor. One of my favorites is adding a bit of protein for a more filling treat. You can make a pistachio cottage cheese ice cream by blending the base with 1 cup of cottage cheese before churning.
This creates a high protein pistachio ice cream that still feels decadent but has a tangy, cheesecake like finish.
If you are using a ninja creami pistachio ice cream method, you can skip the churning step entirely. Just freeze the base in the specific pint container and use the "Ice Cream" setting. For a truly decadent pairing, serve a scoop alongside my Chocolate Pudding Cake. The molten sauce and the nutty cream are a match made in heaven.
Essential Scaling Guidelines
Scaling a custard can be tricky because of the way egg yolks behave. If you want to make a massive batch for a party, you can't just quadruple everything and expect it to work the same way.
- Downsizing (1/2 batch): Use 3 egg yolks instead of 2.5 to keep the structure. Reduce the cook time for the custard by about 30%, as a smaller volume heats up much faster.
- Upsizing (2x or more): Keep the sugar and salt at the exact ratio, but reduce the vanilla bean paste slightly (use 1.5x instead of 2x) as the flavor can become overwhelming in large batches. Work in batches for the churning process; never overfill your ice cream maker beyond the "max fill" line, or it won't aerate properly.
Common Churning Fallacies
One major myth is that adding more nuts will always make it taste "nuttier." In reality, adding too many solids can interfere with the fat to protein ratio, leading to a crumbly texture. The 1.5 cup measurement is carefully balanced to give you maximum flavor without ruining the scoopability.
Another misconception is that the green color must be neon to be "authentic." Real, high-quality pistachios produce a pale, brownish green or sage colored ice cream. If you see a recipe that is bright green without food coloring, they are likely using an extract or a pre made paste with dyes.
Embrace the natural hue it looks much more artisanal and expensive on the plate!
Storage and Freezing Guidelines
Pistachio ice cream is best consumed within the first week, as the delicate nut oils can start to pick up "freezer smells" after that. Keep it in a shallow, airtight container with a piece of plastic wrap pressed directly onto the surface of the cream. This prevents a "skin" or ice crystals from forming.
It will stay good in the freezer for up to 1 month, but the texture is most velvety in the first 3 to 5 days.
For a zero waste approach, don't throw away the steeped pistachios from the milk! While they have lost some of their punch, they are still edible. You can dry them out in a low oven and toss them into a morning granola or use them as a textured topping for a Chocolate Sour Cream Bundt Cake. The leftover egg whites from the 5 yolks can be frozen in an ice cube tray for future meringues or a healthy breakfast scramble.
Best Ways to Serve
Presentation is everything when you have put 45 minutes of active work into a dessert. I love serving this in chilled glass coupes with a tiny sprinkle of extra sea salt and some crushed, un roasted pistachios for a pop of bright green color.
A slice of rich chocolate cake creates a beautiful contrast with the nutty green tones.
If you really want to lean into the Italian vibe, serve it "Affogato" style by pouring a hot shot of espresso over a single scoop. The way the bitter coffee melts the nutty cream into a latte like sauce is pure joy. It is an accessible way to turn a simple scoop into a true showstopper for your next dinner party.

Recipe FAQs
How to roast pistachios for the best flavor?
Spread the raw shelled pistachios on a baking sheet and roast at 325°F (160°C) for 8 10 minutes. Watch them closely until they become aromatic and golden, as nuts can transition from toasted to burnt very quickly.
Is it necessary to steep the nuts in the dairy?
Yes, the 30-minute steep is essential for developing the deep, roasted nut flavor. This process extracts the oils into the heavy cream and whole milk, creating the backbone of the final profile.
How to prevent the eggs from scrambling when adding hot cream?
Temper the yolks by streaming the warm dairy mixture in very slowly while whisking constantly. If you enjoyed mastering this technique, see how we use the same silky custard logic to create a smooth, emulsified texture in other desserts.
How to check if the custard is cooked enough?
Stir the mixture over medium low heat until it thickens enough to coat the back of a spoon. This indicates the eggs have thickened the base correctly without curdling.
How to achieve a perfectly smooth pistachio paste?
Process the roasted nuts with the neutral oil and sea salt in a high speed blender until microscopic particles form. A powerful blender is key to breaking down the solids into a uniform paste that integrates seamlessly into the custard.
Is it true I can churn the mixture immediately after cooking?
No, this is a common misconception. You must chill the strained base in the refrigerator for at least 4 hours, ideally overnight, to ensure the temperature is below 40°F before it hits the churner.
How to keep the texture velvety in the freezer?
Press a piece of plastic wrap directly onto the surface of the ice cream before sealing the container. This creates an airtight barrier that prevents ice crystals from forming on top, keeping the texture smooth for up to a month.
Homemade Pistachio Ice Cream

Ingredients:
Instructions:
Nutrition Facts:
| Calories | 483 kcal |
|---|---|
| Protein | 8.9 g |
| Fat | 38.1 g |
| Carbs | 29.0 g |
| Fiber | 2.5 g |
| Sugar | 21.8 g |
| Sodium | 170 mg |
