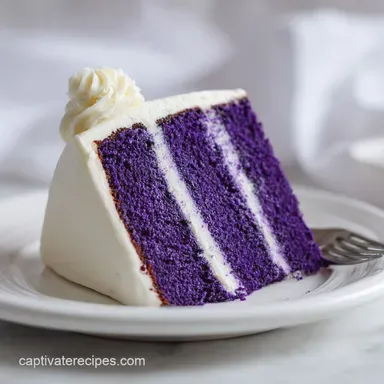
Royal Purple Velvet Cake with Creamy Vanilla Frosting

- Time: 25 min active + 32 min baking + 105 min cooling/chilling
- Flavor & Texture: Mild cocoa notes with a tender, springy crumb and rich vanilla frosting
- Perfect for: Birthday parties or a bold centerpiece dessert
Ever wondered why some purple cakes look like gray mud after they leave the oven? It usually happens because standard liquid dyes break down under heat, leaving you with a dull, mauve color that doesn't exactly scream royalty.
The goal here is a vibrant, deep violet cake that stays moist for days. By using a specific combination of oil for tenderness and gel coloring for stability, we avoid the dry, crumbly texture that plagues many velvet recipes.
This Royal Purple Velvet Cake is a showstopper that balances a hint of cocoa with a creamy, vanilla heavy finish. It's designed to be bold in color but gentle in flavor, making it a crowd-pleaser for anyone who loves a visual surprise.
Royal Purple Velvet Cake
This cake is built on a foundation of moisture and color stability. Unlike traditional butter cakes that firm up in the fridge, the oil base keeps every slice tender.
The process involves two main stages: baking the layers to a precise springy doneness and whipping a frosting that holds its shape without being overly stiff. It's a joy to assemble, especially once those vivid purple layers are stacked.
Ingredient Deep Dive
The success of the crumb depends on the balance of acid and fat. Using room-temperature ingredients prevents the batter from breaking, ensuring the color distributes evenly without streaks.
| Component | Purpose | Substitute Notes |
|---|---|---|
| Buttermilk | Provides acid to activate baking soda for lift | Plain yogurt thinned with milk; adds a slightly tangier note |
| Vegetable Oil | Ensures a moist, tender crumb that doesn't harden | Melted coconut oil; adds a subtle coconut scent |
| Gel Food Color | Concentrated pigment that resists oven heat | Liquid coloring; requires more volume and may fade or thin the batter |
| Cocoa Powder | Adds a hint of depth and stabilizes the purple hue | Very small amount of espresso powder; changes flavor profile to coffee |
Equipment Needed
While you don't need a commercial kitchen, having these items on hand simplifies the process.
Essential Tools
- Two 9 inch round pans: Necessary for achieving the proper height and bake time.
- Serrated knife: The best tool for leveling cake domes without damaging the crumb.
- Hand mixer or stand mixer: Required to whip the frosting until light and fluffy.
Step-by-step Instructions
Phase 1: Prep Pans and Ingredients
Heat the oven to 180°C (350°F). Grease two 9 inch round cake pans and line each bottom with parchment.
Set the buttermilk and eggs out for 30 minutes. If you're in a rush, place the eggs in a bowl of warm water for 5 minutes to take the chill off. In a small bowl, whisk the buttermilk with the vinegar. Let it sit for 2 minutes until it looks slightly thickened and curdled.
Phase 2: Build the Batter in Two Bowls
In a large bowl, whisk together the flour, sugar, baking soda, salt, and cocoa powder until no lumps remain.
In a medium bowl, whisk the oil, eggs, vanilla, and purple gel coloring until the color is uniform and glossy. Pour the wet mixture into the dry bowl, then add the buttermilk mixture. Stir gently until just combined. A few small streaks are fine.
Stop mixing as soon as the batter is smooth and even violet with no white flour patches.
Phase 3: Bake Until Springy
Divide the batter evenly between the two pans and smooth the tops with a spatula.
Bake for 28 to 32 minutes until the tops spring back when lightly pressed, the edges pull away from the pan, and a toothpick comes out with a few moist crumbs.
Phase 4: Cool Without Cracking
Cool the layers in their pans for 10 minutes, then turn them out onto a wire rack. Let them cool for about 50 minutes until fully cool. If the layers are domed, level them with a serrated knife.
Phase 5: Whip the Frosting and Assemble
Beat the softened butter on medium speed for 2 minutes until creamy. Add the powdered sugar, pinch of salt, and vanilla on low speed, then beat for 3 minutes until fluffy.
Add 2 tablespoons of heavy cream and beat on medium. Add more cream one spoonful at a time until the frosting is spreadable but still holds soft peaks. If the frosting feels too soft, refrigerate it for 30 minutes.
Place one cake layer on a plate and spread a thin layer of frosting. Top with the second layer. Spread a thin crumb coat of frosting over the top and sides, then refrigerate for 15 minutes. Spread the remaining frosting over the cake and slice into 14 servings.
Fix Your Cake Issues

Creating a velvet cake is primarily a balance of leavening chemistry and color preservation. If the texture is too dense or the hue is incorrect, the issue typically lies in the mixing technique or the coloring agent.
Color Turns Muddy or Grayish
This often occurs if you exceed the cocoa amount or if buttermilk reacts with liquid dyes. Stick to exactly ½ teaspoon of cocoa. For a vivid purple that survives the oven, opt for gel-based colors.
Dense or Gummy Crumb
Overworking the batter creates excess gluten, transforming a light cake into something rubbery. Mix only until the flour is just incorporated. Stop as soon as the batter looks smooth.
Frosting Too Soft or Runny
This is usually caused by overly warm butter or an excess of cream. To remedy this, let the frosting set in the refrigerator for 30 minutes to solidify the fats.
| Problem | Root Cause | Solution |
|---|---|---|
| Dull purple color | Liquid dye or extra cocoa | Use gel coloring and stick to ½ tsp cocoa |
| Heavy/Dense cake | Overmixing the batter | Stir only until combined; stop at first sign of smoothness |
| Frosting sliding | Butter too warm or too much cream | Chill frosting for 30 mins before applying |
Creative Twists and Swaps
If you want to change the flavor profile, you can either keep it classic or try a few modern shortcuts. For a different dessert experience, you might enjoy a Chocolate Pudding Cake for something more molten.
Flavor Variations
- Blackberry Lemon: Fold in ¼ cup of finely diced fresh blackberries and add 1 teaspoon of lemon zest to the batter.
- Lavender Vanilla: Add ½ teaspoon of culinary lavender powder to the dry ingredients for a floral note.
- White Chocolate Pair: Swap the vanilla frosting for a white chocolate ganache for a richer contrast.
If you prefer a lighter, more airy cake, you might like the Heavenly White Snack Cake for a different style of crumb.
| Approach | Effort | Texture | Best For |
|---|---|---|---|
| Classic (Scratch) | Higher | Tender and springy | Special occasions |
| Quick-Cut (Box Mix) | Lower | More uniform/dense | Casual gatherings |
Storage and Freshness
Since this cake uses oil instead of butter, it remains moist for a longer period. Keep it in a sealed, airtight container.
Store the cake in the refrigerator for a maximum of 5 days. If you've added frosting, refrigeration is necessary to prevent the vanilla icing from softening. For the best experience, let a slice sit at room temperature for 20 minutes so the butter in the frosting softens and the flavors fully bloom.
Avoid freezing this cake once it is frosted. You can, however, wrap unfrosted layers in plastic wrap and freeze them for up to 2 months. Simply let them thaw in the refrigerator overnight before frosting.
Serving Suggestions
The deep purple color looks best against a clean, white backdrop. Serve each slice on a white porcelain plate to make the colors pop.
I like serving this with a side of fresh raspberries or a few sliced strawberries. The tartness of the berries cuts through the rich vanilla frosting. A glass of cold milk or a light Earl Grey tea complements the subtle cocoa notes in the cake without overpowering the sweetness.
Why This Works
The success of this cake is all about the interaction of fat and acid.
- The Oil Advantage: Vegetable oil remains liquid at cool temperatures, which means the cake doesn't turn hard or dry when stored in the fridge.
- Acid Base Lift: The vinegar and buttermilk react with the baking soda to create thousands of tiny air bubbles, resulting in a velvety texture.
- Gel Dye Stability: Gel colors are more concentrated than liquid ones, so they don't dilute the batter or fade into gray when the heat hits.
Recipe FAQs
What food coloring works best for this cake?
Use a purple gel food coloring for a vibrant, glossy finish.
Tip: add the color to the wet ingredients first to ensure it mixes evenly without streaks.
How does velvet cake taste?
It has a mild cocoa flavor balanced by a slight tang from the buttermilk and vinegar.
Tip: the small amount of cocoa powder is for color and depth rather than a strong chocolate taste.
Why is a velvet cake different from a regular cake?
The combination of vinegar and buttermilk reacts with the baking soda to create a finer, more velvet-like crumb.
Tip: avoid overmixing the batter to keep this delicate texture intact.
Can this be made in an old-fashioned style?
Yes, this recipe uses traditional ingredients like buttermilk and vinegar to achieve the classic velvet profile.
Tip: use room temperature eggs and buttermilk to ensure a smooth emulsion.
How to bake a royal purple velvet cake?
Heat the oven to 180°C (350°F) and grease two 9-inch pans.
Tip: line the bottoms with parchment paper for an easy release.
Which adjustments customize this purple velvet cake?
Tweak the quantity of purple gel food coloring until you reach your desired shade of violet.
Tip: If you liked perfecting this frosting, try using a similar approach for our chocolate strawberry cake.
Where do I store the finished cake?
Store the frosted cake in a sealed container in the fridge for as long as 5 days.
Tip: Before eating, let a slice sit at room temperature for 20 minutes to soften the butter in the frosting.
Royal Purple Velvet Cake, 14 Servings