Chewy Homemade Flatbread Crust
- Time: 10 min active + 1 hour rising
- Flavor/Texture Hook: Charred, bubbly, and chewy
- Perfect for: Quick weeknight dinners or a bold appetizer platter
- Homemade Flatbread Crust Basics
- Why This Dough Works
- What Each Ingredient Does
- The Must Have Ingredients
- Tools for the Job
- From Mixing to Searing
- Fixing Common Dough Issues
- Customizing Your Flatbread
- Adjusting the Batch Size
- Bread Truths and Myths
- Storage and Waste Tips
- Best Ways to Serve
- Recipe FAQs
- 📝 Recipe Card
The smell of toasted grain and warm yeast always takes me back to the little bakeries in the Mediterranean. I remember watching the bakers slide rounds of dough into screaming hot ovens, the air thick with that nutty, roasted aroma.
There's something so communal about breaking bread with your hands, a tradition that spans thousands of years and dozens of cultures.
It's not just about the food, it's about the feel of the dough. Making a Homemade Flatbread Crust in your own kitchen brings that same warmth. You get to experience the dough transforming from a shaggy mess into something smooth and alive.
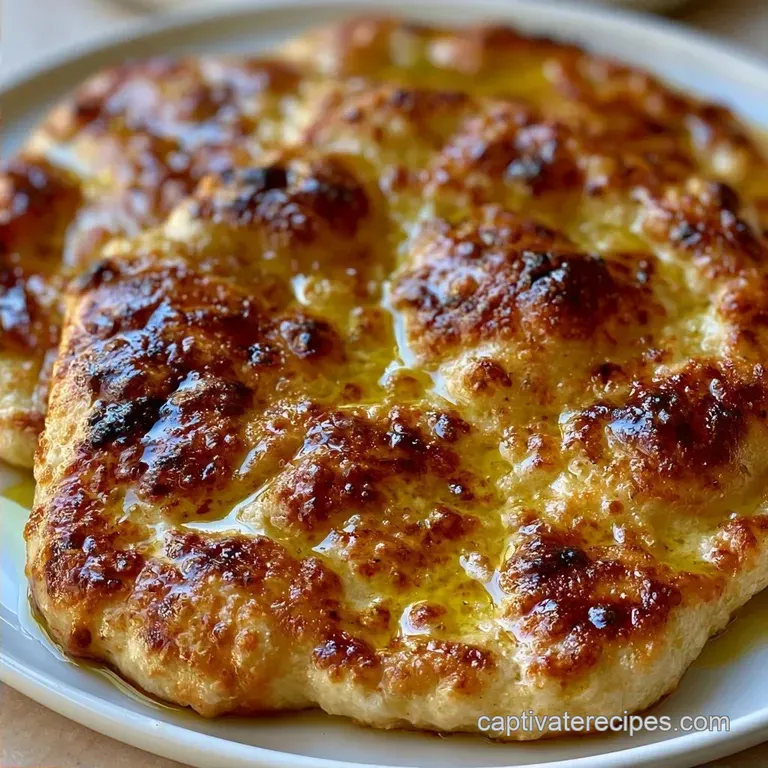
This version is all about bold textures and fresh tastes. You don't need a fancy pizza oven to get those charred spots. A simple cast iron skillet does the trick, giving you a crust that's crisp on the outside and soft in the middle.
Homemade Flatbread Crust Basics
The trick to a Homemade Flatbread Crust is balancing the hydration. If the dough is too dry, it becomes a cracker. Too wet, and it sticks to everything. We're aiming for a "tacky" feel, which means it doesn't leave a mess on your hands but still feels supple.
Getting the water temperature right is the first real checkpoint. You want it around 110°F, which feels like warm bath water. If it's too hot, you'll kill the yeast. If it's too cold, your dough will just sit there, refusing to grow.
Once the dough hits the pan, the aroma shifts from sweet and yeasty to that unmistakable scent of toasted bread. That's when you know the heat is doing its job.
Why This Dough Works
- Warm Water: It wakes up the yeast quickly, allowing the sugars to ferment and create those airy pockets.
- The Resting Period: Letting the dough balls sit for 10 minutes relaxes the gluten. Without this, the dough snaps back like a rubber band when you try to roll it.
- Dry Heat: Using a skillet without oil creates a direct sear, which produces the charred bubbles that give the bread its bold character.
| Method | Time | Texture | Best For |
|---|---|---|---|
| Classic Yeast | 1 hr 25 min | Chewy & Bubbly | Traditional meals |
| No Yeast | 20 min | Denser & Crisp | Last minute sides |
What Each Ingredient Does
| Ingredient | What It Does | Best Swap |
|---|---|---|
| All Purpose Flour | Provides the structure | Bread flour for more chew |
| Active Dry Yeast | Makes the dough rise | Instant yeast (skip the bloom) |
| Extra Virgin Olive Oil | Adds flavor and softness | Melted butter for richness |
| Fine Sea Salt | Tightens gluten and adds taste | Kosher salt (use slightly more) |
The Must Have Ingredients
Gather these items before you start. Using fresh, high-quality olive oil makes a huge difference in the final scent of the bread.
- 2 cups (250g) all purpose flour
- 3/4 cup (180ml) warm water Why this? Activates yeast without scorching it
- 2 1/4 tsp (7g) active dry yeast
- 1 tsp (6g) granulated sugar Why this? Feeds the yeast for a better rise
- 1 tsp (6g) fine sea salt
- 2 tbsp (30ml) extra virgin olive oil Why this? Gives a vibrant, fruity undertone
Tools for the Job
You don't need a professional bakery, but a few specific tools help. A large mixing bowl is a must for the rise. A wooden spoon helps you mix without burning your hands on the warm water.
The real star is the cast iron skillet. It holds heat better than any other pan, which is how we get those beautiful charred spots. If you don't have one, a heavy stainless steel pan works, but it might not brown as evenly.
A rolling pin is helpful, though you can use a wine bottle in a pinch. Just make sure your surface is well floured so the Homemade Flatbread Crust doesn't stick.
From Mixing to Searing
Follow these steps for the best results. Pay attention to the smells and the feel of the dough as you go.
- Combine warm water, sugar, and yeast in a bowl. Let it sit for 5-10 minutes until it looks frothy and smells like fresh beer.
- Stir in the olive oil.
- Gradually add the all purpose flour and fine sea salt.
- Stir with a wooden spoon until a shaggy dough forms.
- Knead by hand for 3-5 minutes until the surface is silky and slightly tacky.
- Place the dough in a lightly oiled bowl and cover with a damp cloth.
- Let it rise in a warm spot for 1 hour until it has doubled in size.
- Divide the dough into 8 equal portions and roll them into tight balls.
- Let the balls rest for 10 minutes. Note: This prevents the dough from shrinking.
- Roll each ball into a 1/4 inch thick rustic oval on a floured surface.
- Heat a cast iron skillet over medium high heat without any oil.
- Lay the dough in the pan and cook for 2 minutes per side until charred bubbles form and it smells toasted.
Fixing Common Dough Issues
When things go sideways, it's usually a temperature or hydration issue. If your dough isn't behaving, don't panic. Most of these fixes are quick.
The Dough is Too Sticky to Roll
This happens if your flour is too low or your kitchen is very humid. It's a common issue when making a Homemade Flatbread Crust from scratch. Don't keep dumping flour in, or the bread will get tough. Instead, lightly oil your hands and the rolling pin.
The Crust is Hard and Rigid
If the bread feels like a cracker, you probably overcooked it or used too much flour during the kneading phase. The heat should be high and the cook time short. If you want a softer version, try my No Yeast Flatbread Dough for a different texture.
No Bubbles are Forming
This usually means the yeast didn't activate or the pan wasn't hot enough. The pan should be almost smoking before the dough hits the surface.
| Problem | Root Cause | Solution |
|---|---|---|
| Dough didn't rise | Dead yeast or water too cold | Check yeast with sugar water first |
| Tough texture | Over kneaded the dough | Knead only until smooth |
| Uneven browning | Pan heat fluctuated | Use a heavier cast iron skillet |
Customizing Your Flatbread
Once you've got the base down, you can play with the flavors. I love adding a pinch of garlic powder or dried oregano directly into the flour for a more savory profile.
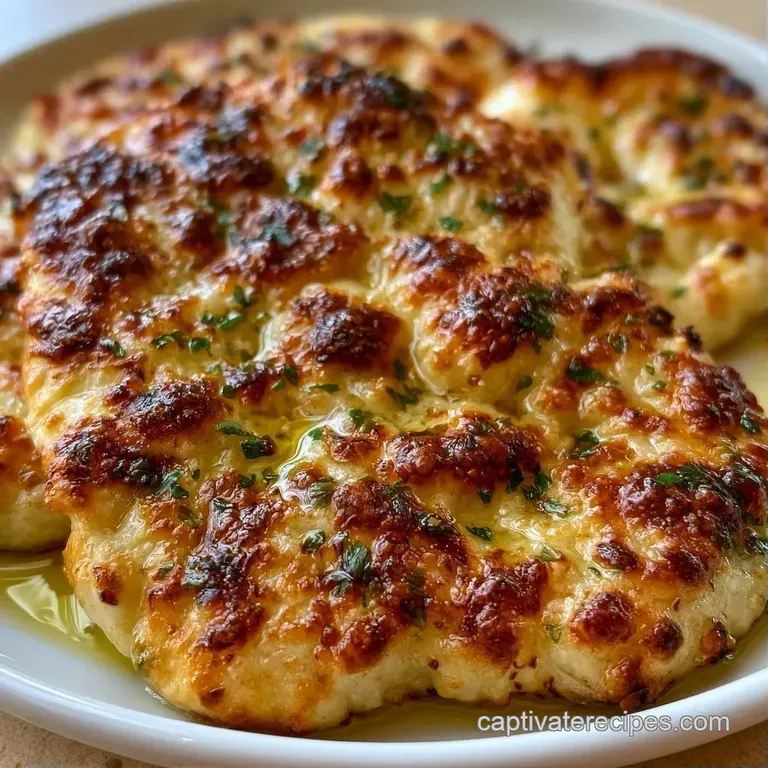
- For a Garlic Butter Finish: Melt 2 tbsp butter with a crushed garlic clove. Brush this over the bread the second it comes out of the pan.
- For a Nutty Taste: Replace 1/4 cup of all purpose flour with whole wheat flour. It adds a rustic, earthy vibe.
- For the Vegan Friendly Version: This recipe is already vegan, but you can swap the olive oil for avocado oil for a more neutral flavor.
If you find the yeast process too slow, you can always pivot to a quicker method. But for that classic chew, the yeast version is the way to go.
Adjusting the Batch Size
Scaling this Homemade Flatbread Crust is pretty straightforward, but you can't just double everything blindly.
Scaling Down (Half Batch): Use 1 cup of flour and about 1 1/8 tsp of yeast. Use a smaller skillet to keep the heat concentrated.
Scaling Up (Double Batch): Don't double the salt and sugar exactly. Use 1.5x the salt and sugar to avoid an overpowering taste. Work in batches when searing, as crowding the pan drops the temperature and kills the bubbles.
If you're baking these in an oven instead of a pan, lower the temperature by 25°F and extend the time by 2-3 minutes.
Bread Truths and Myths
There are a few things people get wrong about flatbreads. Let's clear those up.
Myth: You must use a pizza stone for a crisp crust. Truth: A cast iron skillet actually provides more direct, intense heat for flatbreads. You get better charring without needing to preheat a stone for an hour.
Myth: More kneading always means better bread. Truth: For flatbreads, over kneading creates too much gluten, making the bread rubbery. Stop as soon as the dough is smooth.
Myth: You can't freeze Homemade Flatbread Crust. Truth: You can, but you have to do it after the first rise. Just freeze the shaped dough balls.
Storage and Waste Tips
To keep the bread fresh, store it in a breathable bag or a cloth towel. If you put it in an airtight plastic bag while it's still warm, the steam will make it soggy.
- Fridge: Keep in a sealed container for up to 3 days. Reheat in a dry skillet for 1 minute per side.
- Freezer: Freeze cooked flatbreads in a single layer on a baking sheet, then move to a freezer bag. They last 2 months.
To avoid waste, use any leftover dough scraps to make tiny "crackers." Roll them thin, sprinkle with salt, and sear them until crisp. You can also use the leftover flour water slurry from your bowl to thicken a savory soup.
Best Ways to Serve
The beauty of this bread is its versatility. Because it's neutral and bold, it pairs with almost anything. I love serving it as part of a Mediterranean platter with hummus, kalamata olives, and fresh cucumber.
For a heartier meal, use it as a base for a quick dinner. You can top it with fresh mozzarella, basil, and a scoop of Simple Pizza Sauce Flatbread for a fast feast.
Quick Decision Guide:
- If you want a dip: Serve warm with tzatziki or baba ganoush.
- If you want a main: Top with grilled chicken, feta, and pickled onions.
- If you want a snack: Drizzle with honey and sprinkle with sea salt.
Hope you love this Homemade Flatbread Crust! It's a simple way to bring some vibrant, fresh energy to your table. Trust me, once you smell that toasted aroma in your kitchen, you'll never go back to store-bought.
Recipe FAQs
Is flatbread dough different from pizza dough?
Yes, primarily in texture and cooking method. While they share similar ingredients, flatbread is typically thinner and seared in a skillet rather than baked in a high heat oven.
How to make a flatbread crust?
Combine warm water, sugar, and yeast until frothy, then stir in olive oil, flour, and salt. Knead for 3-5 minutes, let rise for one hour, roll into 1/4 inch ovals, and cook in a hot skillet for 2 minutes per side.
How to make 3 ingredient flatbread?
Combine flour, water, and olive oil in a bowl and knead until smooth. While this simple version works, using all six ingredients in this recipe provides a superior rise and flavor.
What is the best flour to use for flatbread?
All-purpose flour provides the ideal balance. It creates a crust that is flexible yet sturdy enough to hold toppings without becoming overly chewy.
How to make flatbread pizza dough without yeast?
Omit the yeast and sugar and stir together the flour, water, and oil. The resulting crust will be denser and lack the charred bubbles of the yeast leavened version.
Is it true that you cannot make a homemade flatbread crust without yeast?
No, this is a common misconception. You can create an unleavened crust using only flour, water, and oil, though it will be significantly less airy than the traditional version.
Why does my flatbread shrink while rolling?
Rest the dough balls for 10 minutes. This relaxes the gluten to prevent snapping back; if you enjoyed mastering the texture control here, apply the same precision to our homemade burger patty for a tender result.
Homemade Flatbread Crust

